Multi-Factor Authentication
Overview
Multi-factor Authentication (MFA) is an authentication method that requires the user to provide two or more verification factors to gain access to a resource such as an application or online account. MFA is a core component of a strong identity and access management policy.
Login with One-Time Passcodes
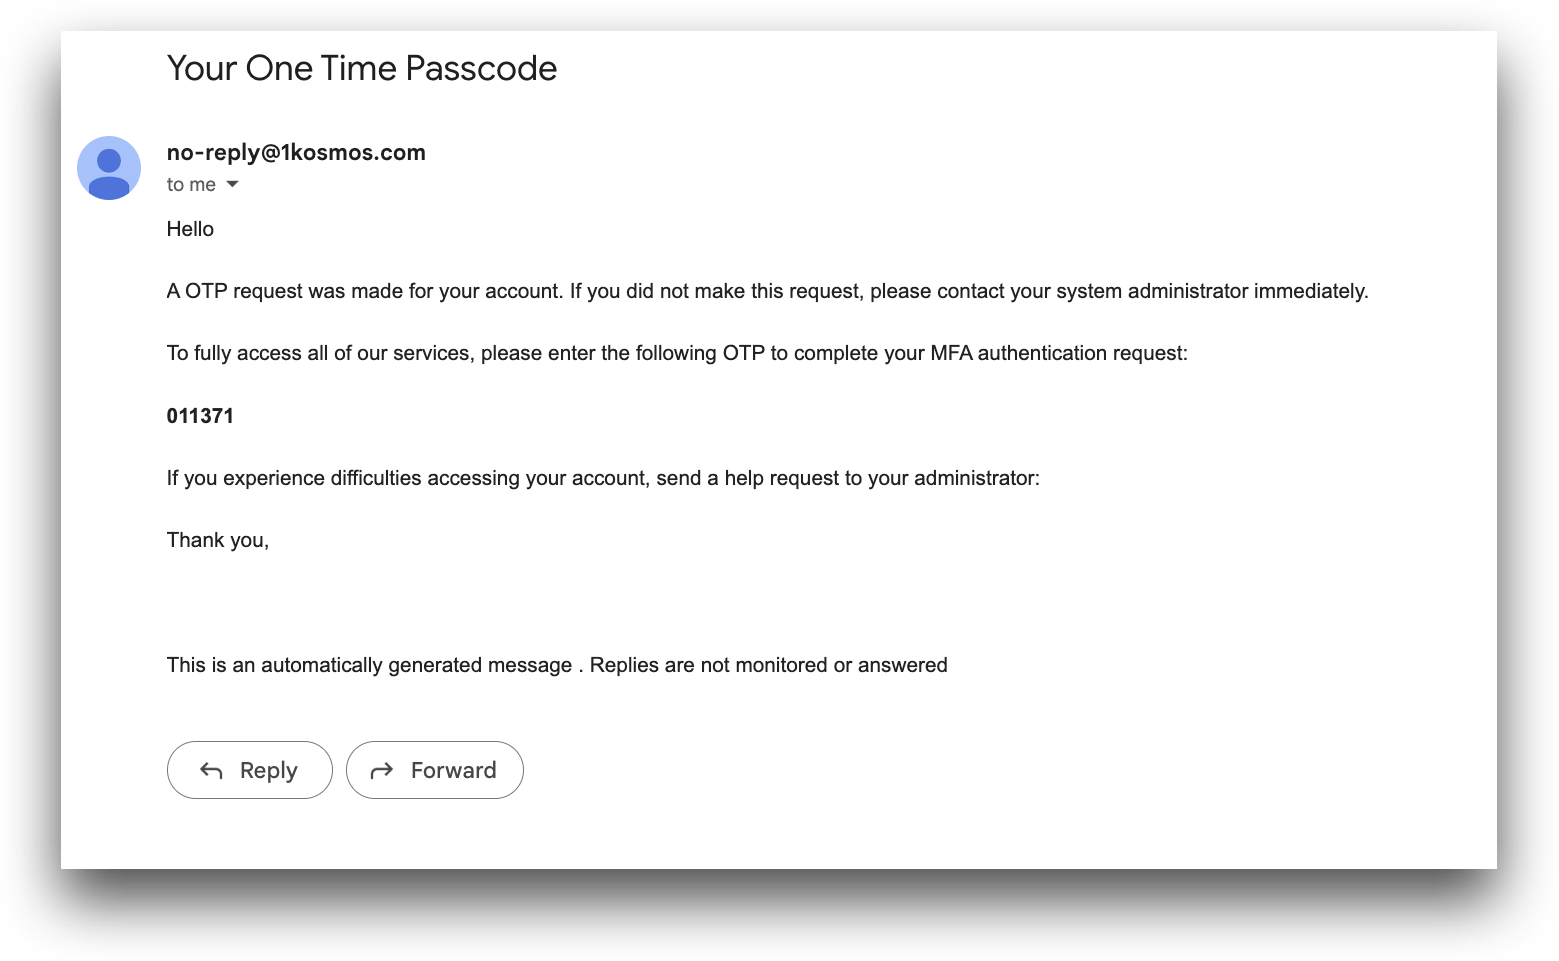
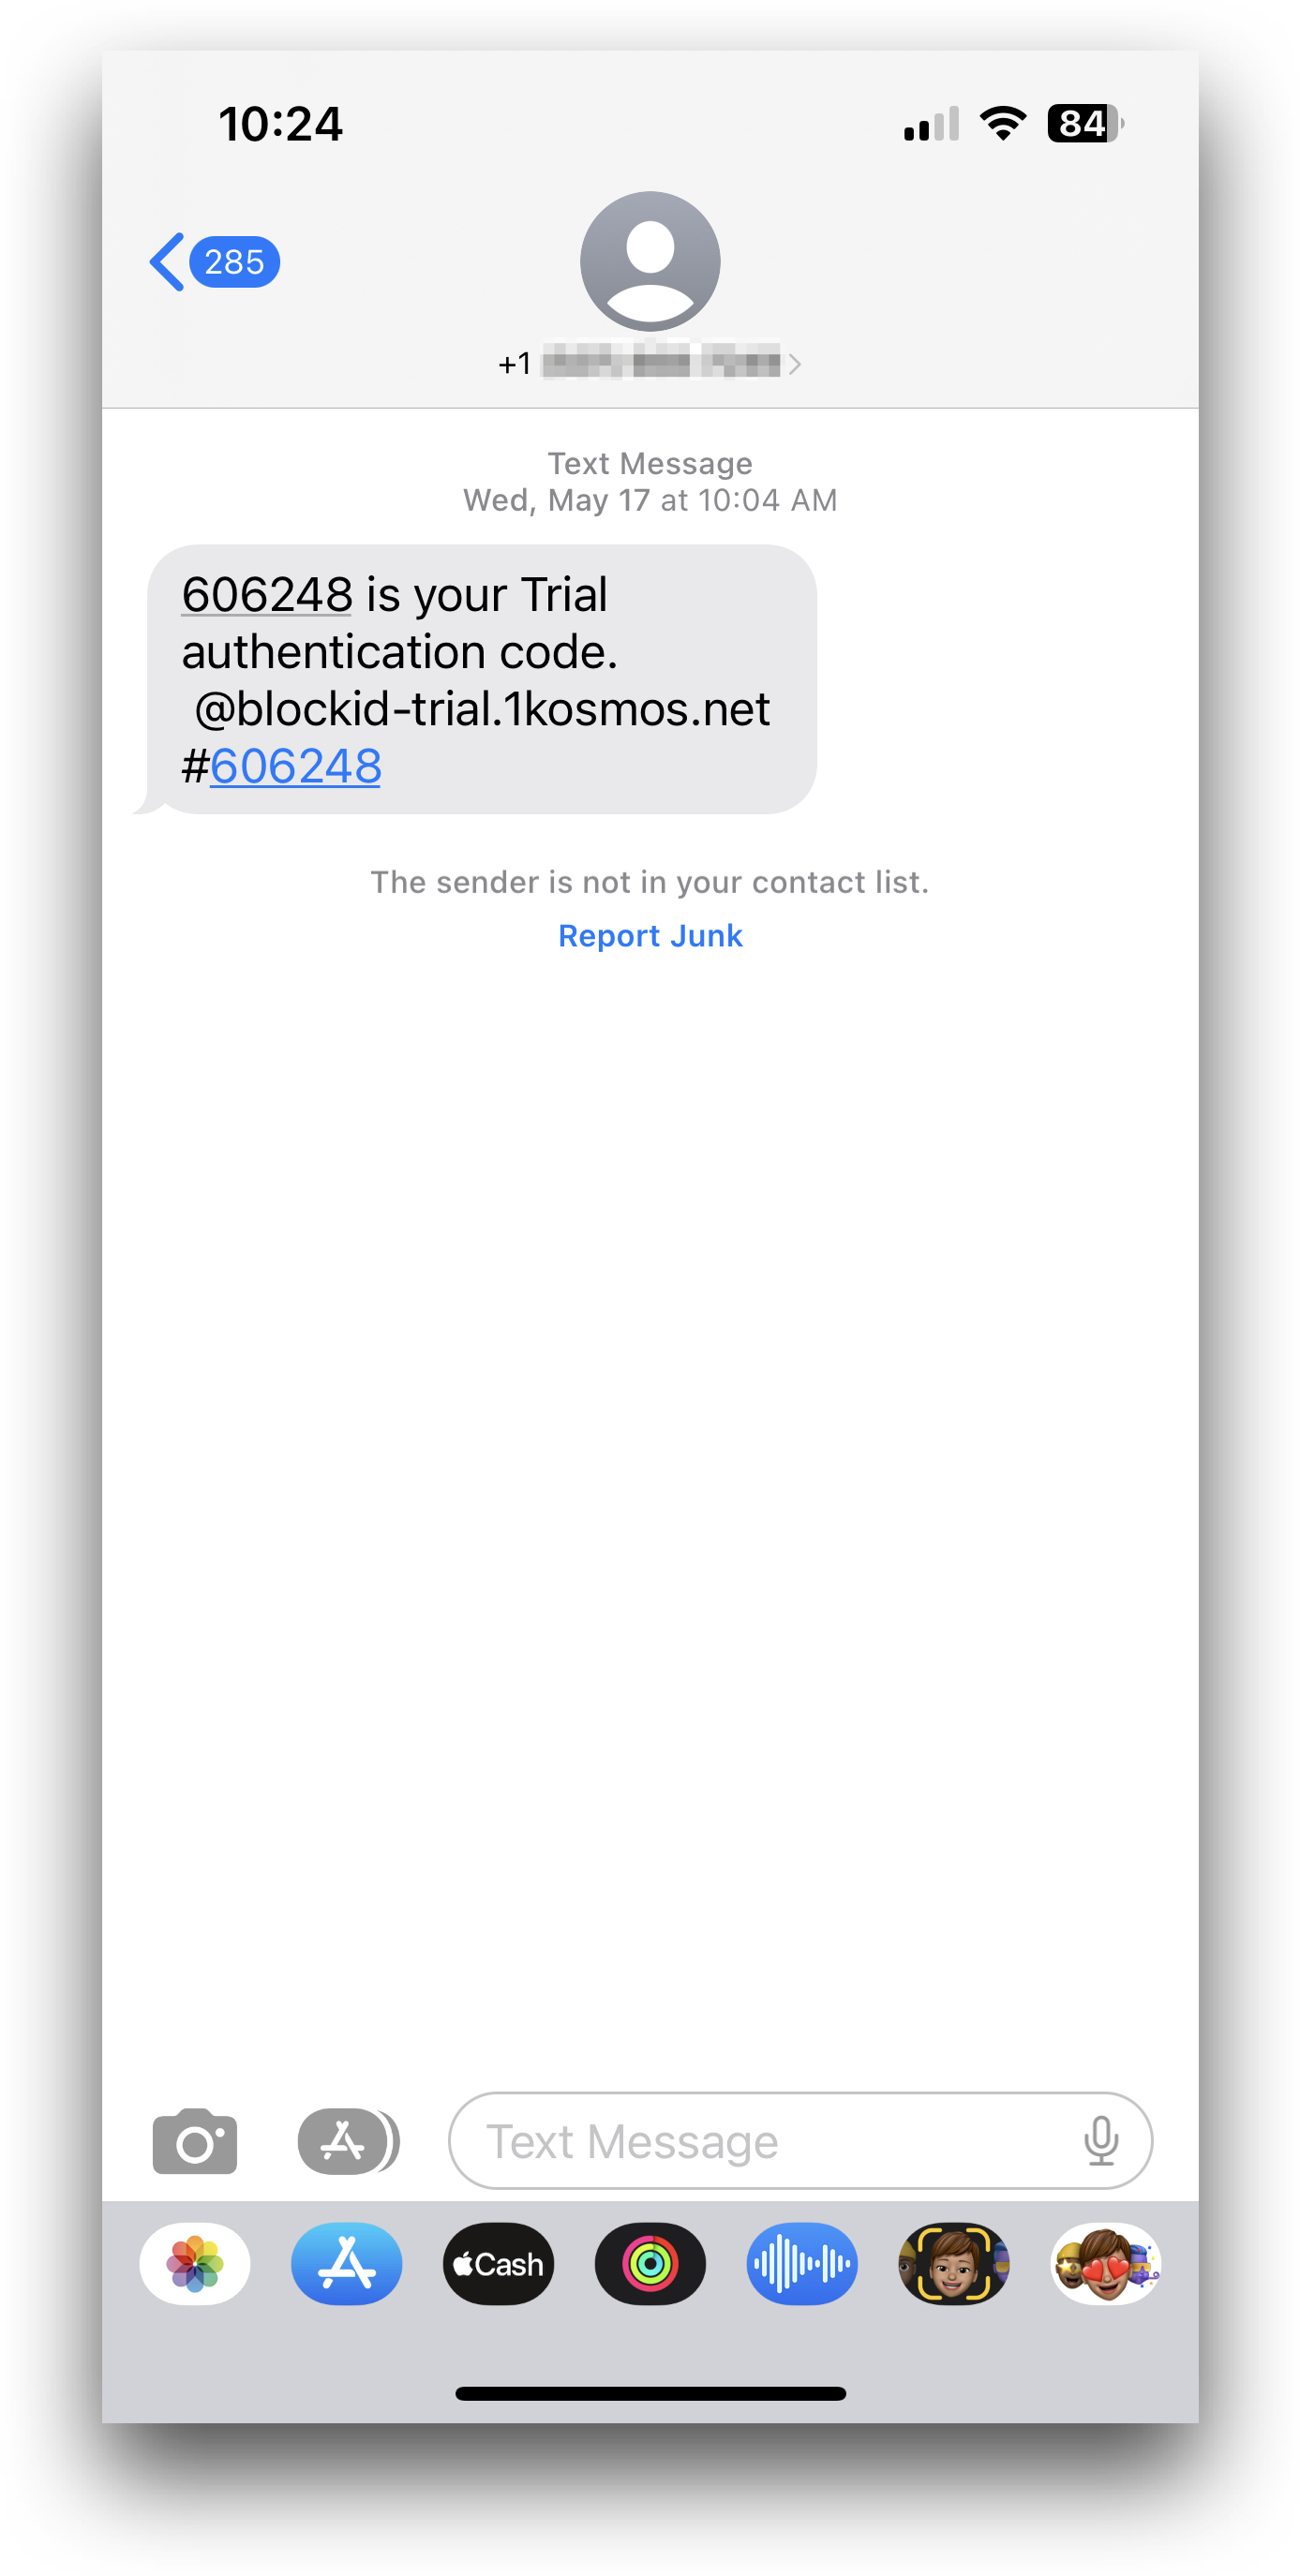
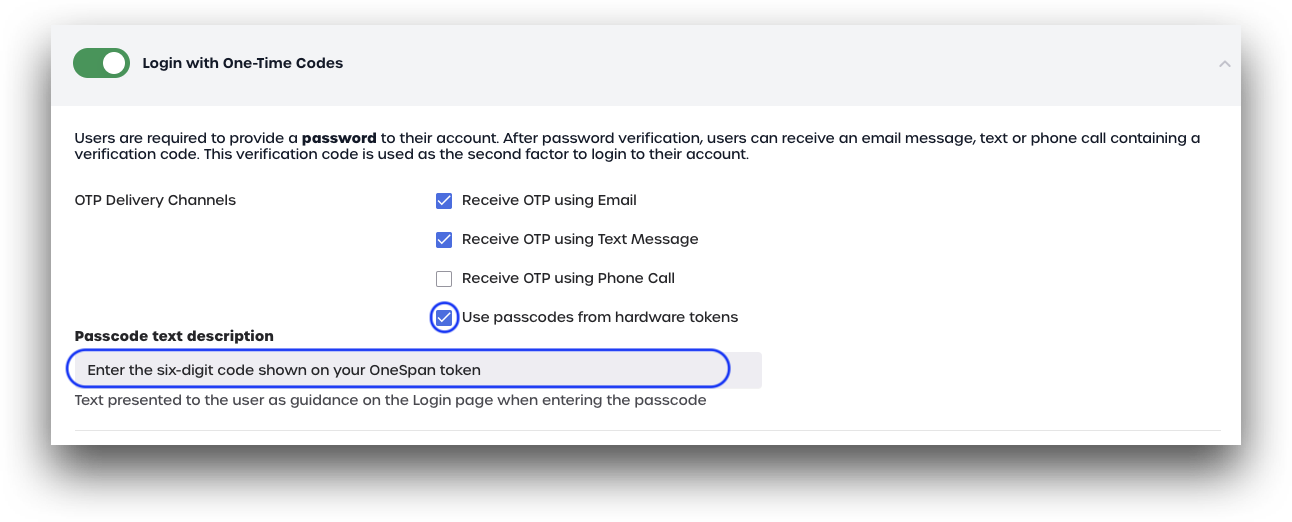
Users are required to provide a password to their account. After password verification, users can receive an email message, text or phone call containing a one-time passcode (OTP). This one-time passcode is used as the second authentication factor for users to login to their account.
-
To enable or disable One-Time Passcode (OTP) authentication, login to AdminX as a tenant or community administrator.
-
From the left-hand menu, click Authentication -> Multi-factor Authentication.
-
Toggle the Login with One-Time Codes switch to turn OTP authentication on or off.
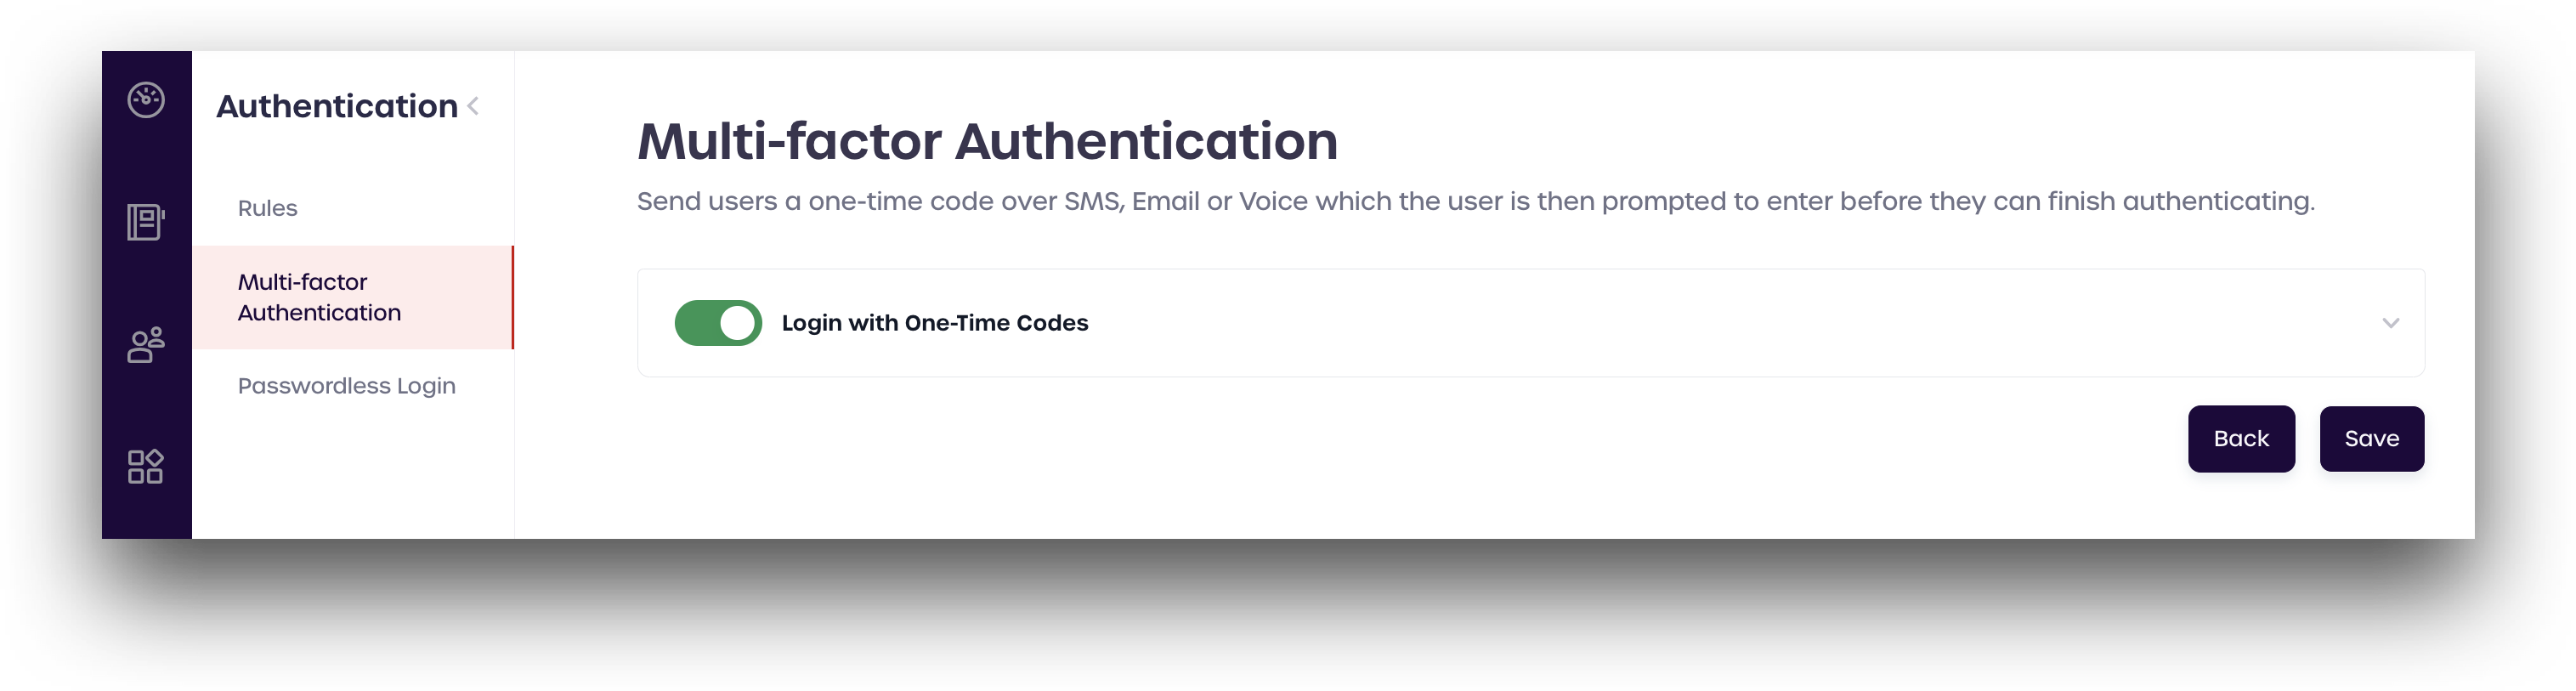
Click anywhere in the box to expand the menu and see the different configuration options.
OTP Delivery Channels
Mark which OTP delivery channels are available for users to receive one-time passcodes.
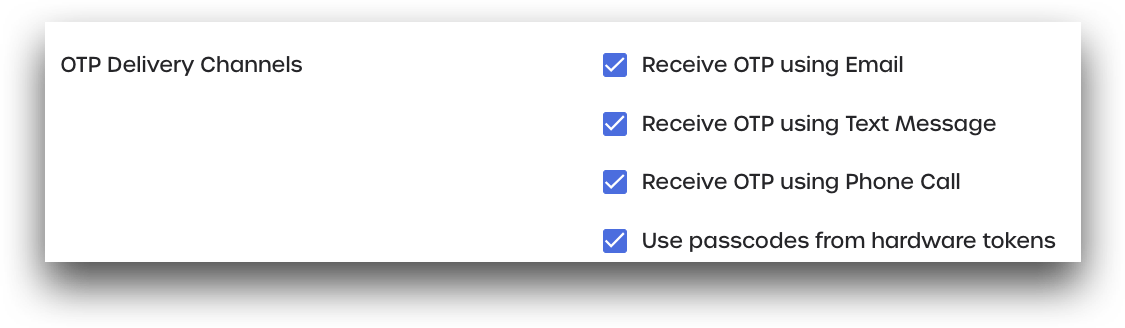
- Receive OTP using Email: Users can request their one-time passcode be sent to their primary email address.
- Receive OTP using Text Message: Users can request their one-time passcode be sent to their linked mobile device.
-
Receive OTP using Phone Call: Users can request that their one-time passcode be sent via a voice call.
-
Use passcodes from hardware tokens: Users can use their linked OneSpan Token to generate their one-time passcode. See OneSpan Token Configuration for more details
Community administrators must have configured their email, SMS, and Voice gateways before this feature can be used. Please see Email and SMS for more details on how to configure SMS and email in AdminX
OneSpan Token Configuration
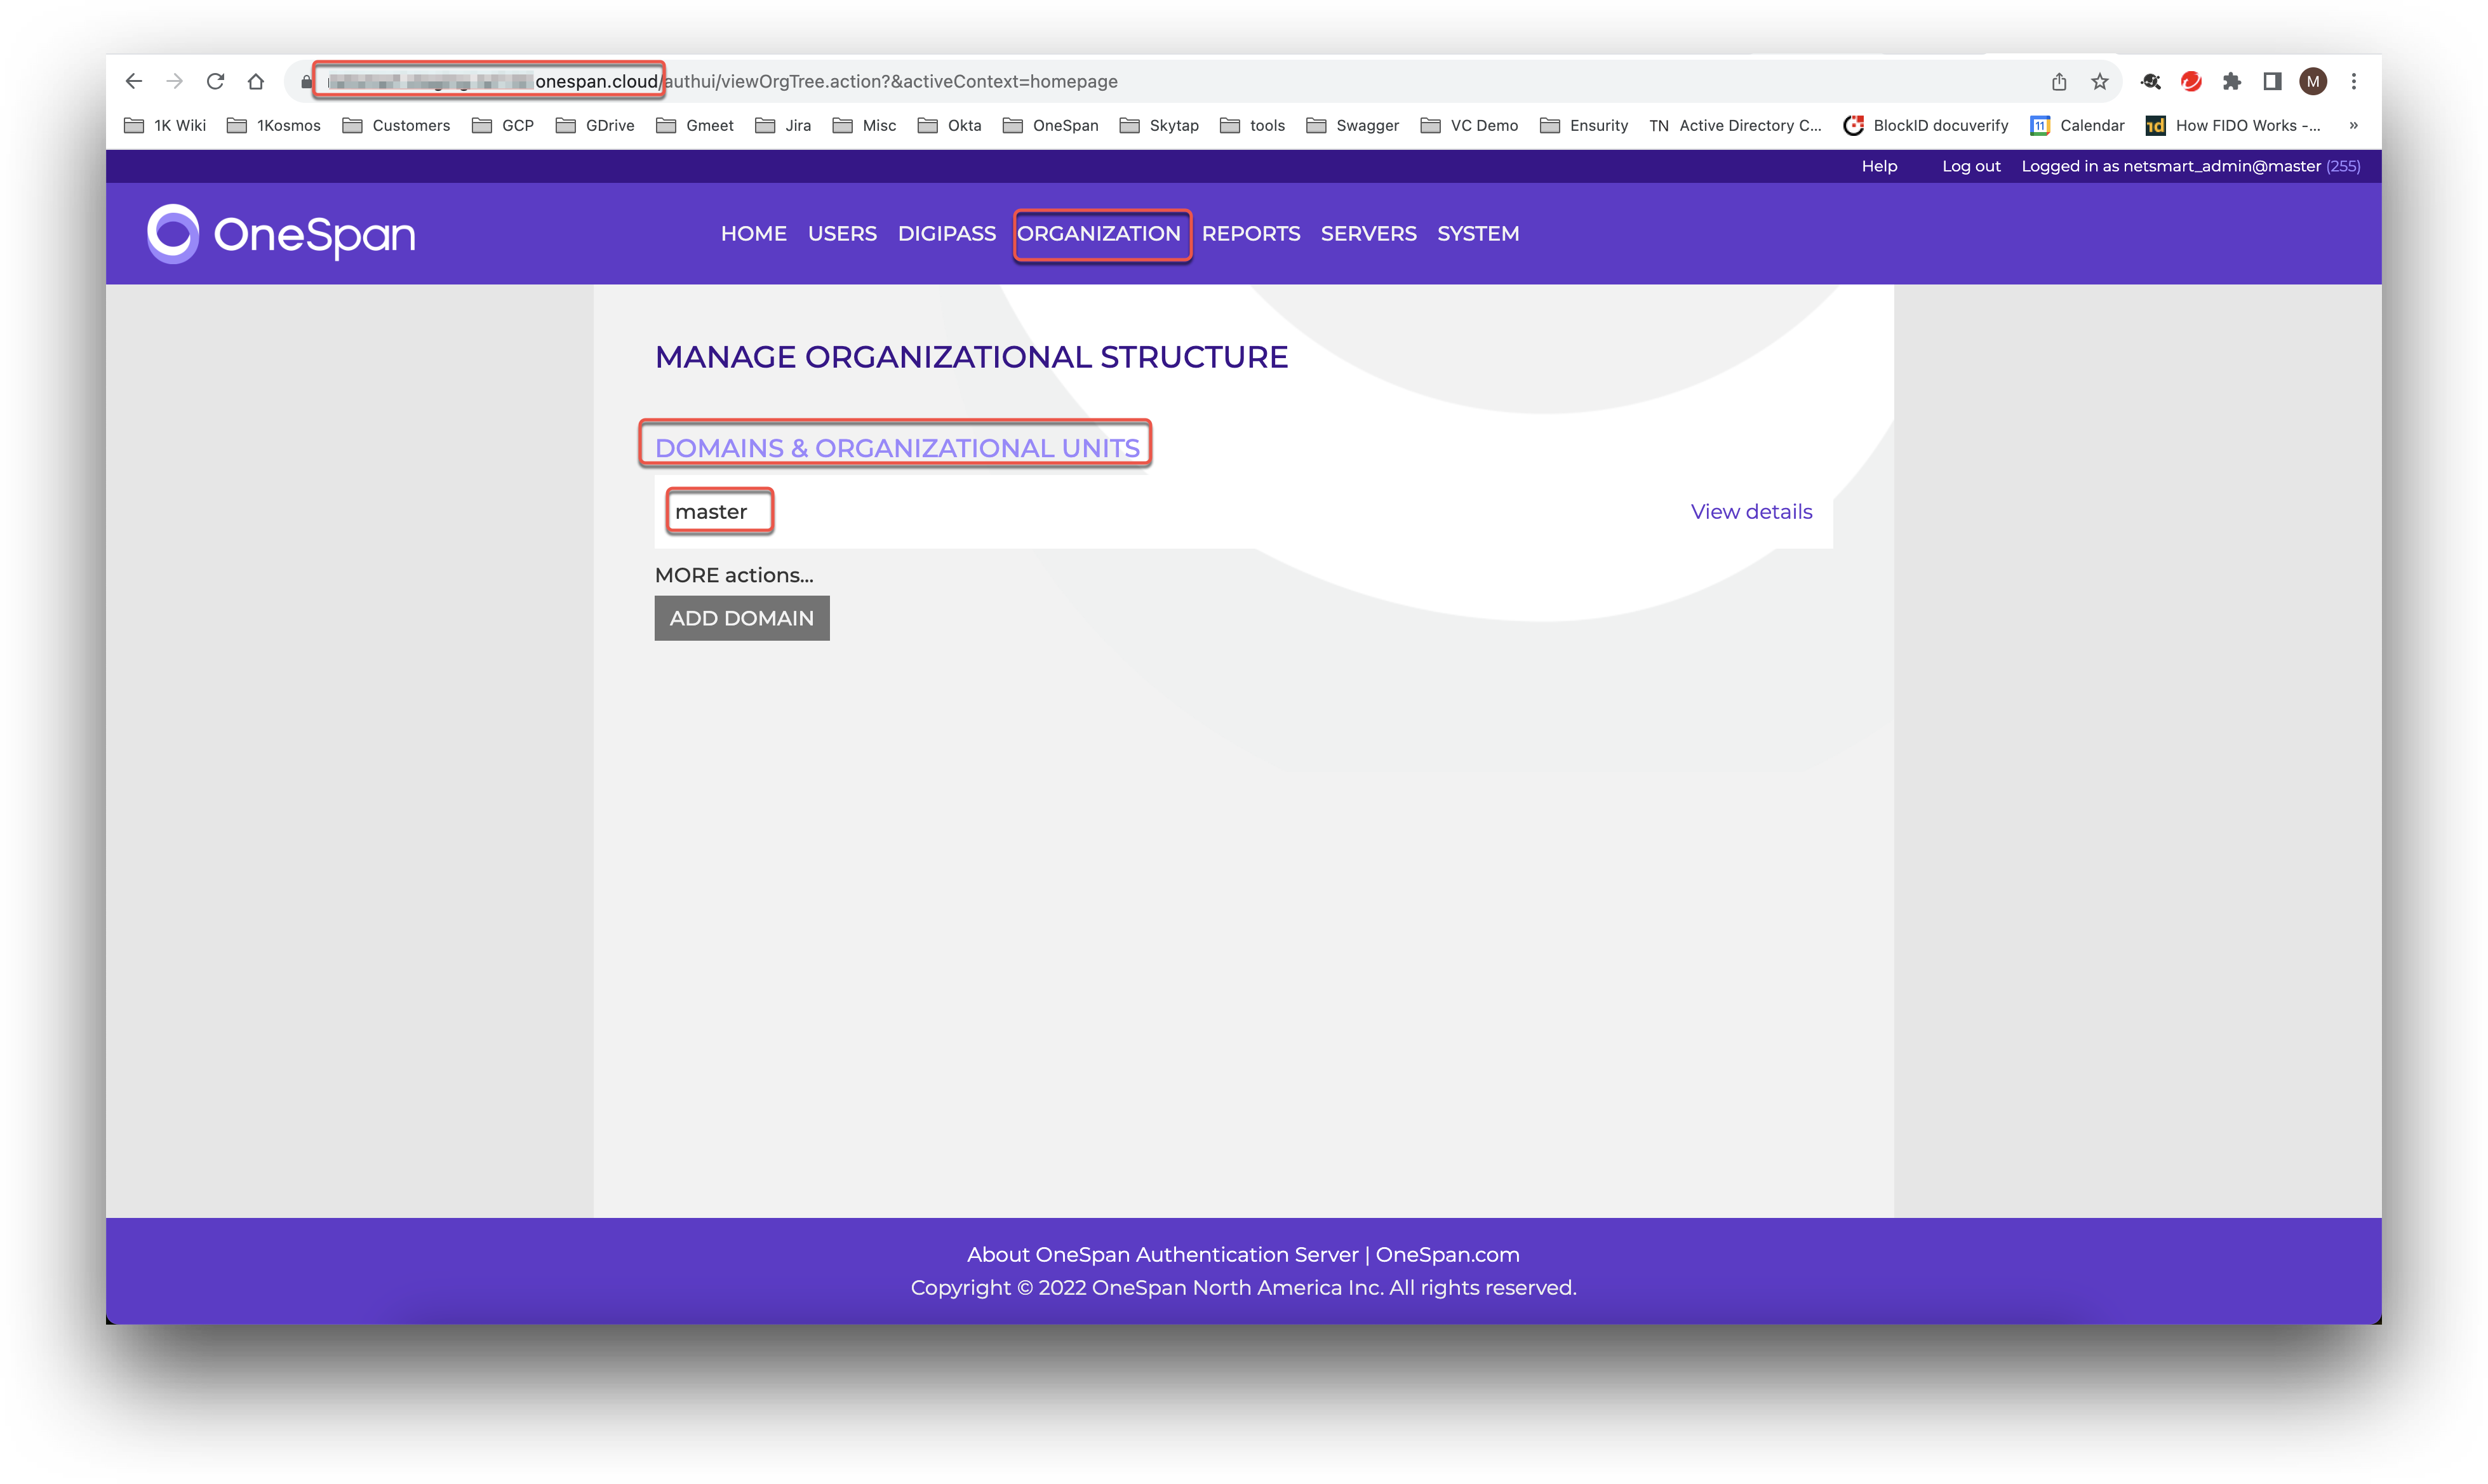
If your organization uses OneSpan tokens to generate one-time codes, additional configuration is needed before the tokens will work on your tenant. You will need your OneSpan domain and URL to proceed with the token configuration.
Your OneSpan domain is listed in the Organization section of your OneSpan administration panel under Domains and Organizational Units.
- Under OTP Delivery Channels, check the use passcodes from hardware tokens box.
- Optionally update the message in passcode text description to direct users to enter an OTP from their OneSpan token
- Under OneSpan Token Configuration, enter your OneSpan domain and URL.
- Domain: Your OneSpan domain Example:
master - URL: Your OneSpan URL. Example:
yourdomain.onespan.cloud
- Domain: Your OneSpan domain Example:
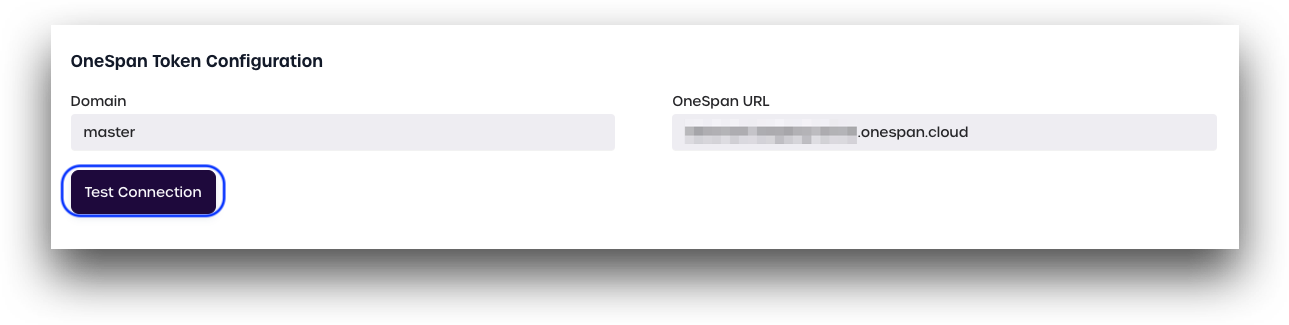
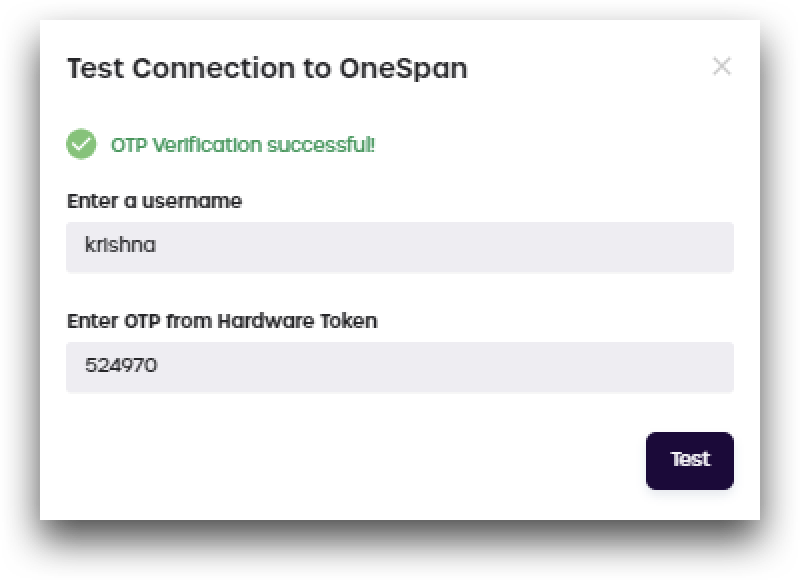
- Click Test Connection to check if your OneSpan token has been successfully linked to your account.
- Enter your OneSpan username and the OTP shown on your OneSpan token. Click Test.
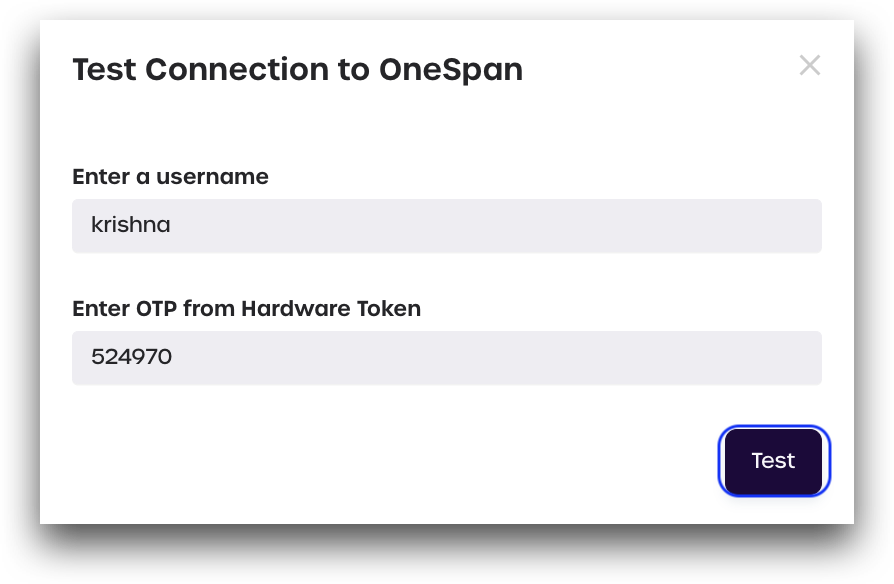
- A message will display indicating if the connection was successful or not.
OneSpan Event Logs
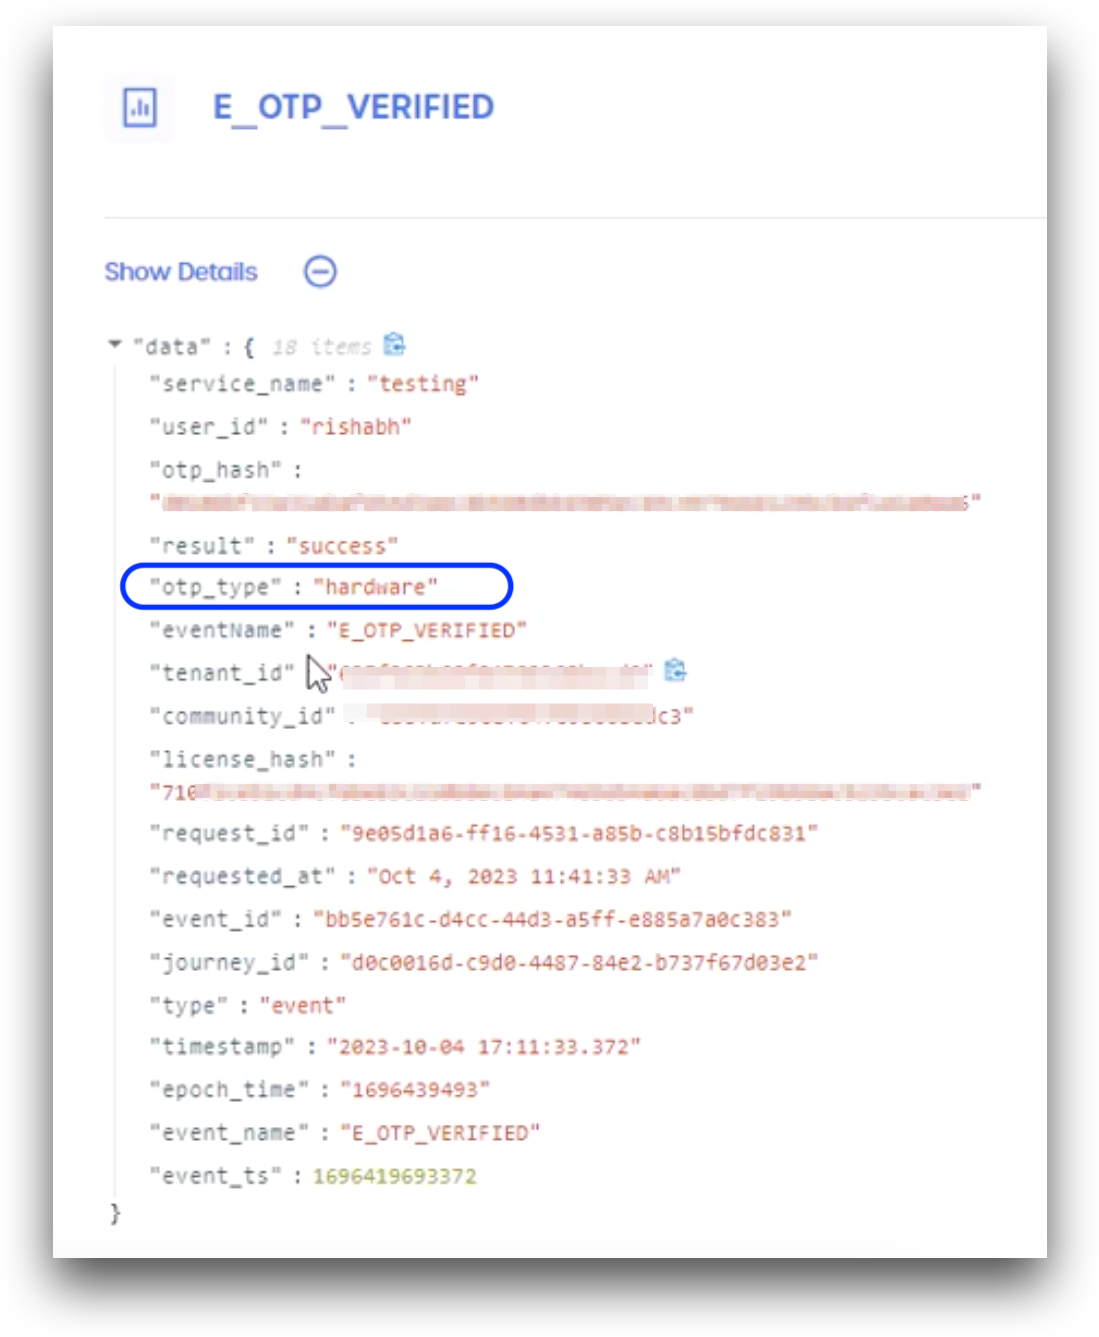
Administrators and Help Desk Admins can also audit the tenant Event Logs for OneSpan token activity. The E_OTP_VERIFIED and E_LOGIN_SUCCEEDED events will show OneSpan activity as "otp_type":"hardware".
Enforce Account Lockout for Incorrect Passcodes
When enabled, the OTP account lockout policy will automatically lock a user account from being able to sign in aft er the specified number of incorrect passcodes has been entered. The account will automatically unlock after the specified number of minutes has passed.
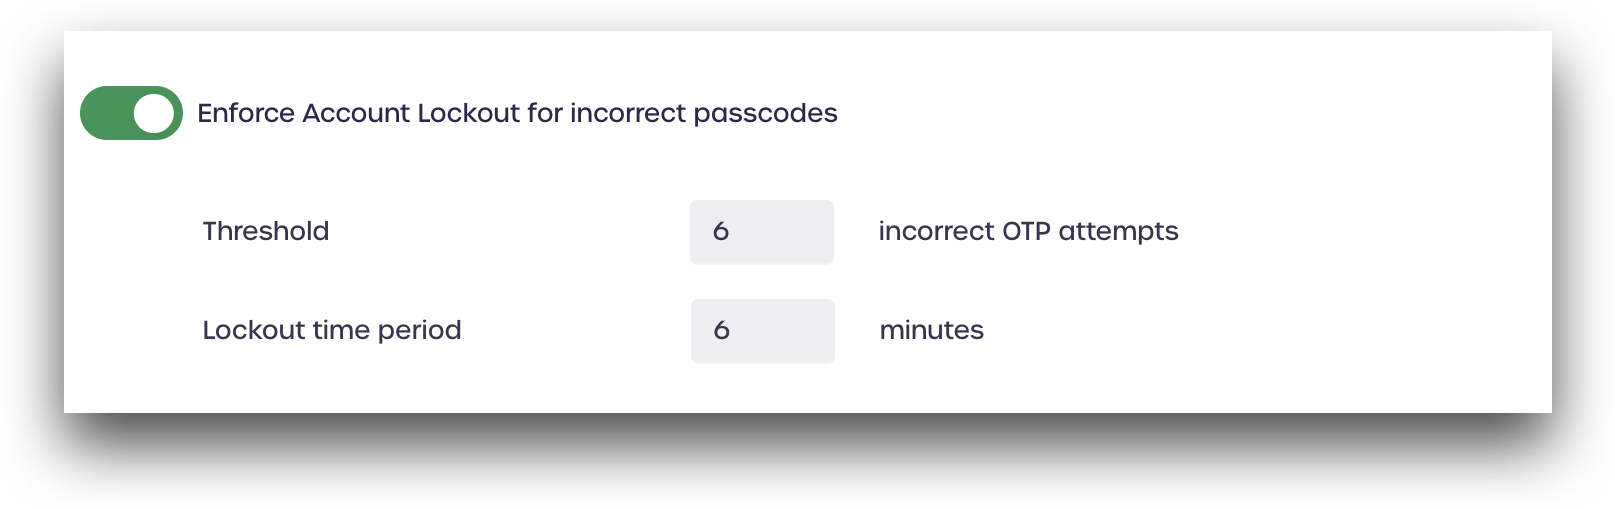
Account Lockout Threshold and Time Period
- Threshold: The number of incorrect OTP attempts needed to trigger the account lockout
- Lockout time period: Number of minutes the account will remain locked. After the time has passed, the account will automatically unlock and the user can attempt to log in again.
Administrators can track account lockouts due to incorrect one-time passcodes from the Event Logs page. The E_OTP_LOCKED event captures details pertaining to the account being locked.
HOTP tokens
HMAC-based One-Time Password (HOTP) is an event-driven OTP algorithm that generates a single-use numeric or alphanumeric code based on a shared secret and a counter. Each time an OTP is requested, the counter increments, and the HOTP value is derived from the HMAC of the secret and counter.
Unlike time-based OTPs (TOTP), HOTPs are not time-bound—they remain valid until the next event triggers a new code, such as pressing a button on a hardware token. HOTP uses a counter as its moving factor, unlike TOTP which uses time.
Benefits of HOTP Tokens
Hardware security tokens play a crucial role in strengthening data protection, user authentication, and access control. Their use provides several key advantages:
- Time Independence: Unlike TOTP, which depends on time synchronization, HOTP operates without relying on time as it is event driven. This makes it ideal for systems where maintaining synchronized clocks is difficult or unreliable. Also, TOTPs can fail if the system clocks drift apart. HOTP avoids this by relying solely on counters, which mitigates the need for clock synchronization.
- Ease of Implementation: Its relatively simple architecture makes HOTP easy to deploy and maintain, offering a practical solution for developers and system administrators.
- Longer Validity Window: Since HOTPs remain valid until the next one is used, they offer more flexibility for users who may take longer to complete an authentication step, unlike TOTPs which expire quickly.
- Offline-Friendly: HOTP tokens can function entirely offline — no need for a network connection or accurate clock—making them ideal for air-gapped systems or constrained environments.
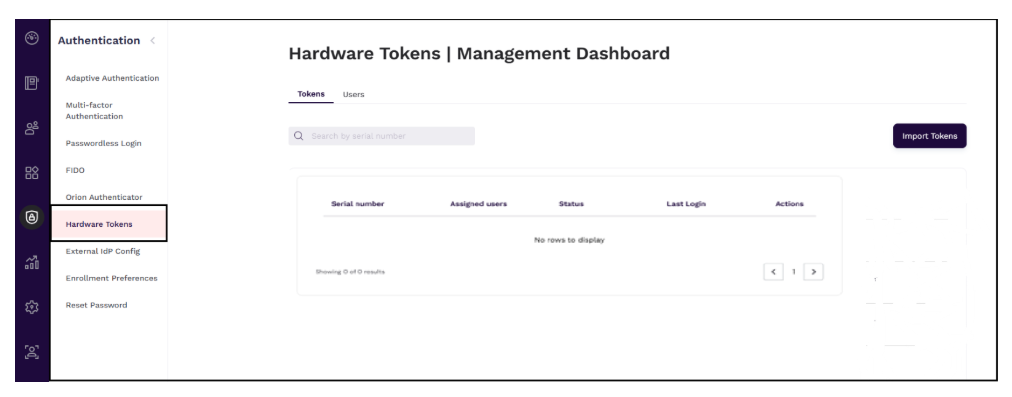
Accessing Hardware Tokens Dashboard on AdminX
To access the hardware tokens management dashboard, follow these steps:
- Log in to your tenant as a community administrator.
- Navigate to Authentication > Hardware Tokens. The Hardware Tokens dashboard is displayed.
Enabling Hardware Tokens for the Community
- Navigate to Authentication > Multi-factor Authentication > Login with One-Time Codes.
- Check Use passcodes from hardware tokens.
- In the Token Configuration section, enter dummy data in Domain and URL.
Managing Hardware Tokens
Community administrators can use the Hardware Tokens Dashboard to perform the following tasks:
- Provisioning Hardware Tokens
- Assigning Tokens to Users
- Removing Users from Assigned Tokens
- Viewing Provisioned Tokens
- Viewing Users that are Assigned Tokens
- Modifying HOTP Tokens
- Resynchronize Tokens
- Authenticating using Hardware Tokens
- Exporting Hardware Tokens
To perform any update activity, the user must be a community administrator and must have the authentication.hardware-tokens.view permission along with at least one of the following:
- authentication.hardware-tokens.create
- authentication.hardware-tokens.update
- authentication.hardware-tokens.delete
Provisioning Tokens
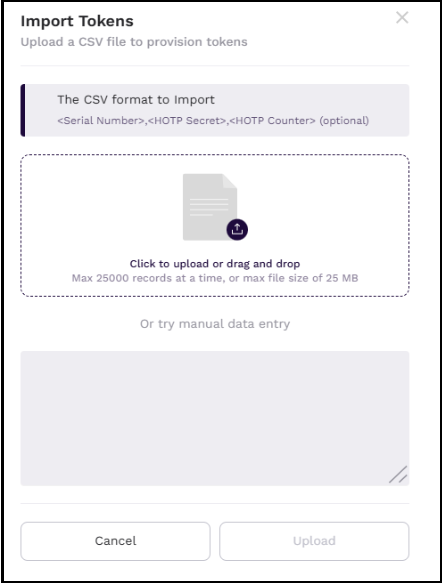
Provisioning involves importing hardware tokens into the AdminX interface. Community administrators or users with the authentication.hardware-tokens.create permission can use the Import Tokens button on the Hardware Tokens dashboard page to provision tokens. Administrators must use the CSV file or CSV data containing token details in the following format to upload tokens.
<serial number>,<HOTP secret key>,<HOTP counter>
Here, the HOTP counter field is optional. If not provided, its value can is set to 0.
The CSV file can contain a maximum of 25000 records, and the file size should not exceed 25MB.
To provision tokens, follow these steps:
-
Log into your tenant as a community administrator.
-
Navigate to Authentication > Hardware Tokens.
-
In the Hardware Tokens dashboard page that is displayed, click Import Tokens. The Import Tokens window is displayed.
-
Click the Upload icon to browse the CSV file for upload or manually paste the token details in the following format in the blank area.
<serial number>,<HOTP secret key>,<HOTP counter> -
After selecting the appropriate file, click Upload. The tokens are imported/provisioned on the AdminX interface. By default, the status of all the imported tokens will be inactive. Once you use a token for authentication, the status of that specific token becomes active.
Assigning Tokens to Users
Community administrators can manually assign the user to a provisioned token. When assigning tokens, the same user can be assigned multiple tokens, or a single token can be assigned to multiple users.
To assign a token to a user, follow these steps:
-
In the Serial number column, click on a token that you want to assign to a user.
-
In the Hardware Token Details screen that is displayed, click Add User.

-
In the Assign User window that is displayed, enter a username in the Add user section and click Update.

The Users section displays the user to whom the token is assigned.
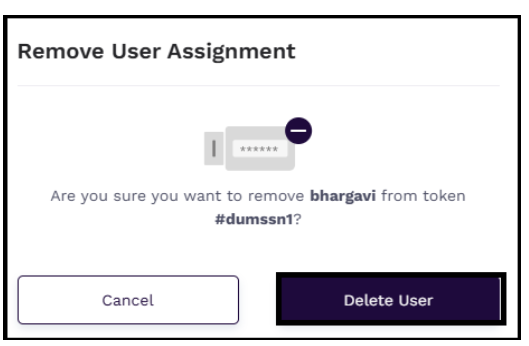
Removing Users from an Assigned Token
Community administrators can remove user(s) from the assigned tokens. To remove user(s), follow these steps:
-
In the Hardware Tokens tab, select a token from which you want to remove the user.
-
In the Users section, click the Delete icon under the **Actions column against the user that you want to delete.
-
In the Remove User Assignment window that is displayed, click Delete User.
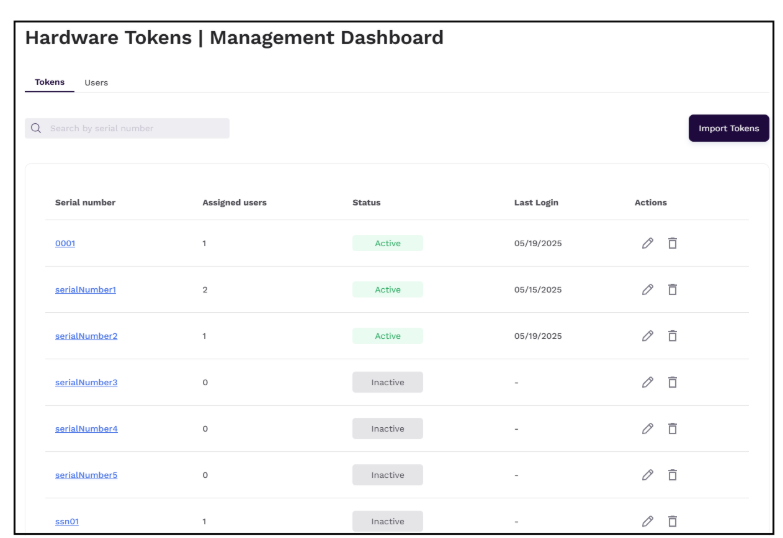
Viewing Provisioned Tokens
Community administrators with the authentication.hardware-tokens.view permission can view the list of tokens and users from the Hardware Tokens Management Dashboard. This dashboard consists of the following tabs:
- Tokens – Use this tab to view the list of tokens, their status and the number of users to whom the tokens have been assigned. Additionally, you can edit or delete the token. Clicking on a token will load the token details on the screen and allows community administrators to resync a token, update seed/secret, update counter, assign/remove user, and delete a token.
- Users – Use this tab to view the number of users for whom the token has been assigned. Additionally, you can delete the user from the system. Upon deletion, users will be removed from all the associated tokens.
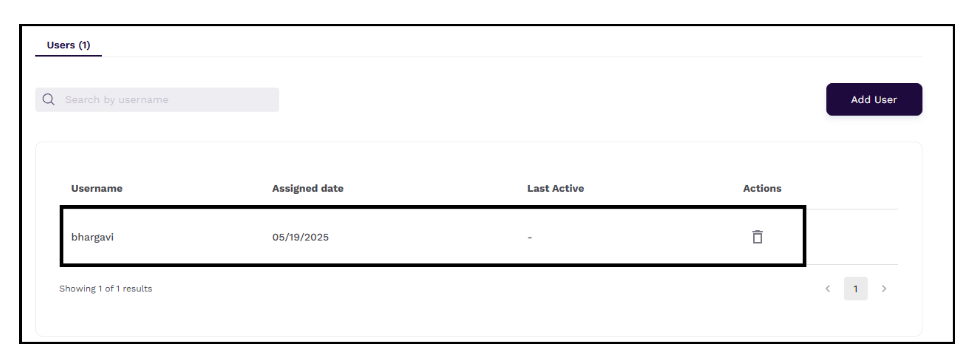
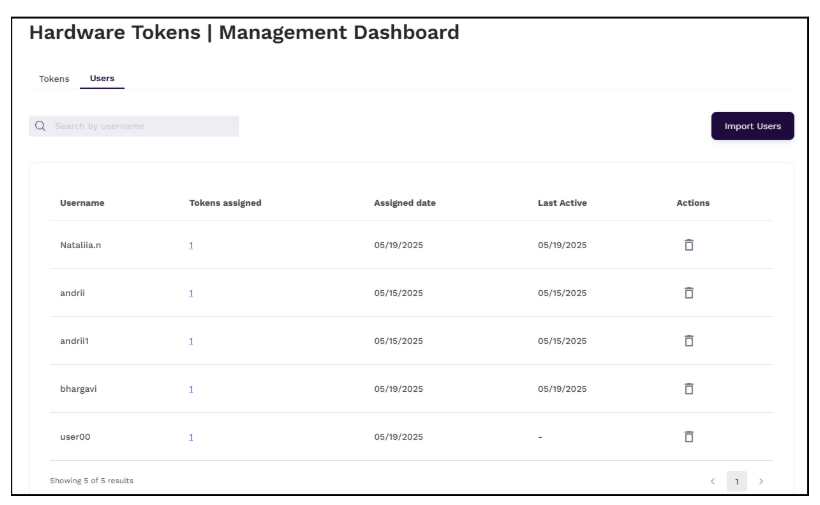
Viewing Users that are Assigned Tokens
Community administrators can use the Users tab on the Hardware Tokens Dashboard page to view assigned users that are assigned tokens. This list does not display all the users in the community. Administrators can sort and search the list based on username.
To view the users that are assigned tokens, follow these steps:
-
In the Hardware Tokens dashboard page, navigate to the Users tab.
-
View the list of users, their assigned tokens, the date on which the tokens are assigned, and delete user assignments. The Last Active is the date when the user used their token to authenticate.
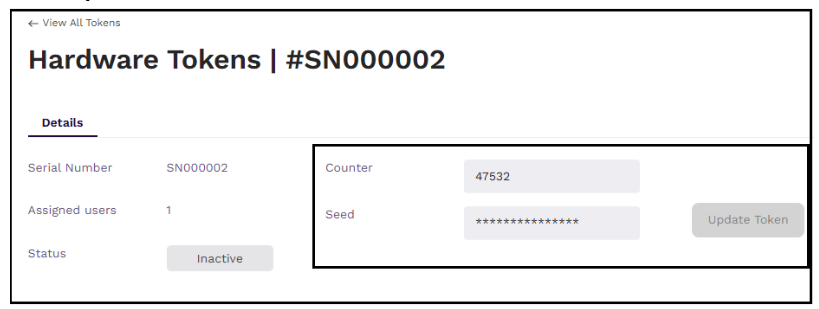
Modifying HOTP Tokens
Community administrators with the authentication.hardware-tokens.update permission can modify or update the token details such as counter and seed value.
To update HOTP tokens, follow these steps:
-
In the Hardware Tokens tab, click Edit under the Actions column against the token that you want to edit.
-
Modify the counter or the seed value.
noteYou cannot read the seed value currently assigned to the token.
-
Click Update Token.
Resynchronize Out of Step Tokens
In certain scenarios, user tokens may fall out of sync—typically when the counter on the hardware device is ahead of the counter on the server. The Token Resynchronization feature enables Community Administrators to realign these tokens without the need for replacement, minimizing disruption to the user experience. The server can correct drift of up to 50 counter steps via re-synchronization. If the drift exceeds this, re-synchronization will fail. In that case, the community admin can either reset the token’s counter through the provider and match it in AdminX, or manually update the counter in the token settings before retrying synchronization.
To resynchronize tokens, follow these steps:
-
In the Hardware Tokens dashboard page, click Edit under the Actions column against the token that you want to resynchronize.
-
Click Re-sync Token.
-
Generate three sequential passcodes from the hardware device.
-
In the Re-sync Token window that is displayed, enter the generated passcodes to resync the hardware tokens.
-
Click Update.

Token Counter Sync on First Use
To improve the onboarding experience for users with hardware tokens that have never been used, a new token sync flow has been introduced. This feature detects whether a user has been assigned an unused token and prompts them to complete a one-time synchronization process during their first login. The process ensures the token’s counter is correctly set and allows for secure validation of OTPs moving forward.
In this feature, syncing is required only once per token, even if it is shared across multiple users. To support this, a configuration setting - Hardware Token Sync Window has been added to the AdminX interface under Authentication > Multi-factor Authentication, providing better control and visibility for administrators
Prerequisites:
- In the Hardware Token Sync Window field, specify a value between 1 and 500,000. This defines the allowed range for token counter synchronization during OTP validation.
- Ensure your adaptive authentication journey is set to Password & Hardware OTP Codes.
- Under Authentication > Multi-factor Authentication:
- Select the Use passcodes from hardware token check box (in the OTP Delivery Channels section).
- Add the domain and OneSpan URL.
To resync a token for the first time login user, follow these steps:
-
Open your tenant URL.
-
Enter the username for whom the token has to be resynchornized and click Next.
-
Enter the password and click Next.
-
In the Enter your verification code screen, click the First login with token? Continue to sync token link.

-
On the First-Time Login Setup screen, enter three consecutive passcodes generated by your hardware token.
note- If multiple token serial numbers are assigned to your account, a dropdown menu will be displayed. Select the serial number of the token you wish to re-sync. If only one eligible token is available, the dropdown will display the serial number but will not allow selection changes.
- If the user has already synced the token, they can directly click the Already Synced?Continue to Login link.

-
Upon successfully entering the passcodes, click Sync Token & Login. You will then be logged into the AdminX interface.
Event Logs:
In the E_TOKEN_MODIFIED event, the activity parameter is set to authentication. Additionally, the E_OTP_VERIFIED event contains the hash of the third OTP entered during token sync and shares the same requestId as the corresponding E_TOKEN_MODIFIED event.
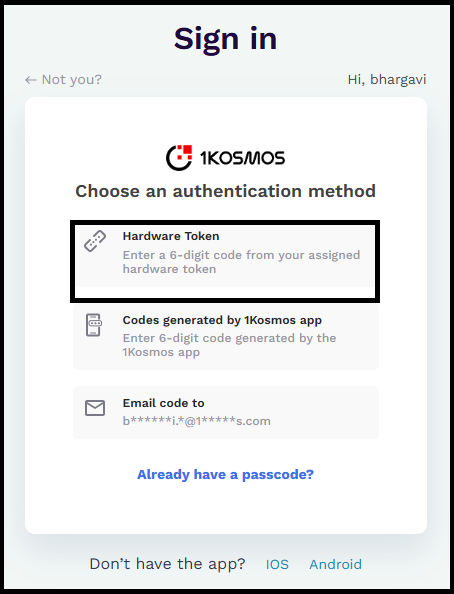
Authenticating using Hardware Tokens
Community Administrators can generate One-Time Passwords (OTPs) using their hardware tokens and use the generated passcodes to authenticate applications that support OTP-based authentication.
Prerequisites:
Make sure that the user has enabled the Use passcodes from hardware tokens check box on the AdminX interface under Authentication > Multi-factor Authentication.
To authenticate using hardware tokens, follow these steps:
-
Open your tenant URL.
-
Navigate to the USERNAME tab and enter the username and click Next.
-
In the Choose an authentication method screen, select Password & OTP.
-
Enter the password and click Next.
-
Select Hardware Token.
-
Generate the passcode on your device and enter the passcode. You will be logged into the application.
Exporting and Downloading Token Data
To export the token data, follow these steps:
- Log in to your tenant as a community administrator.
- Navigate to Authentication > Hardware Tokens. The Hardware Tokens Management dashboard is displayed.
- To download the token data, click Export Data in the Tokens tab; To download the users for whom the token has been assigned, navigate to the Users tab and then click Export Data.
- In the Export Data window that is displayed, enter your email address and click Generate. Once the report generation is successful, you will be notified through email.
Event Logs
The following events are triggered:
- E_OTP_VERIFIED
- E_LOGIN_SUCCEEDED
- E_LOGIN_FAILED
- E_TOKEN_LIST_EXPORTED
- E_TOKEN_ASSIGNMENT_EXPORTED
- E_TOKEN_ADDED
- E_TOKEN_MODIFIED
- E_TOKEN_ASSIGNED
- E_TOKEN_UNASSIGNED
- E_TOKEN_DELETED
CSV Sanitization and Formatting Considerations
The Community Administrator should follow best practice guidelines mentioned below when creating the CSV file for upload:
-
Your CSV file must follow this format:
serialnumber, seed, currentcounterExample: Supported Format:
- SN001, ABCD1234, 0
- SN003,ABCD7890,35
-
In case the counter is not available or is not provided, the CSV record should be as follows:
SN003, ABCD7890,
-
The HOTP counter must have a non-negative numeric value. The following examples are not supported and will result in an error:
-5 OR 0.5 OR abc OR #%! -
You cannot upload more than 25000 records at a given time.
-
Blank rows between records in your CSV file are not allowed.