Two-Factor Authentication Using OIDC
Overview
Add 1Kosmos’s two-factor authentication to your web application using a new OIDC-compliant authentication protocol to perform two-factor authentication.
Implementing 1Kosmos two-factor authentication into your site involves splitting your login handler into two parts. You should be familiar with your web application's programming language and authentication process.
1Kosmos uses the OpenID Connect protocol to deliver two-factor authentication to users and make available the result of the two-factor authentication.
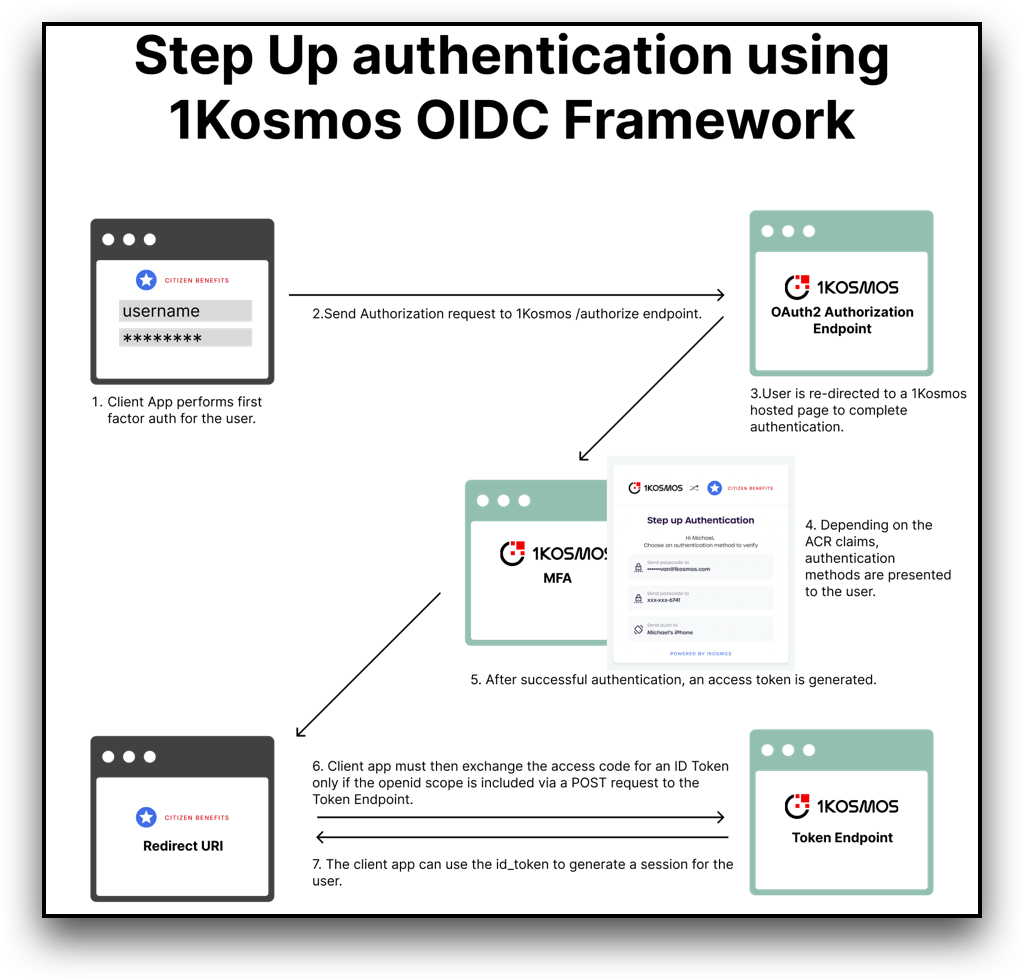
The first factor authentication will be performed by the client site followed by a request for authorization to OAuth2 /authorize endpoint.
After validating this request, 1Kosmos redirects the user to a 1Kosmos-hosted page for multi-factor authentication.
Upon a successful second-factor verification, 1Kosmos redirects the user to the redirect URI supplied in the initial Authorization request.
To retrieve the result of the two-factor authentication from 1Kosmos the client will make a request to the Token endpoint to receive the id_token.
When an id token is available, the user is successfully validated and a new session is created for the user.
First Steps
To enable Two-Factor Step-Up Authentication, you must first create a new OIDC application.
- Navigate to your AdminX control panel and log in as a community administrator.
- From the dashboard, navigate to Applications. Click Add Application
- From the Add New Applications page, scroll down to OIDC and click Add Integration
- Enter an application name, and upload a logo file (<2MB in size).
- For Grant Type, select Authorization Code from the dropdown menu.
- Provide the sign-in redirect URI for your OIDC provider. You can add additional URIs as needed.
- Review the Scopes.
- After reviewing all your information, click Create. AdminX will automatically assign a Client ID and Client Secret to your new OIDC application client.
For more information, see OIDC Application Integrations
1Kosmos Authentication Prompt Interface
To set up your app to trigger two-factor authentication, the incoming request must pass claims that includes the id_token and acr values. The id_token provides the context for 1Kosmos to find the user. The acr helps determine the authentication methods permitted for the user.
Steps
- Acme (Sample Client App) application handles primary login for the user. Either the username or username and password is validated by the client app.
- Subsequently, the client app needs to initiate an authorization request to
/authorizeendpoint. The incoming request must have claims with theid_tokenandacrvalues as"liveID push","otp sms","otp email","otp”Sample request authorization request is available here:
https://blockid-trials.1kosmos.net/oauth2/community/default/v1/authorize
  ?response_type=code
  &client_id=ae0456c92ac24f0ace200f103ab93c81
  &scope=email openid
  &redirect_uri=https://google.com&state=123
  &claims={"id_token":{"username":"adrian","email":"adrian@gmail.com","acr":{"essential":true,"values":["liveID push","otp sms", "otp email", "otp"]}}}
The openid scope must be passed for the response to include an id_token.
- After validating the authorization request, a 1Kosmos hosted MFA page will present authentication
options to the user depending on the
acrclaims.
acr=liveID push- Requires users to provide live gestures to approve the authentication from the mobile app.acr=otp sms- Allows users to receive an OTP on their mobile number to authenticate.acr=otp email- Allows users to receive an OTP on their email address.acr=otp- Allows users to receive an email or SMS OTP to authenticate.
- Upon successful authentication of the user, an access code is issued 1Kosmos.
- Sample response is available here:
{
    "access_token": "kxP75YVJkULkEqek8yrl6j8n1h9eH1-LiMM775ecNvZ",
    "expires_in": 3600,
    "id_token": "eyJhbGciOiJSUzI1NiIsInR5cCI6IkpXVCIsImtpZCI6IjVLM2hYemxVUldHZFRoWmNhS1FJcFRLLXpUM2JUSnppODNkZHdwX3J0UzgifQ.eyJzdWIiOiJQT1N0NnlkVUZkNFJTU01FS0hDOHAiLCJlbWFpbCI6ImFkcmlhbi5sYXJ5c3pAMWtvc21vcy5jb20iLCJhdF9oYXNoIjoiSTJNYlFTUDd0R1ZadFVTTzBBNThkZyIsImF1ZCI6ImFlMDQ1NmM5MmFjMjRmMGFjZTIwMGYxMDNhYjkzYzgxIiwiZXhwIjoxNjY2NjQ0NjIwLCJpYXQiOjE2NjY2NDEwMjAsImlzcyI6Imh0dHBzOi8vMWstZGV2LjFrb3Ntb3MubmV0L29hdXRoMi9jb21tdW5pdHkvZGVmYXVsdCJ9.exLwMBNgaDKO_lhSrIh--TYw-Vb7m1OihAETuudJas4BB-qz_Q1FwmecWvNslNEm7LJEomNA38pdtmXCZBGvUwSM0mA2bJID2A8aDQrjs_VIMBgeCUZ_TwEvgobNm99X1Tkvmn2l34uwv1i0TYJM5BnMvGrpNO4Zt2mkidVf4H4HsFO_Xh4DBn29YcIP3byI16vU6I-9R04sswKAEqoPzKUpHNcQ8Clfdtb7Z-wboA5xx9FUf5LWcKwPOl6O0YfsYRDSygehqZlE2cz2N54ZKalOT-YGn76MDwTLEqghS2n8HPJdnzfvdYQRfzWTp3xzUQDdKor4qvuJaqJxyfjeRQ",
    "refresh_token": "6m5KmMjEQDKyELSvO_1vlJ1y54lPR3KnNNb3H0wE6S5",
    "scope": "profile email openid",
    "token_type": "Bearer"
}
- The client app must present the access code to the
/tokenendpoint to receive an updatedid_tokenfor the user. - The
id_tokencan be used to create a session for the user or step up the user's existing session. Users are seamlessly redirected to their client app.