Linux SSH MFA
Overview
1Kosmos Login for Linux integrates with the Pluggable Authentication Module (PAM) to enable SSH login on Linux systems. It offers both standalone authentication and 2FA/MFA options, supporting various methods like PUSH Notification, TOTP, OTP via Email, OTP via SMS, and Password.
Supported Authentication methods
Any combination of the following online authentication methods is supported when using 1Kosmos PAM:
- Push Notification-Based Login
- Online OTP-Based Login
- Password Based Login
- OTP via SMS Login
- OTP via Email Login
- OTP via Voice Call Login
For example, an admin can enable push notification and SMS OTP as authentication methods and give users the flexibility to choose any of the enabled methods during login or enforce all the enabled authentication methods as MFA.
Prerequisites
- 1Kosmos PAM installer
- Root access to Linux host
- SSHD service running
- Network connectivity to 1Kosmos cloud
- 1Kosmos Mobile Application installed and linked to your account
The 1Kosmos Linux PAM can only be used to authenticate accounts in user directories connected to your 1Kosmos tenant.
System Requirements
Supported Operating Systems
- RHEL 6, 7, 8, and 9
- Ubuntu Server (20, 22, and 24)
- Ubuntu Desktop/Workstation(20, 22, and 24)
Hardware Requirements
- CPU: 1.4 GHz or faster multi-core recommended
- RAM: 2 GB minimum, 4 GB recommended
- Disk Space: 20 GB minimum
- Network Interface(For network connectivity)
Installing Linux 1Kosmos PAM
To install the required packages on the RHEL or Ubuntu server, follow these steps:
- RHEL
- Ubuntu
-
Install the prerequisite packages using the following command:
sudo yum install -y tar libuuid vim-common libcurl -
Install the 1Kosmos Linux PAM package
sudo ./blockId.<version>.<timestamp>.sh
-
Install the prerequisite packages using the following command.
sudo apt install uuid-runtime libcurl4 -
Install the 1Kosmos Linux PAM package.
sudo ./blockId.<version>.<timestamp>.sh
Configuring Files
This section outlines the steps required to be followed to configure both the License and PAM files.
Configuring License File
The configuration file can only be updated by a user with root privileges.
To configure the login mechanism in the 1Kosmos Linux PAM, you must modify the license_config file on your system, located at /opt/BlockId/data/license_config.
A sample of the license_config file is shown below:

The priviliged user can use a text editor, such as vi, to modify the COMMUNITY and TENANT_DNS parameters in the file with your tenant details. The following parameter values are sample values.
TENANT_DNS=yourtenant.1kosmos.net
COMMUNITY=yourcommunity
Configuring PAM Files
This section provides information on the steps required to configure the PAM files for both RHEL and Ubuntu servers.
It is recommended to keep an additional root shell open before making changes to your PAM files or sshd configuration to prevent accidentally locking yourself out. Additionally, ensure your PAM configuration works locally before testing it with SSH logins. Be sure to back up the files to be modified, as outlined below.
- RHEL
- Ubuntu
In the case of RHEL, you must configure the password-auth and sshd files.
Password-auth
When updating the password-auth file located in the /etc/pam.d/password-auth directory, it is essential to ensure that the authentication rules are properly configured to support 1Kosmos 2FA. It is recommended to follow the guidelines suggested below:
-
You must not have any auth rule with a control flag set to sufficient or [...success=done...], as it will bypass any other PAM rules (such as 1Kosmos).
-
For any auth rule with the control flag set to sufficient, update it to [success=X default=ignore], where X represents the number of authentication rules that appear after the current rule in the file.
-
For any auth rule with the flag
[...success=done...], modify it to[success=X default=ignore], where X is the number of authentication rules below the current auth rule, in the same file. This change ensures that thepassword-authfile remains technically unchanged while still allowing 1Kosmos 2FA to work.For example, if the rule is
auth sufficient pam_sss.so forward_pass, and there are three additionalauthrules below it, the updated rule should be:
auth [success=3 default=ignore] pam_sss.so forward_pass -
Ensure that the last authentication rule,
pam_deny.so, has the control flag set to requisite.If the rule appears as,
auth required pam_deny.so, update it toauth requisite pam_deny.soBelow is an example of the
password-authfile before modification: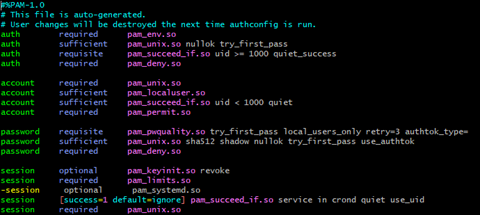
Below is an example of the
password-authfile after modification:
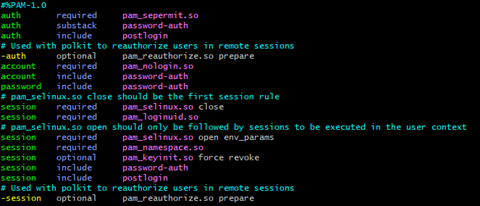
sshd Files
To modify the sshd file located in the /etc/pam.d/sshd directory, follow these steps:
- Add the
pam_blockId.soauthentication rule immediately after the primary authentication (typically password-auth by default) and set its control flag to requisite. - Modify the control flags of the PAM rules preceding
pam_blockId.soto ensure none of them have a control flag of sufficient or success=done. - If there is another PAM entry with a control flag of substack before
pam_blockId.so:- Change its control flag to include.
- Ensure it does not contain any authentication rules marked as sufficient or success=done (refer to the changes needed for
/etc/pam.d/password-auth).
A sample of the sshd file before modification.
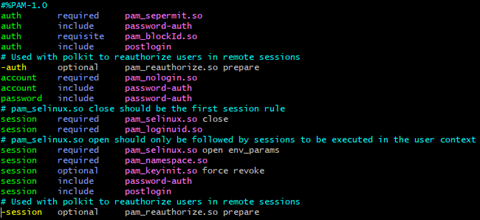
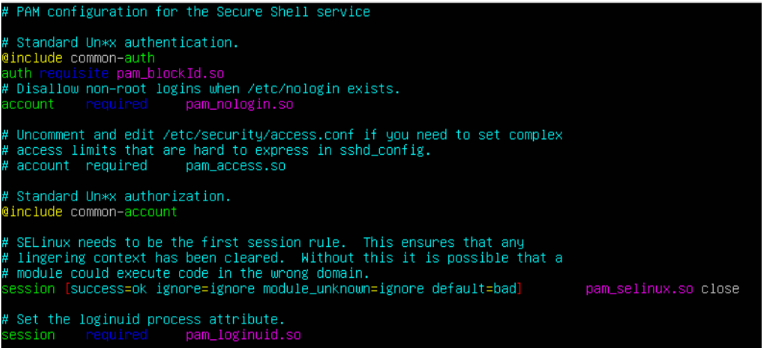
A sample of the sshd file after modification:
In case of Ubuntu, you must configure the sshd files.
sshd Files
- Navigate to the
/etc/pam.d/sshdfile. - Add the
pam_blockId.soauthentication rule after your primary authentication (typicallycommon-authby default) and set its control flag torequisite.
A sample of the sshd file before modification.
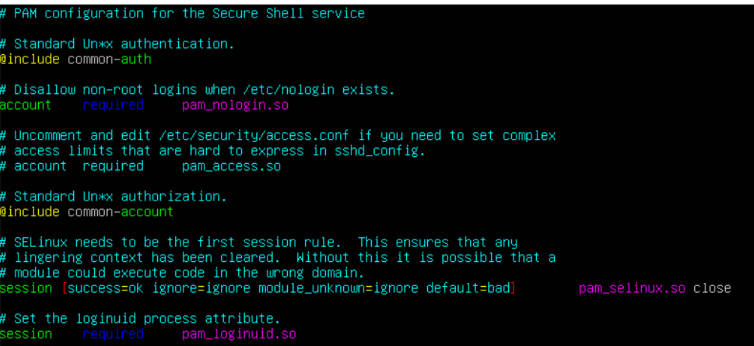
A sample of the sshd file before modification.
Configuring sshd_config File
The following table provides information on the flags that must be enabled for both RHEL and Ubuntu servers.
Add the following flags and their values to the sshd_config file located in the /etc/ssh/ directory:
| Flags | Value | Description |
|---|---|---|
ChallengeResponseAuthentication | yes | Specifies whether to allow keyboard-interactive authentication. |
KbdInteractiveAuthentication | yes | Deprecated alias for ChallengeResponseAuthentication. |
UsePAM | yes | Enables the Pluggable Authentication Module interface. |
MaxAuthTries | 1 | Defines the maximum allowable number of authentication attempts per connection. |
PubkeyAuthentication | no | Specifies whether public key authentication is permitted, with the default setting being yes. 1Kosmos advises turning off this feature since it allows users to bypass the authentication process when using public key authentication. |
Modifying 50-redhat.conf File
In addition to the above changes, edit the 50-redhat.conf file if it exists in the /etc/ssh/sshd_config.d directory. Comment the # ChallengeResponseAuthentication no directive.
Remember to restart the sshd service after modifying the sshd_config file for the changes to take effect. To restart the service, run the command service sshd restart.
Configuring Additional Permissions for SELinux
These permissions are required only for the RHEL server.
If your Linux host has been enabled with SELinux, additional permissions are needed for the 1Kosmos PAM to work as expected.
- To verify if
SELinuxhas been enabled, run thesestatuscommand. - Follow the below steps only if your Linux host has been enabled with SELinux.
-
Create and install a semodule to enable the necessary permissions for the 1Kosmos PAM module to function by following these steps:
-
Set SELinux to Permissive mode.
setenforce 0 -
Install the
policycoreutilspackage, which is required to create and install the SELinux module.sudo yum -y install policycoreutils-pythonIf you encounter a "package not found" error, use the alternative command:
sudo yum -y install policycoreutils-python-utils -
Open a new terminal window and connect the same host through
SSH. This connection is required to generate a log file for auditing in the next step.ssh <username>@ip> -
After establishing the connection, the audit logs for sshd are autogenerated highlighting the permissions required by the 1Kosmos 2FA module. Then, create a semodule from these logs.
sudo ausearch -c 'sshd' --raw | audit2allow -M BlockIDPAMThis command will create two files:
BlockIDPAM.teandBlockIDPAM.pp. -
Install the created semodule.
sudo semodule -i BlockIDPAM.pp -
Set SELinux back to Enforcing mode.
setenforce 1
-
Testing your Setup
Once the configuration is complete, 1Kosmos 2FA will be ready for use.
To test your 1Kosmos 2FA setup, simply SSH into the server configured with Linux:
ssh <username>@<ip address>
After entering the correct password, you will be presented with the 1Kosmos 2FA Login menu, as shown in the image below:
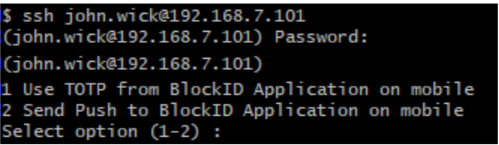
The 2FA options displayed will depend on the configurations set for the Linux CP Application on the cloud.
Using SSH Login for Linux
After installing the 1Kosmos PAM on your Linux host, users can log in through SSH. The following examples illustrate different scenarios of SSH login.
SSH Login via Push Notification
The Linux SSH Login agent enables push notifications as a login factor for Linux servers. The push notification is sent to the 1Kosmos mobile app, and the user must have their account enrolled.
Starting with Release v1.09.08, 1Kosmos introduced the number challenge feature for push notifications. This feature enhances security by defending against push bombing attacks. When enabled, users will see a number on the login screen and must select the corresponding number from three options displayed in the app when approving the push notification.
Enabling Number Challenge
To enable the number challenge for push notifications on the Linux SSH MFA agent, the administrator must perform the following steps:
-
Enable number challenge for push notification requests (this enables number challenge for push notifications across all apps) in the AdminX interface under Authentication > Passwordless Login > expand Passwordless Login using 1Kosmos App > Enable number challenge on all push notification requests.
-
Upgrade to 1Kosmos Linux SSH MFA v1.09.08 or greater.
How does the number challenge work?
For more information on number challenge, see the How does the Number Challenge Work? section in the Passwordless Login topic.
The table below summarizes how the behavior of push notifications changes when the setting is either enabled or disabled.
| Behavior | Number Challenge is enabled | Number Challenge is disabled |
|---|---|---|
| Interface on Windows | Number Challenge option appears 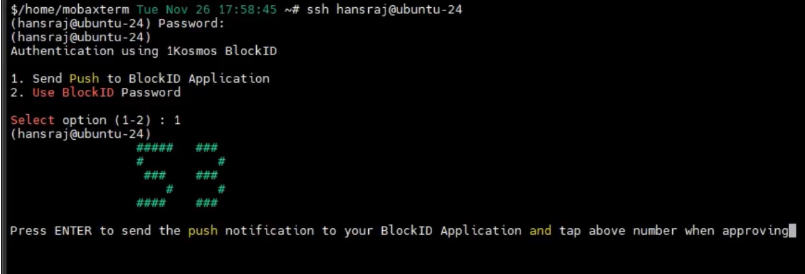 | Number challenge option does not appear 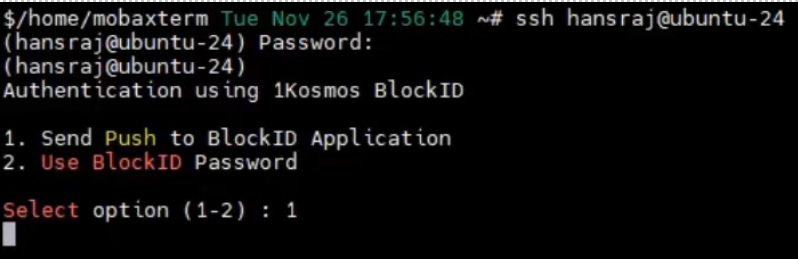 |
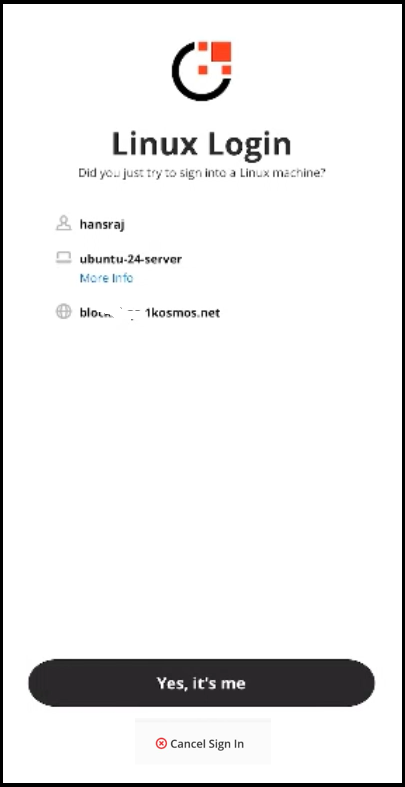
| Interface on mobile | Number Challenge screen appears 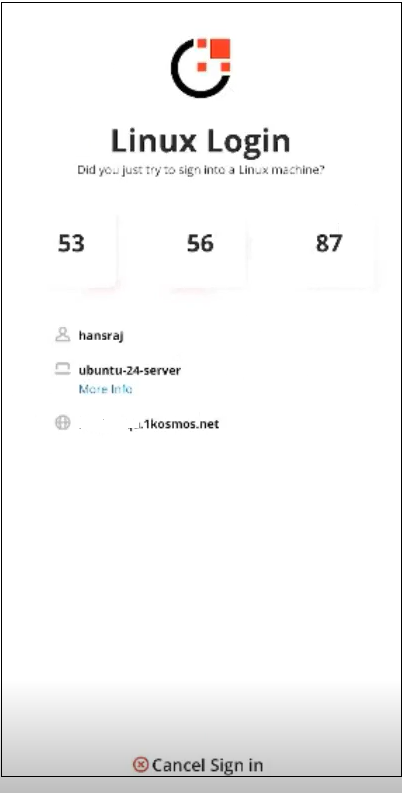 | Consent screen appears 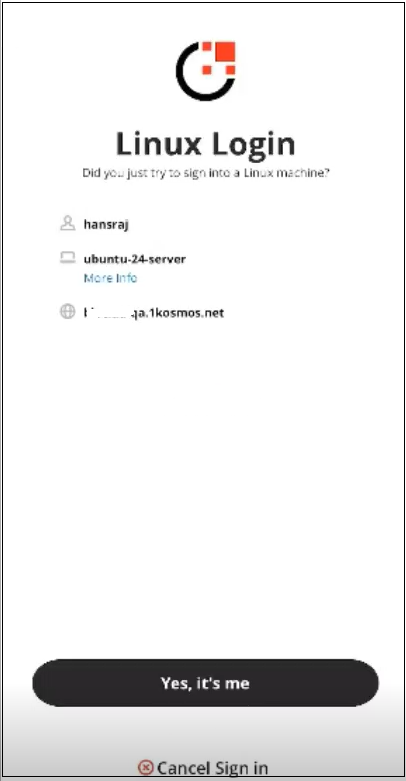 |
| User Action | - To approve the request, tap the correct number as seen on the Linux SSH prompt. - In case, if the user taps an incorrect number, the authentication is canceled. - If the user taps Cancel Sign In, their login request is abandoned. | To approve the request, tap Yes, it's me. - If user taps Cancel Sign In, their login request is abandoned. |
To log in using the number challenge, follow these steps:
-
On your client machine, connect to your Linux host using SSH.
-
When prompted, enter your password for first factor authentication.

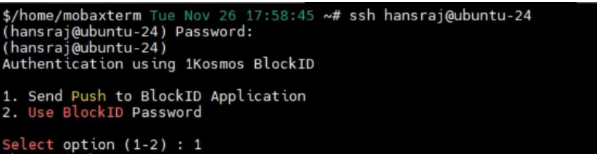
-
A menu will appear with available authentication methods. Select option 1 to send push notifications.
-
The Linux SSH screen displays a randomly generated number, and the mobile displays a set of challenge values.
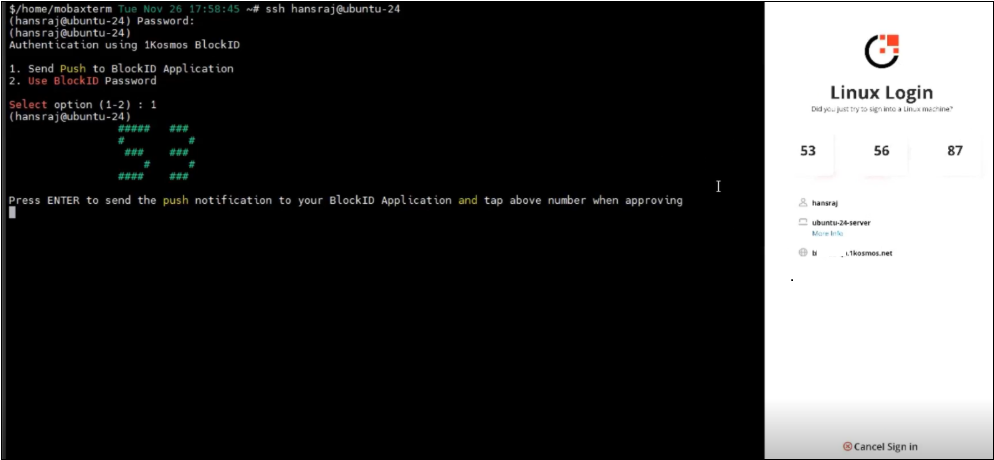
-
Tap the correct challenge value on the mobile.
-
After the successful authentication through push, the user logs onto their workstation.
SSH Login via OTP
-
On your client machine, connect to your Linux host using SSH. You will be prompted to enter OTP.

-
Open the 1Kosmos mobile application on your mobile device and note the six-digit Workstation OTP displayed (swipe left if you cannot see it).
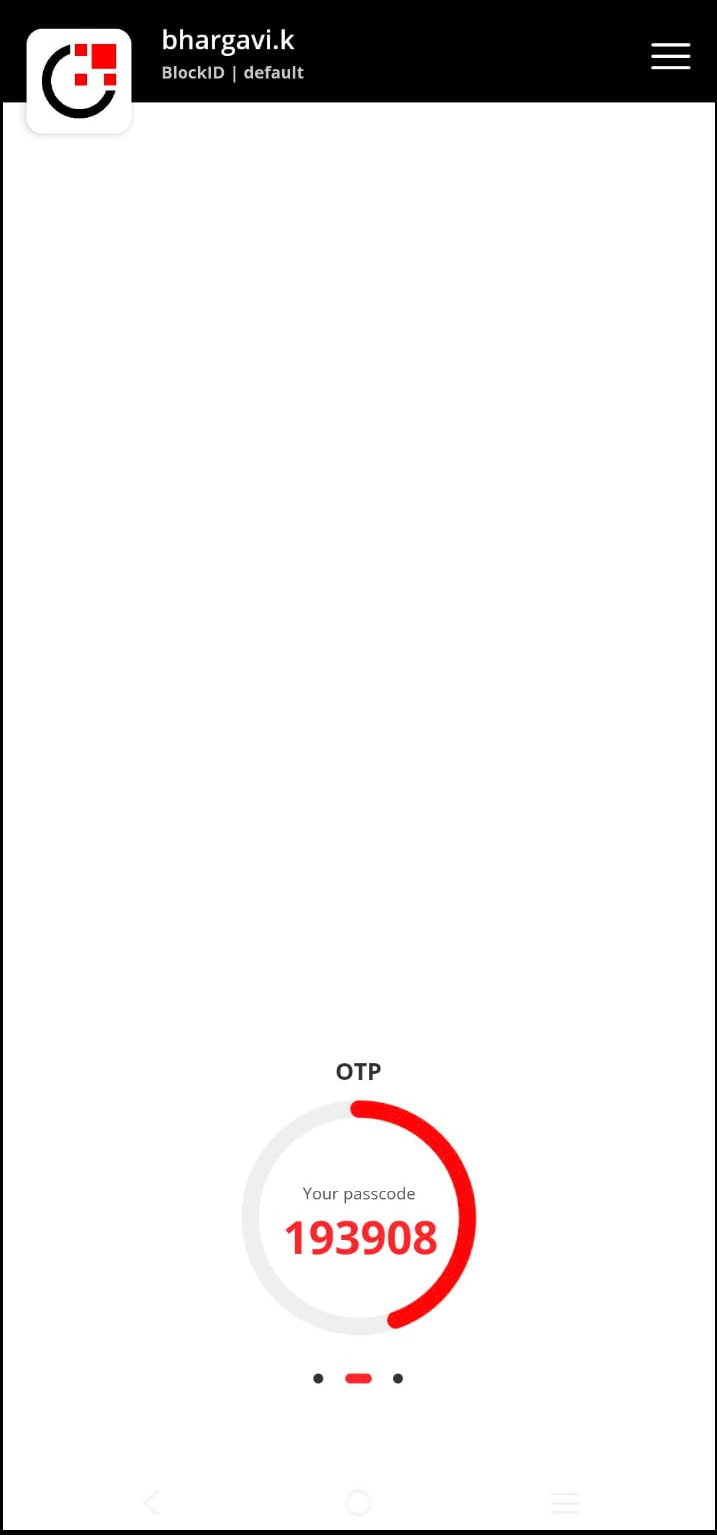
-
Enter the same six-digit Workstation OTP from your app and press
ENTER. If the OTP matches, you will be logged in to your Linux host.
SSH Login via QR
To login SSH through QR, follow these steps:
-
On your client machine, connect to your Linux host using SSH.
-
QR is displayed as option 3 on the terminal screen as shown below.
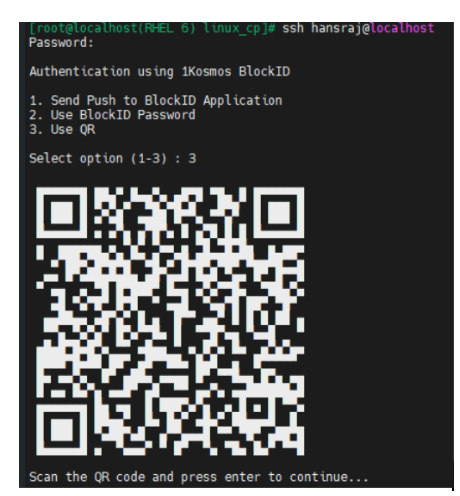
-
Use the 1Kosmos mobile app to scan the QR code and approve the authentiction request.
-
After approval, press Enter to continue.
-
Upon successful verification, you will be logged into the Linux host.
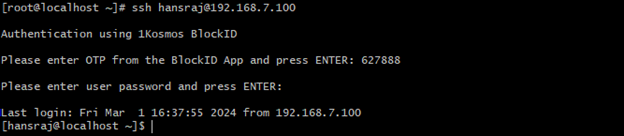
SSH Login via Password, OTP, and Push Notification
To login SSH through the password, 1Kosmos OTP, and push notification mechanism, follow these steps:
-
On your client machine, connect to your Linux host using SSH.
-
You will be prompted to enter a six-digit OTP.

-
Open the 1Kosmos mobile application on your mobile device and note the six-digit Workstation OTP displayed (swipe left if you cannot see it).

-
Enter the same six-digit Workstation OTP from your app and press
ENTER. -
On successful OTP validation, you will receive a push notification to the mobile device linked to your account.

-
Approve the request by clicking the notification.
-
On successful authentication of push notification using your enrolled biometrics, enter your 1Kosmos user password at the prompt and press
ENTER.
Once authentication is successful, you will be logged into your Linux host.
Managing Adaptive Auth Journey for Linux PAM
1Kosmos now offers the capability of providing possession on the user’s configured device during onboarding. You can now configure a new Adaptive Auth Journey for Linux PAM using the Linux PAM menu under Applications > Linux PAM on the AdminX interface to provide second or multi-factor authentication when logging into your Linux servers.
When you are configuring the journey, you can associate conditions and actions with username or groups. By default, the new adaptive auth journey is applicable for all users. However, you can add a condition in case the journey must be made applicable for a specific set of users or AD usergroups. The following actions can be configured as follows:
- Deny access: User is denied access by the Linux PAM.
- Grant access: User is granted access without prompting for any factors.
- MFA Required: User is granted access after they have authenticated with at least one of the allowed factors.
Creating Authentication Journey for Linux PAM
The community administrator can use the Adaptive Auth Journeys tab in the Linux PAM menu under Applications > Linux PAM on the AdminX interface.
To create a new adaptive auth journey, follow these steps:
-
Navigate to the Adaptive Auth Journeys section through the Linux PAM menu and click Add new adaptive auth journey. The Create New Adaptive Auth Journey page is displayed.

-
In the Journey Name field, enter a descriptive name for the journey and click the slider to enable or disable the journey.

-
In the Conditions section, click Add a condition to define a condition to whom this auth journey is applicable. You can apply this journey specific to a user or a usergroup.

The following table provides information on various conditions that can be set while configuring an adaptive auth journey:
Category Condition Action Groups - Is one of
- Is not one of
- contains
- Does not containClick the + icon to open the Add Groups window. Specify a group name and click Save.

Username - Is one of
- Is not one of
- contains
- Does not contain
- Starts with
- Does not start with
- Ends with
- Does not end with1. Click the + icon to open the Add Users window.
2. In the username field, enter the name of the user for whom the policy must be applied.
Note: Click +Add another to add one or more users for whom all this policy must be applied.

-
Select the appropriate action applicable for the journey. The following values are available to select:
- Grant access
- Deny access
- MFA Required
-
Click Save. The recently created journey is displayed on the Linux PAM list page.
Managing Actions on Linux PAM
The following table provides information on the actions that can be performed while configuring the adaptive authentication journey for Linux PAM.
| When you select ... | If conditions are matched... |
|---|---|
| Deny Access | Linux CP denies access to users and alerts them by displaying an error message on Linux PAM “Login failed due to max number of authentication attempts". |
| Grant Access | Linux CP grants access to users associated with service accounts and does not display any additional MFAs. It is recommended to use this option only if the 1Kosmos Linux PAM is used alongside LDAP PAM as this option will allow service accounts to locally authenticate with LDAP without any need of MFA. Note: If the grant access option is used exclusively with the 1Kosmos Linux PAM, then Linux accounts meeting this condition will authenticate with just the username, posing a significant security threat. |
| MFA Required | Linux PAM allows you to select the appropriate multi-factors to be displayed while performing the authentication. The following options are available to select: - Just Password : Select this option to display only the password field for the user during authentication. Post validation of the password, the user will be granted access to their system. - Push notification : Select this option to approve the push notification received in your mobile to complete the authentication. - 1Kosmos App Codes : Select this option to enter the six-digit code generated by the 1Kosmos app. - Any OTP : Select this option to enter the code received through the 1Kosmos authenticator such as mobile totp, email otp, sms otp, and phone otp. - SMS OTP : Select this option to authenticate into the system by entering the code received through SMS. Note : This option is available only if the mobile number is registered for the user. - Email OTP : Select this option to enter the OTP received through email to complete the authentication. Note: This option is available only if the email id is registered for the user. - Voice OTP : Select this option to enter the code received through the voice call. Note: This option is available only if the phone/landline number is registered for the user. - Password & Push notification : Select this option to first enter the password. Post its validation, approve the push notification received in your mobile to access the system. - Password & 1Kosmos App Codes : Select this option to first enter the password. Post its validation, enter the code received through the 1Kosmos app. - Password & any OTP : Select this option to first enter the password. Post its validation, enter the code received through the 1Kosmos authenticator such as mobile totp, email otp, sms otp, and phone otp. - Password & SMS OTP : Select this option to first enter the password. Post its validation, enter the OTP received through SMS to complete the authentication. If the phone number is not configured for the user, then Linux PAM will not display the SMS OTP option to the user. - Password & Email OTP : Select this option to first enter the password. Post its validation, enter the OTP received through the email to complete the authentication. Note: If the email address is not configured for the user, then Linux PAM will not display this option to the user. - Password & Voice OTP : Select this option to first enter the password. Post its validation, enter the OTP received through the voice call to complete the authentication. |
Deleting Authentication Journey
The community administrator can delete an authentication journey from the Adaptive Auth Journeys section of the Linux PAM list page.
To delete an authentication journey, follow these steps:
- Navigate to the Linux PAM page under Applications > Linux PAM menu of the AdminX interface.
- Click the delete icon inline with the rule that you want to delete. The AdminX interface displays a message on the successful deletion of the authentication journey.
Troubleshooting SSH Login for Linux
Troubleshooting Logs
Users facing any issues logging in with 1Kosmos PAM can troubleshoot the problem by checking their system logs.
-
First, check the 1Kosmos PAM logs created in
/var/log/blockId/blockId.logand look for error messages. -
If the issue can't be solved from the 1Kosmos logs above, check the system SSHD logs using the following command:
journalctl -t sshd -r
- If needed, read selinux audit logs for any SELinux issues
ausearch -m avc -ts recent
Useful Commands
-
To verify if the
sshdservice is running, use the command:systemctl status sshd -
Stop the sshd service:
systemctl stop sshd -
Start the sshd service:
systemctl start sshd -
Restart the sshd service:
systemctl restart sshd -
Check SELinux status:
sestatus -
Disable SELinux for the active session:
setenforce 0orsetenforce Permissive -
Enable SELinux for the active session:
setenforce 1orsetenforce Enforcing
Uninstalling 1Kosmos Linux PAM
To uninstall the 1Kosmos Linux PAM, run the following command:
sudo /opt/BlockId/bin/BlockIDUninstall.sh
Before proceeding with the uninstallation of 1Kosmos, the administrator must undo any manual configuration changes made during the installation process.