Passwordless Login for Shared Account
Overview
1Kosmos has extended its passwordless login capability for shared accounts, which will be available for deployment across shared workstations.
Shared accounts refer to accounts that multiple employees use within an organization. For example, shared accounts in a factory assembly line enable employees to perform specific tasks collaboratively. Other examples include:
- A shared computer with a legacy common login used by multiple employees.
- A generic company email account monitored by different employees in rotating shifts.
- Shop floor computers are set to kiosk mode, allowing different shifts of employees to access them at various times.
- An online tool or desktop application that restricts access to a single login account.
The problem with shared accounts is that there needs to be visibility into which employee is using the shared account thereby causing a lack of traceability. Also, there is a security risk around sharing credentials for shared accounts. Implementing this shared account feature enhances collaboration, streamlines workflows, and improves efficiency across shared workstations in organizations.
The key features and benefits of the shared account login functionality eliminate the need to manually share credentials.
- Improved Security – 1Kosmos replaces the manual sharing of passwords for shared accounts with a mechanism that verifies the primary user's identity through biometric authentication. This approach eliminates the risks of password sharing, ensures individual accountability, and safeguards critical operational assets from unauthorized access.
- Enhanced User Experience – As username passwords are retrieved from a credential vault, manual intervention in maintaining passwords has been eliminated, providing a seamless, user-friendly experience for employees.
- Comprehensive Auditing and Compliance – Biometric authentication establishes a detailed audit trail, allowing for better tracking of user activity and ensuring compliance with security policies and regulations.
Shared Account Login Workflow
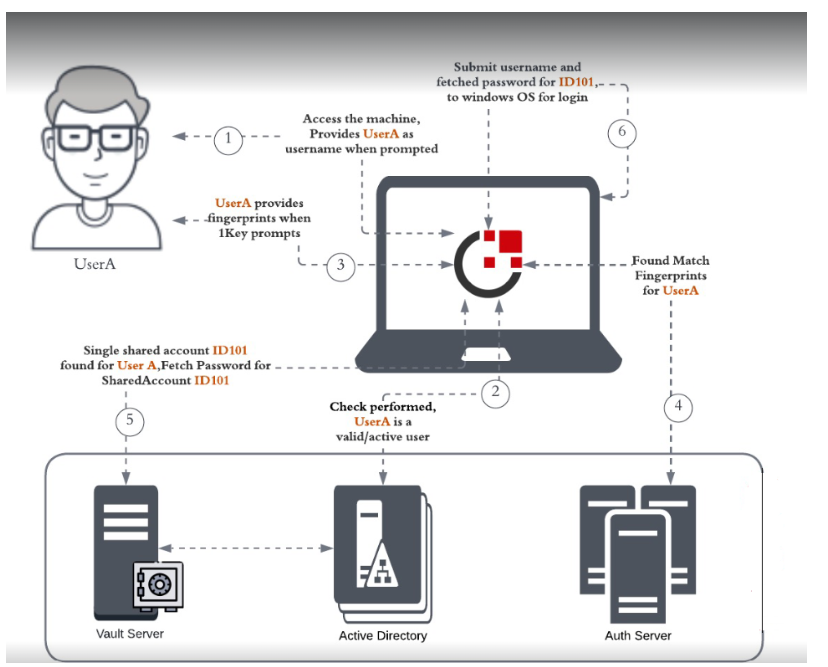
The primary user authenticates themselves using 1Kosmos’ 1Key on a shared workstation, where the user is authenticated using their fingerprint. After successful authentication, the Windows Workstation MFA agent displays the list of shared accounts the user is authorized to access. Once a shared account is selected, its credentials are fetched from the credential vault (currently supported through CyberArk) and the shared account gains access to the workstation.
The following workflow diagram illustrates how the Windows Workstation MFA agent displays the shared account(s) associated with a user.
Managing Shared Account Authorization Table
1Kosmos manages a shared account authorization table that records the accounts authorized for each user. When a user authenticates through the Windows Workstation MFA agent, the system retrieves the relevant shared accounts and displays them on the login screen for quick and secure access.
For more information on setting up the mapping agent in your shared workstation, reach out to your 1kosmos customer representative.
Managing Vault Details
The vault connection details need to be configured in the Windows Workstation MFA agent registry on the shared workstation.
Registry Path:
HKEY_LOCAL_MACHINE\SOFTWARE\Microsoft\Windows\CurrentVersion\Authentication\Credential Providers\{90576E81-DDF8-4E8E-91E2-CA3A9CE52410}
The following table illustrates sample values:
| Registry Key | Registry Type | Registry Sample Value |
|---|---|---|
| VaultUrl | REG_SZ | sample.privilegecloud.cyberark.com |
| VaultUser | REG_SZ | svc_account |
| VaultUserCredential | REG_SZ | Pa$$worD101# |
The registry can be updated either through the SCCM / GPO by the organization or via the BlockIDInstaller.bat script using the -configure directive. For more information, see Automatic Installation of the Windows Workstation MFA Agent.
CyberArk Proxy Login Using Shared Accounts
An on-prem CyberArk Proxy component can be deployed to have a centralized connection to CyberArk and increase the throughput. This component manages connections to CyberArk, offloading direct API calls from individual workstations. Acting as a single-session proxy, it centralizes credential requests from all MFA agents. This new architecture provides:
- A single active session with CyberArk
- Improved throughput and reliability
- Elimination of service account lockouts
System Requirements
- WINDOWS
- LINUX/DARWIN
- Windows Server 2016 or above
- 2 CPU cores or more
- 8 GB RAM or above
- Server class OS
- RAM - 4 GB (Minimum)
- 2 CPU cores or more
Benefits of Using PAM Proxy Component
- The component is capable of handling higher concurrency.
- If multiple service accounts are configured to be used for connections, the proxy automatically selects accounts in a cyclic manner whenever the session expires.
- The proxy component optimizes transaction handling, enabling the system to process a greater volume of transactions concurrently.
Configuring the PAM Proxy
Configuring the CyberArk Proxy for Windows involves the following steps:
Step 1: Installing the CyberArk Proxy Component
Step 2: Configuring the Adaptive Authentication Journey
Step 3: Configuring CyberArk Proxy Connection Details
Step 1: Installing the PAM Proxy Component on Windows
-
Open your powershell terminal and change the directory to where you have unzipped PAM Proxy contents.
-
Run the following command to start the CyberArk Proxy service.
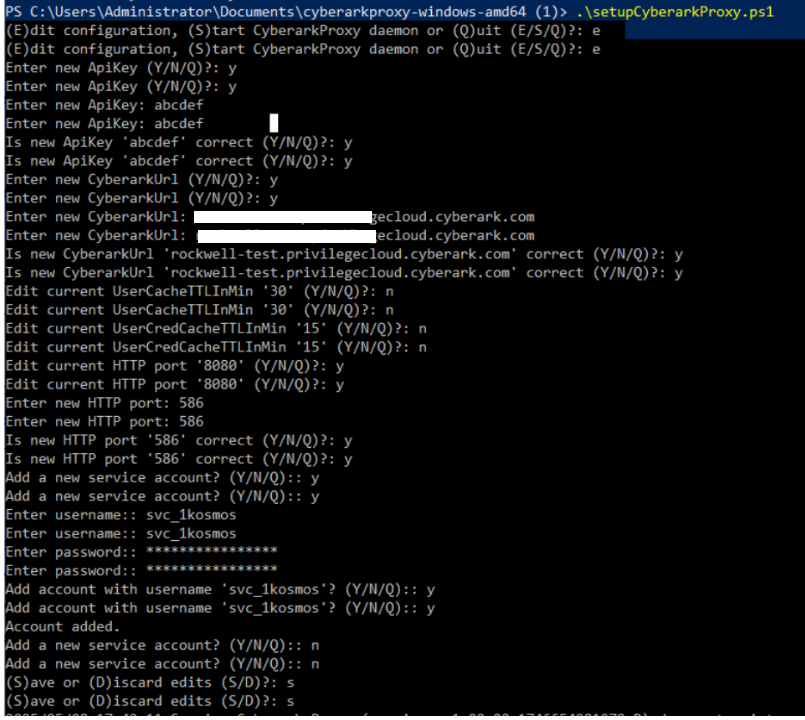
.\setupCyberarkProxy.ps1 -
Follow the on-screen instructions to configure CyberArk Proxy service.
-
Press E to edit the following configuration details. An example is shown below:
- ApiKey - Any string is accepted, and the same key must be configured at the Windows MFA Agent.
- CyberArkUrl - Provide a correct CyberArk URL.
- HTTP port - Provide a HTTP port that is currently not in use.
- Username - Provide the service account username.
- Password - Provide the service account password.
note- You can provide one or more service accounts.
- Re-running the setup script and modifying the service account details will reset all previously saved service accounts, requiring them to be re-entered.
- User Cache TTL: Specifies the duration (in minutes) for caching the shared account username. The value must be set to 1 or higher; a value of 0 is not allowed.
- User Cred Cache TTL: Specifies the duration (in minutes) for caching the shared account credential. The value must be set to 1 or higher; a value of 0 is not allowed.
-
The CyberArk Proxy setup is complete.
Step 2: Configuring the Adaptive Authentication Journey
-
Log in to your tenant as a community administrator.
-
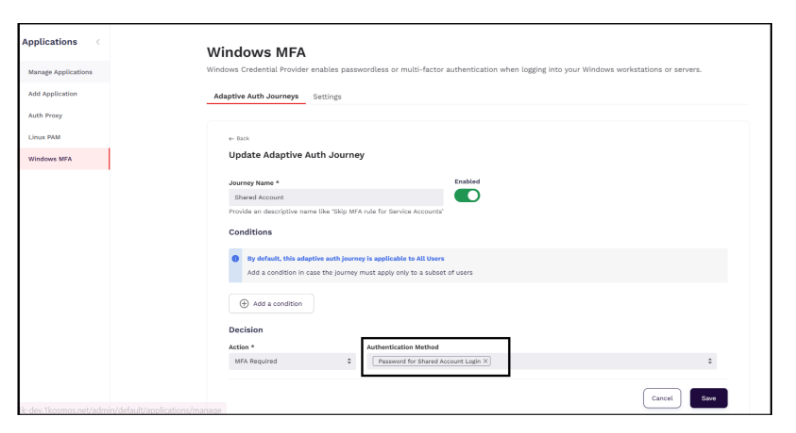
Navigate to Applications > Windows MFA > Add new adaptive auth journey.
-
Add the journey details by providing the user group to shared account logins and select the Authentication Method as FIDO for Shared Account Login.
-
Click Save.

Step 3: Configuring PAM Proxy Connection Details in Windows MFA Agent
You must configure the connection details of PAM Proxy in the registry of the Windows Workstation MFA Agent.
Registry Path:
HKEY_LOCAL_MACHINE\SOFTWARE\Microsoft\Windows\CurrentVersion\Authentication\Credential Providers\{90576E81-DDF8-4E8E-91E2-CA3A9CE52410}
The following table illustrates sample values of the Registry.
| Registry Key | Registry Type | Registry Sample Value | Remark |
|---|---|---|---|
| VaultProxyUrl | REG_SZ | http://192.168.23.131:8888 | Need to provide a protocol (http/https). IMP: If protocol is not provided, it will be set as http:// |
| VaultProxyApiKey | REG_SZ | <any string> | Provide the same apiKey as provided during installation of Cyberark Proxy. |
You can update the registry through SCCM / GPO policy by the organization OR can be handled through the BlockIDInstaller.bat script with -configure directive. For more information, see the Automatic Installation of the Windows Workstation MFA Agent section in the Windows Workstation MFA Agent.
Removing the PAM Proxy Service on Windows
Before removing the PAM Proxy service, you must stop the service.
To stop the service,
- Press the Windows key + R to open the Run dialog box.
- Type services. ...
- Find the CyberArk Proxy service and double-click on it.
- In the Properties window, click on the "Stop" button to stop the service if it is currently running.
To remove the service,
-
Open your powershell.
-
Go to the directory where the CyberArk Proxy folder is present.
-
Run the command as follows:
\removeService.ps1
Managing Credentials in the Vault
Organizations manage shared account credentials through their vault that stores them in a centralized encrypted vault. This approach prevents organizations from manually sharing passwords for shared accounts as they are directly retrieved from the server and helps in a smooth login process on the shared workstations.
Enabling Password Authentication for Shared Accounts
In the current implementation, users who decline biometric consent have no alternative method to authenticate Shared Workstations. Starting with Release v2.1.5.0, a new backup authentication option has been introduced that allows users to sign in using their primary account password instead of FIDO. After successful password authentication, users are presented with the same list of shared accounts and can select an account to log into the workstation.
To enable this capability, a new authentication method — “Password for Shared Account Login” — has been added under Windows MFA in the AdminX interface. When configured, users are prompted to enter their password as the primary authentication step, after which the shared accounts are displayed for selection.
To log into the workstation using Shared Account, follow these steps:
-
On the login screen, select a user tile and click Sign-in options.
-
Click the BlockId option.
-
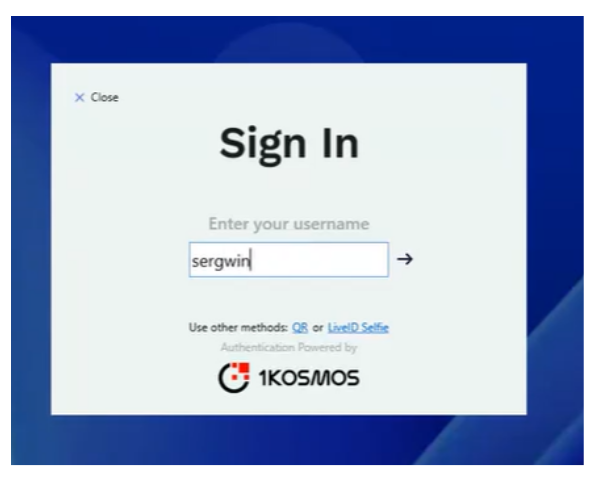
In the Sign In – Enter your username screen, enter your username and press Enter.
-
In the Sign In – Choose an authentication method screen, select Password.
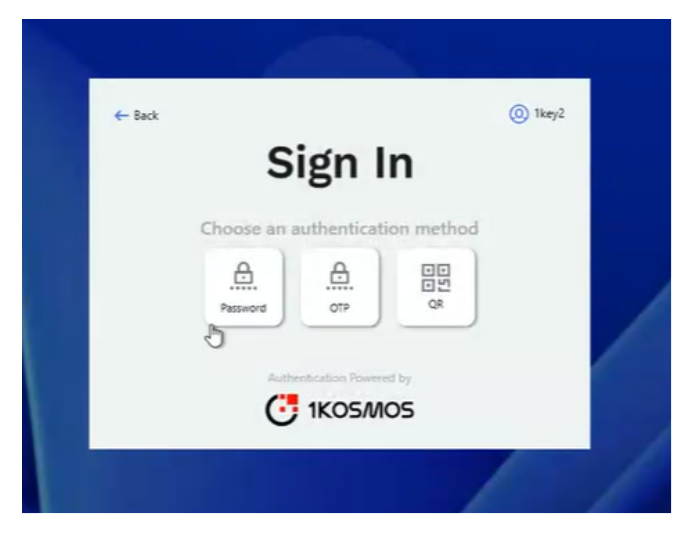
-
Enter your password and press Enter.
-
After successful authentication, select a shared account.

-
Once the password for the selected shared account is fetched from CyberArk, you will be logged in to the workstation.
Authenticating Authorized Shared Accounts
Ensure that the Windows Workstation MFA agent is installed on shared workstations and biometrics are enrolled on 1Key to enable authentication for shared account logins.
To access the shared account, follow these steps:
- In the login screen, click the Other User tile and select the BlockID option.
- Enter the username and click Submit.
- The user will be prompted to insert their 1Key device if it is not already inserted.
The user will be prompted to provide biometric authentication through their registered finger. - Select the appropriate shared account from the list of authorized shared accounts.
- After selecting a shared account, its corresponding credentials are automatically fetched from the vault and submitted to the OS for validation. The user has successfully logged into the workstation through their shared account.
Sample Video
Here is a sample video: