OIDC Application Integrations
Overview
OpenID Connect (OIDC) is an industry-standard authentication layer built on top of the OAuth 2.0 authorization protocol. The OAuth 2.0 protocol provides security through scoped access tokens, and OIDC provides user federation and single sign-on functionality. Within the OIDC workflow, 1Kosmos can act as both the Identity Provider (IdP) or as the Service Provider (SP), depending on the use case.
An OpenID Connect (OIDC) app integration provides identity federation after a user has been deemed authorized via one of the various OAuth 2.0 protocol flows supported by 1Kosmos. OIDC is used by a relying (receiving) party to verify end-user identity and obtain specific user information subject to consent granted by that same end-user.
For detailed information about the OpenID Connect Foundation and to review the full protocol specification, see Welcome to OpenID Connect.
1Kosmos as Identity Provider
1Kosmos can integrate with OIDC applications by acting as an IdP that provides single sign-on (SSO) to external applications.
-
The user requests access to a client application.
-
The application delegates the user authentication and redirects the user to 1Kosmos for authentication. The application requests a token from 1Kosmos to establish the user session.
-
Acting as the IdP, 1Kosmos uses Multi-Factor Authentication (MFA) to authenticate the user. 1Kosmos verifies the user and, if successful, prompts the user to grant access to the application.
-
If the user grants access, 1Kosmos generates an ID token containing the user identity information that the application can access.
-
1Kosmos returns the authenticated user to the application.
1Kosmos as Service Provider
1Kosmos can also serve as the SP, where it consumes single sign-on authentication from other SSO solutions like ForgeRock, Okta, IBM Tivoli Access Manager, Oracle Access Manager, or CA SiteMinder, for example.
In this scenario, if a user tries to sign in to 1Kosmos, they are redirected to an external IdP for authentication. After the user has successfully authenticated, the external IdP returns the OIDC token, which is then passed through the user's browser to access the application.
-
The user opens 1Kosmos in a browser to sign in to their cloud or on-premises app integrations.
-
1Kosmos acts as the SP and delegates the user authentication to the external IP.
-
The external IdP acts as an authorization server for 1Kosmos.
-
The IdP authenticates the user and sends an ID token back to 1Kosmos.
-
1Kosmos validates the OIDC token from the external IdP and, if necessary, enforces MFA for user authentication.
1Kosmos will soon support Just In Time provisioning of users based on the information passed in their identity token (coming soon).
Privacy by Design - User Consent
User Consent for OAuth 2.0 and OpenID Connect Flows
Users have to give their explicit permission to allow 1Kosmos to share their profile information with relying parties. Consent grants are persisted on the 1Kosmos platform. When an application needs to get a new access token, it doesn't need to prompt the user for consent if they've already consented to the specified scopes. Consent grants remain valid until the user manually revokes them or until the user, integration, authorization server, or scope is deactivated or deleted.
OIDC Integration in AdminX
Add a New OIDC Application Client
Adding an OIDC integration in AdminX is simple and straightforward, with a streamlined process for adding all the necessary configuration options.
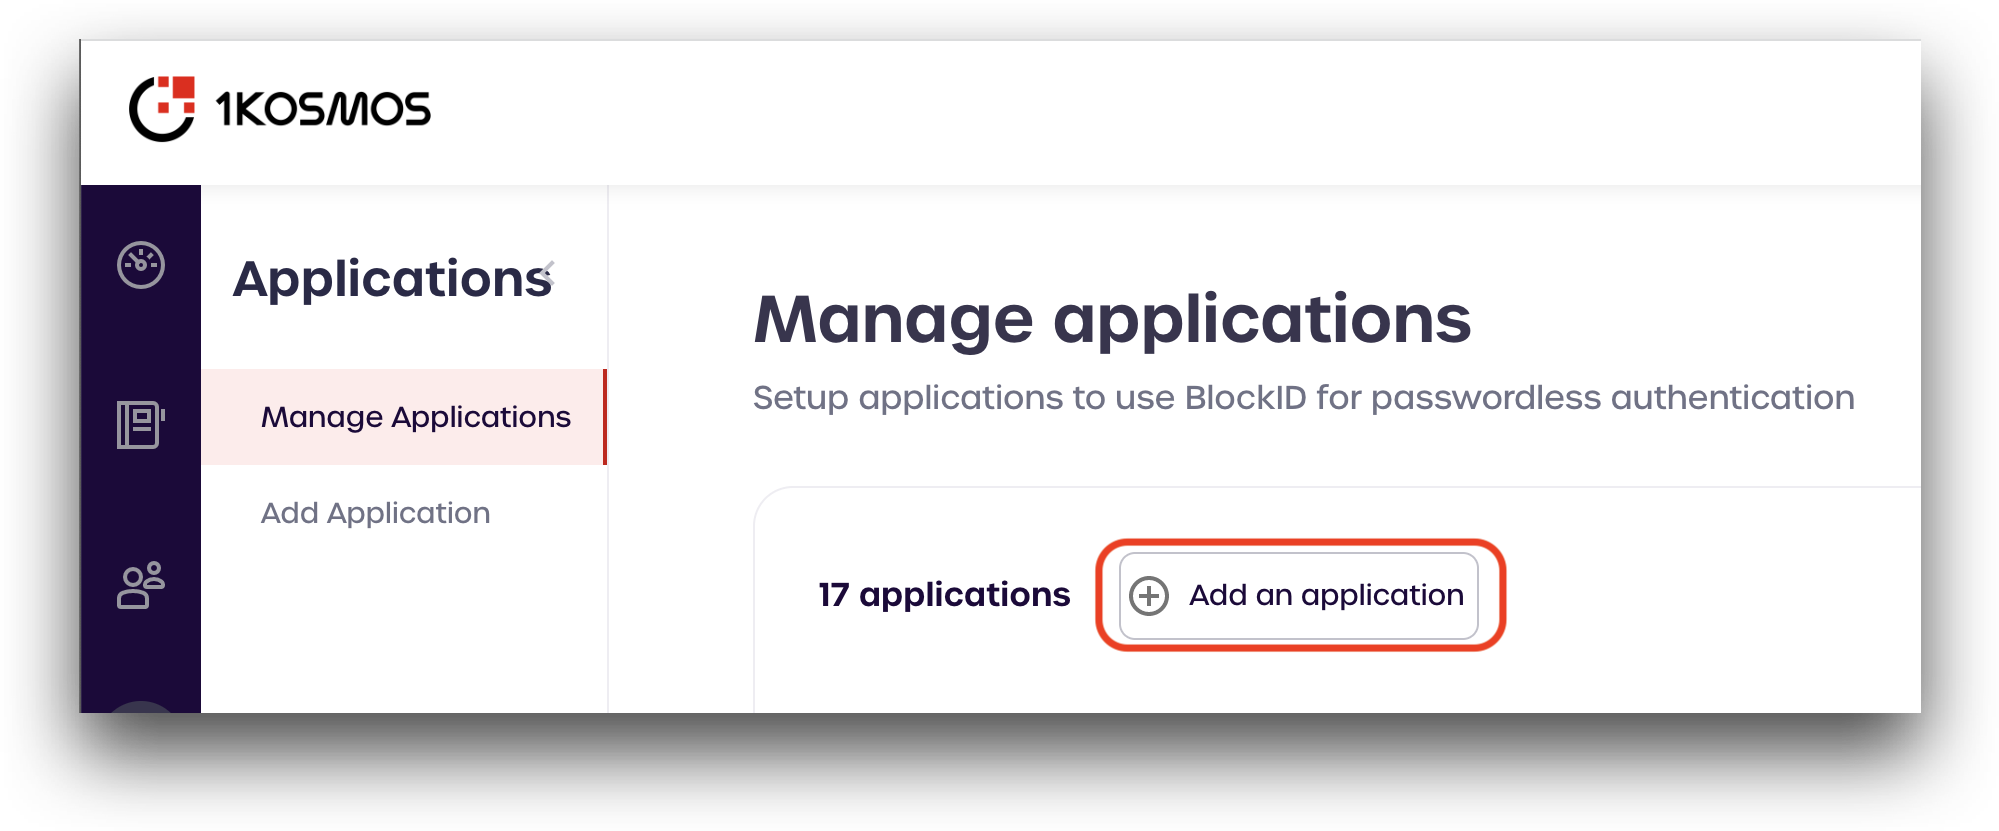
To get started, navigate to your AdminX control panel and log in as a tenant or community administrator.
Navigate to the Applications page. Click Add Application.
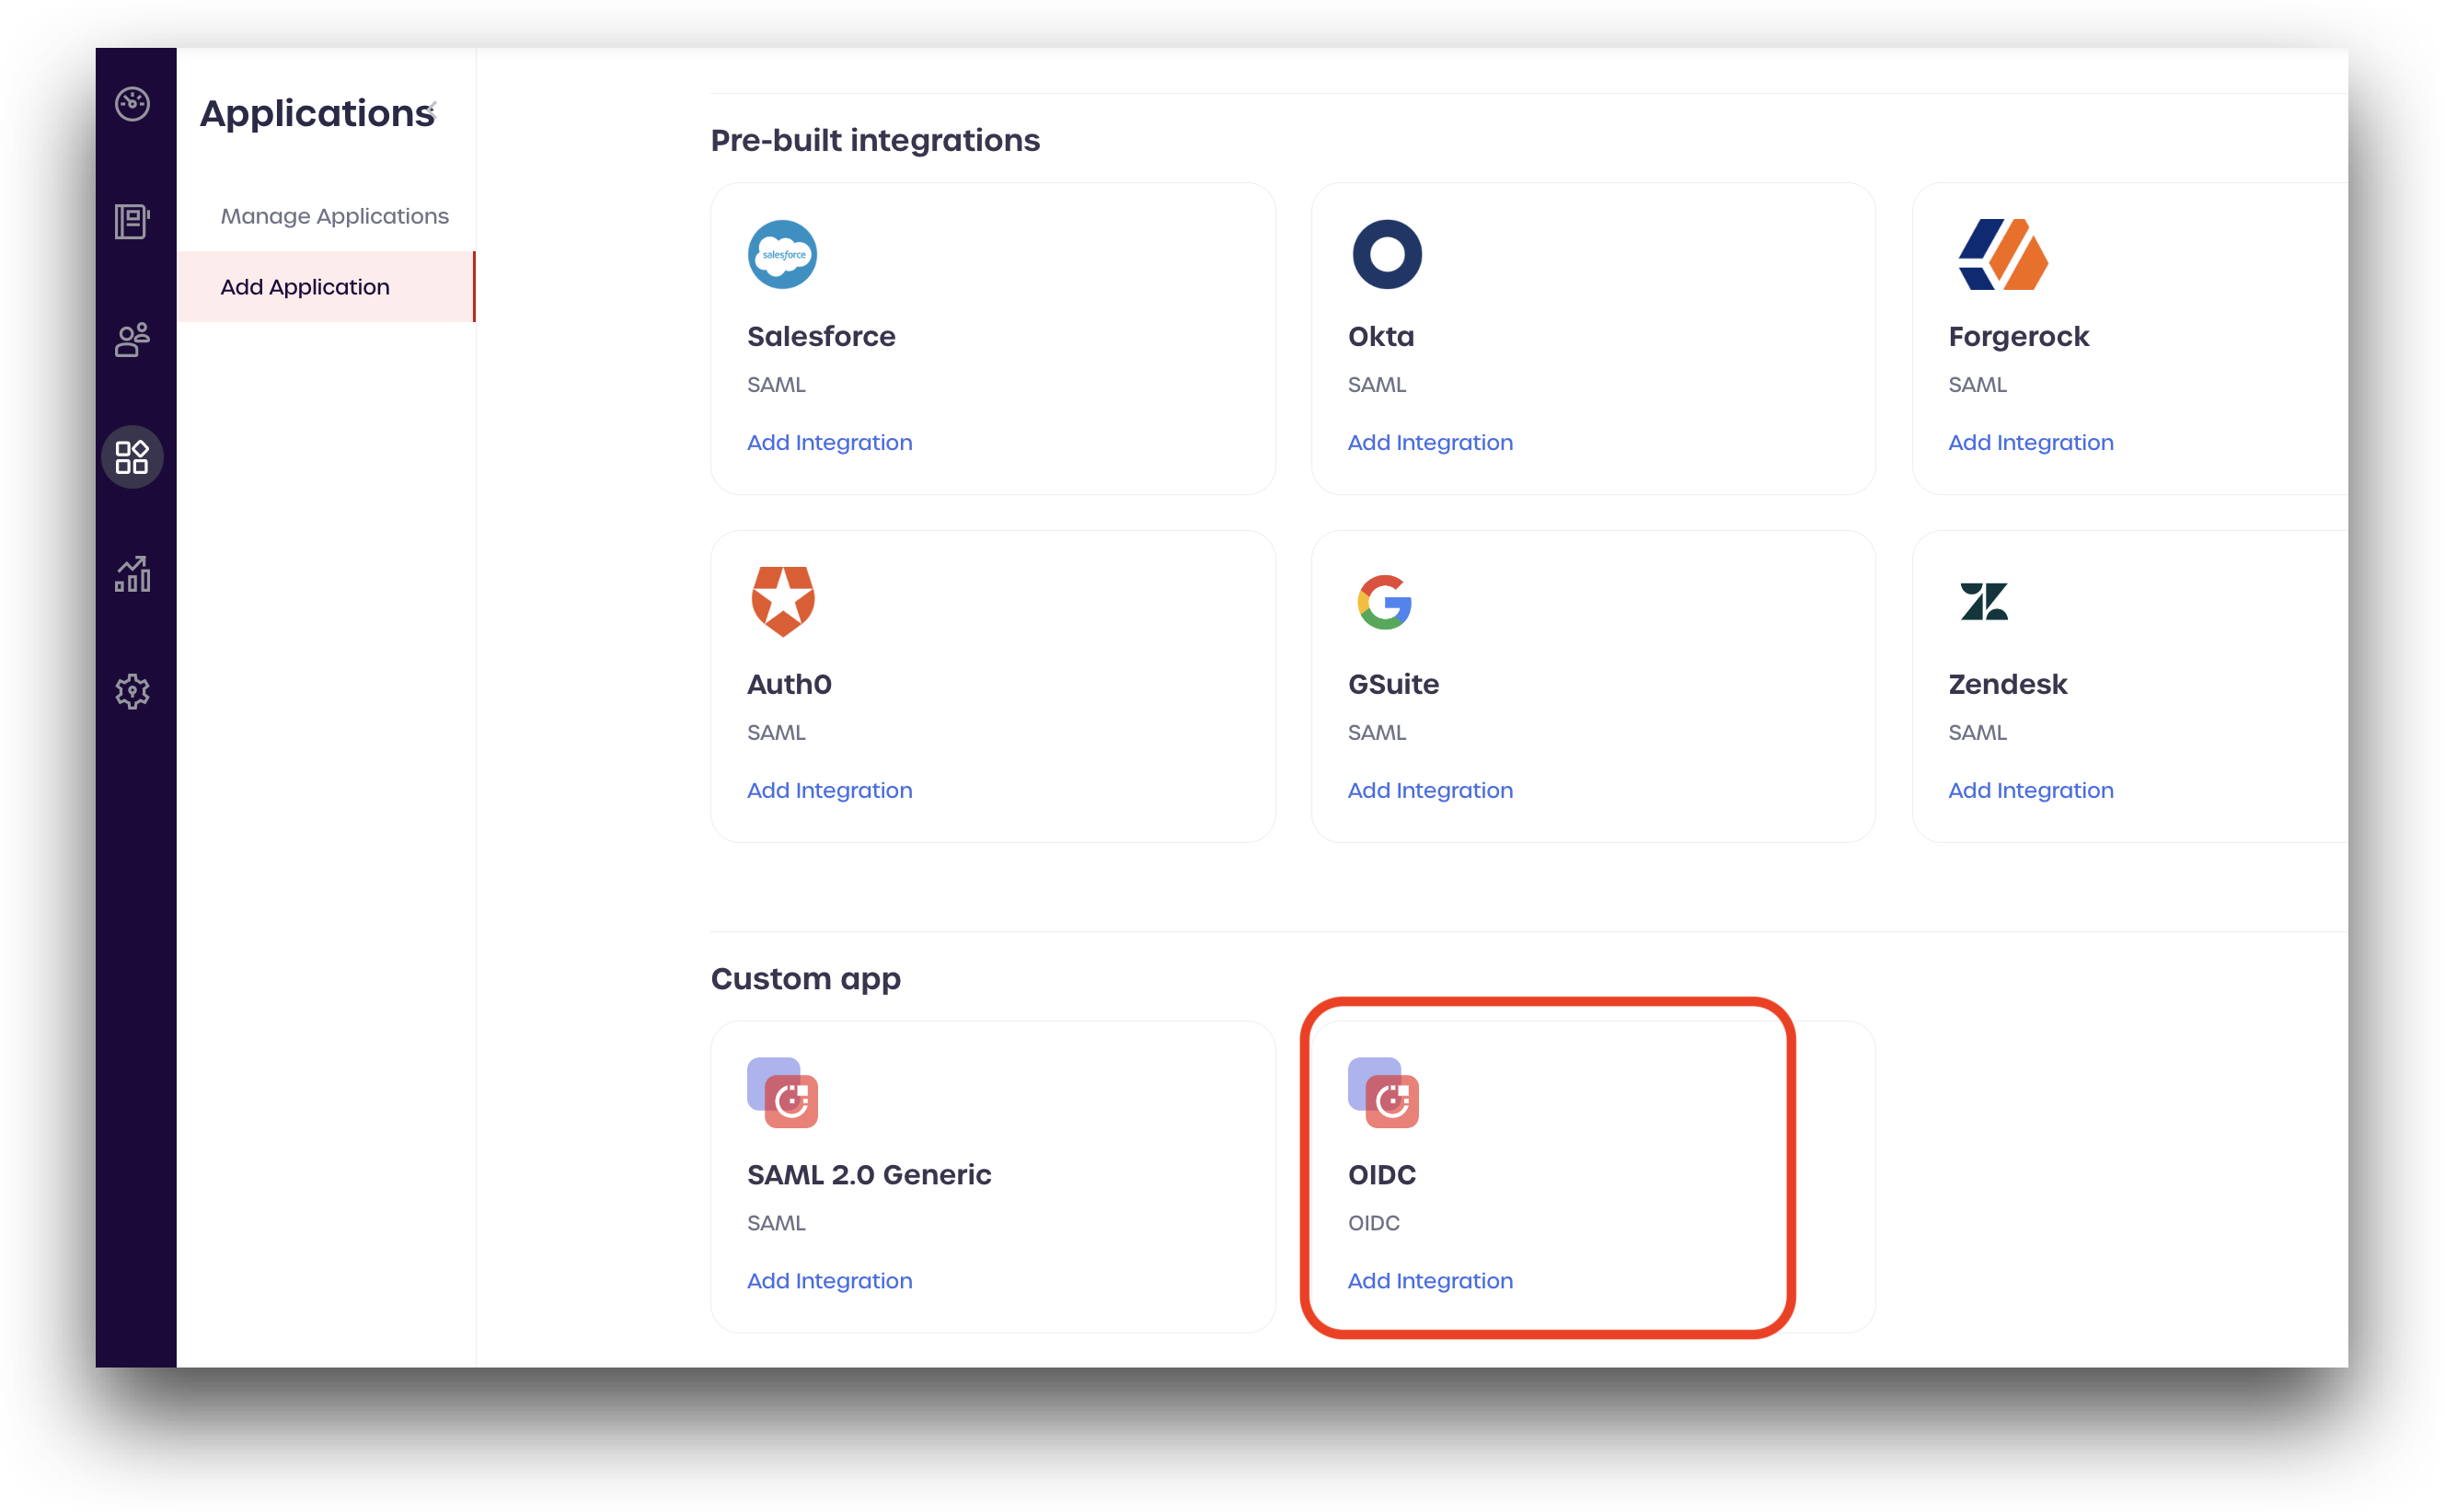
From the Add new applications page, scroll down to the OIDC (located in the Custom app section) and click Add Integration.
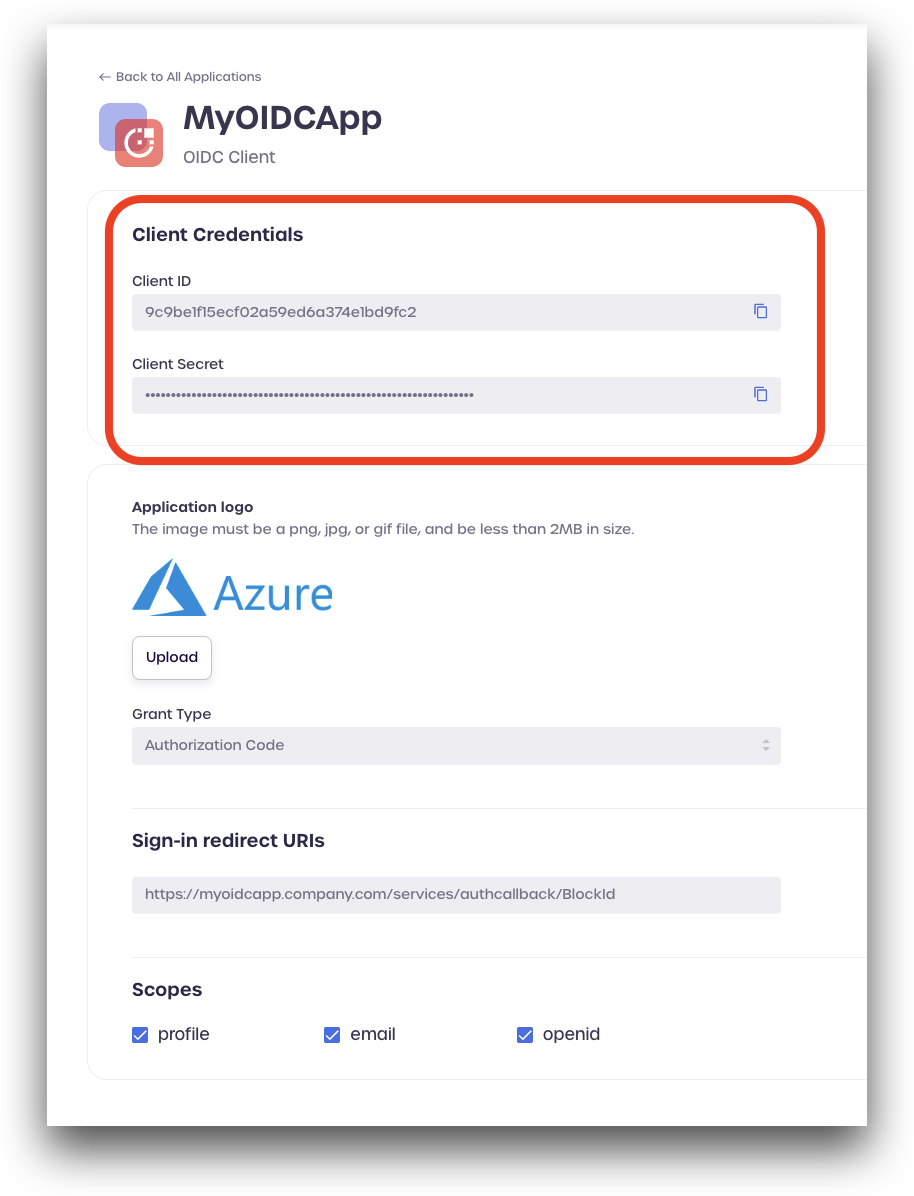
Enter an application name, and upload a logo file (<2MB in size).
For Grant Type, select Authorization Code from the dropdown menu.
Provide the sign-in redirect URI for your OIDC provider. You can add additional URIs as needed.
Finally, review the Scopes. For this example, we are leaving all the boxes checked.
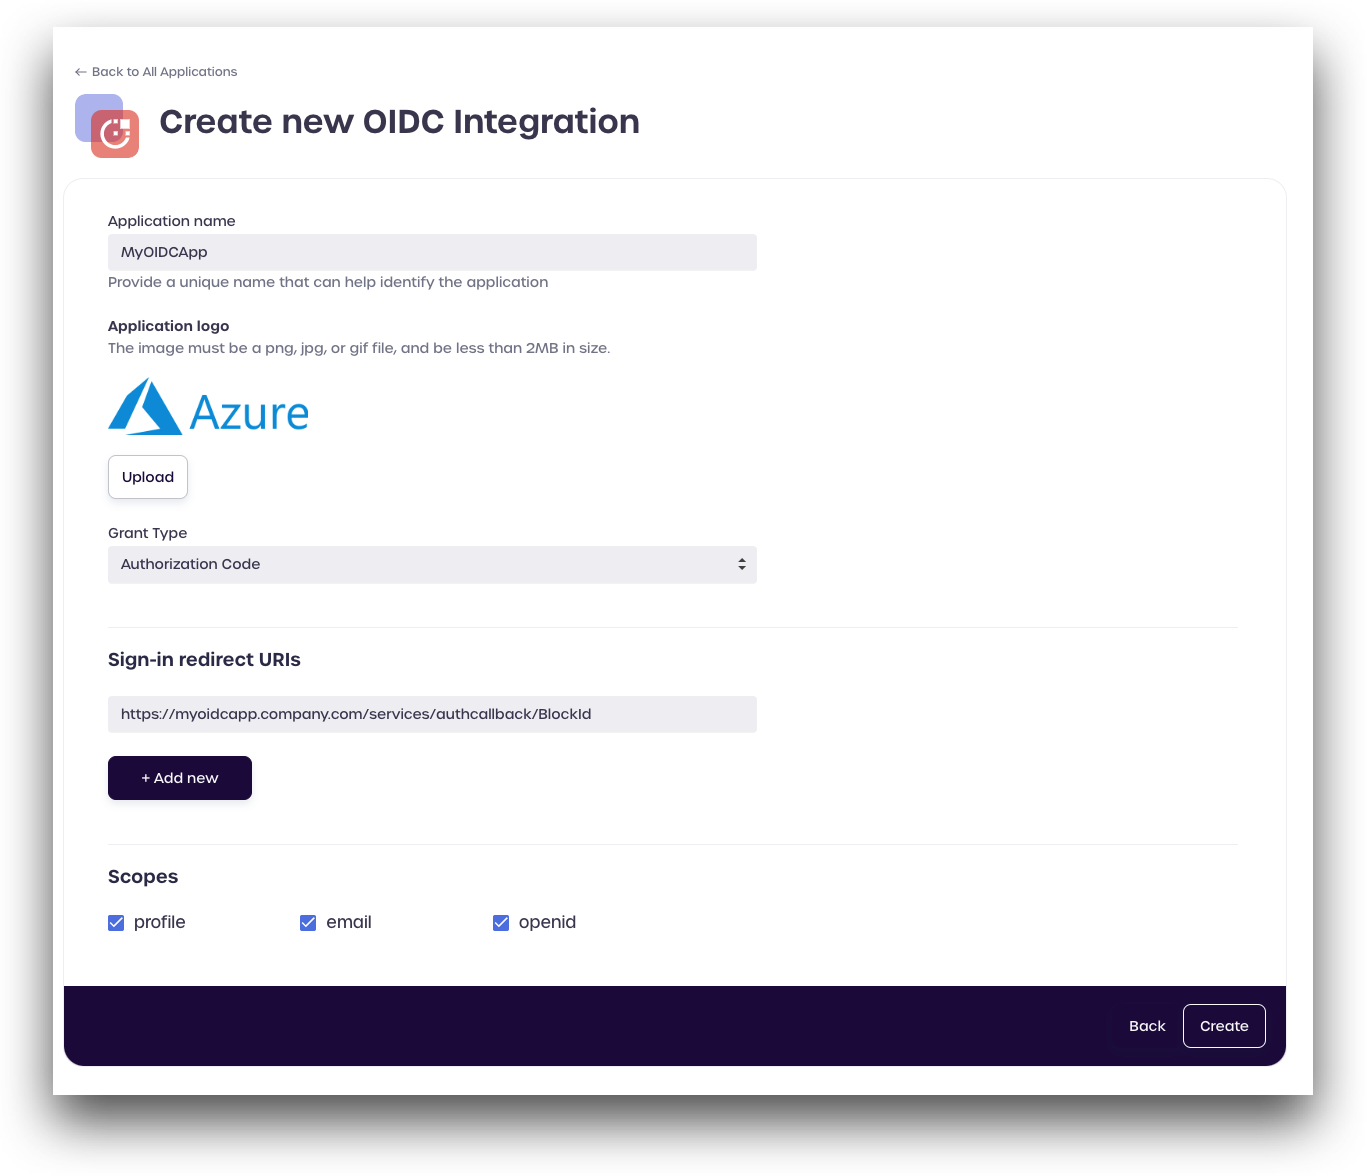
After reviewing all your information, click Create.
AdminX will automatically assign a Client ID and Client Secret to your new OIDC application client.
Configure OAuth2 and OIDC Community settings
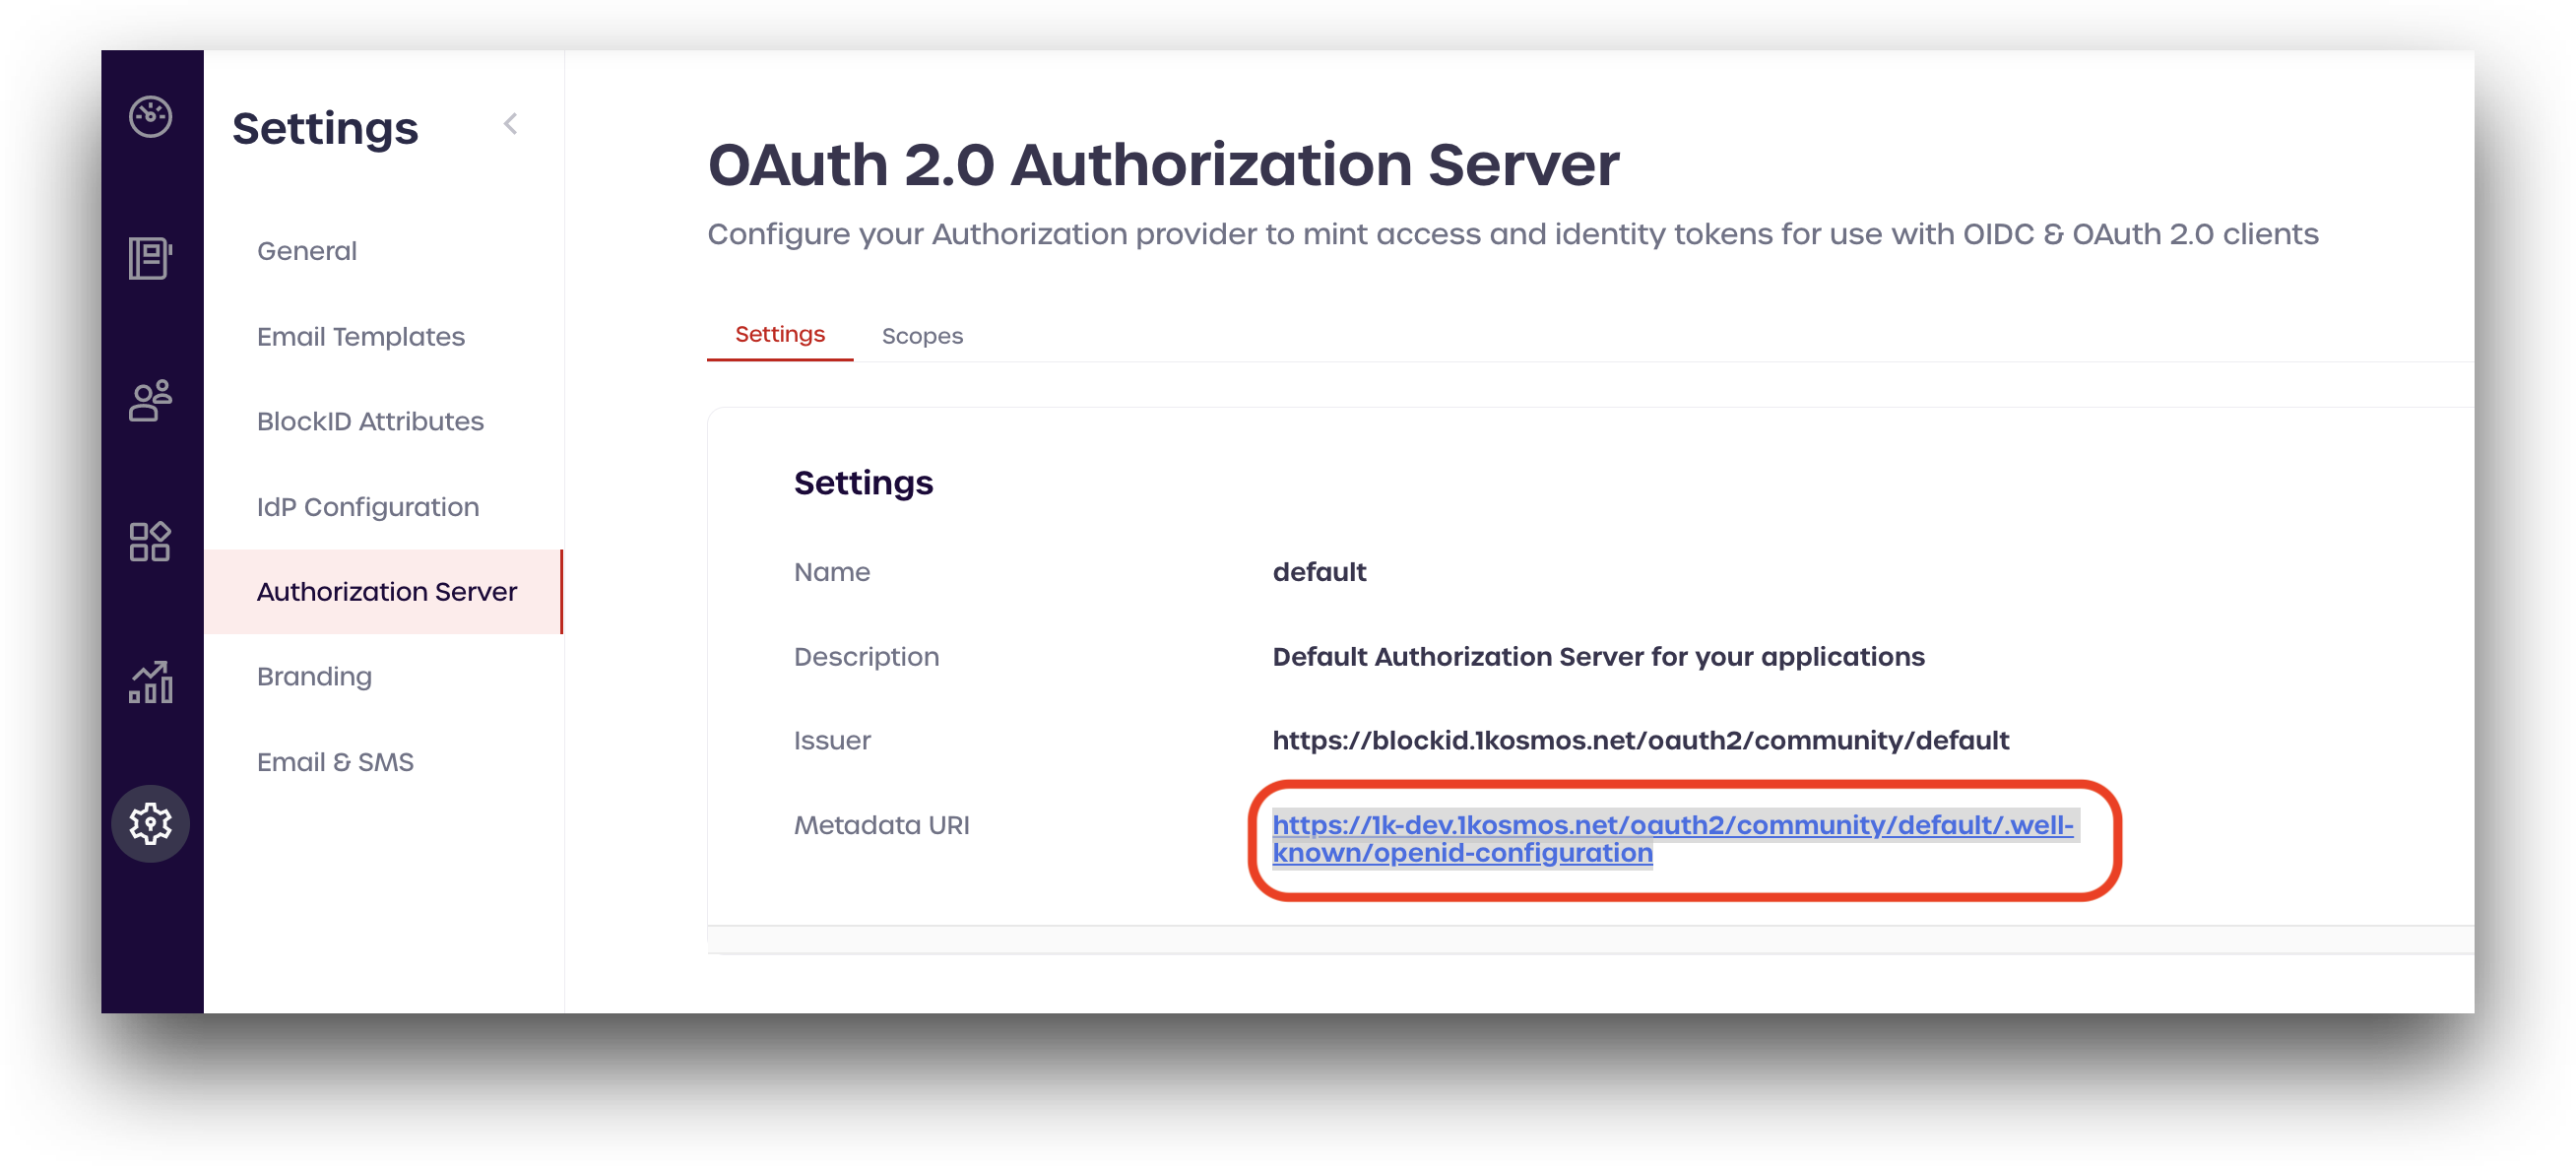
OAuth2 Protocol Settings
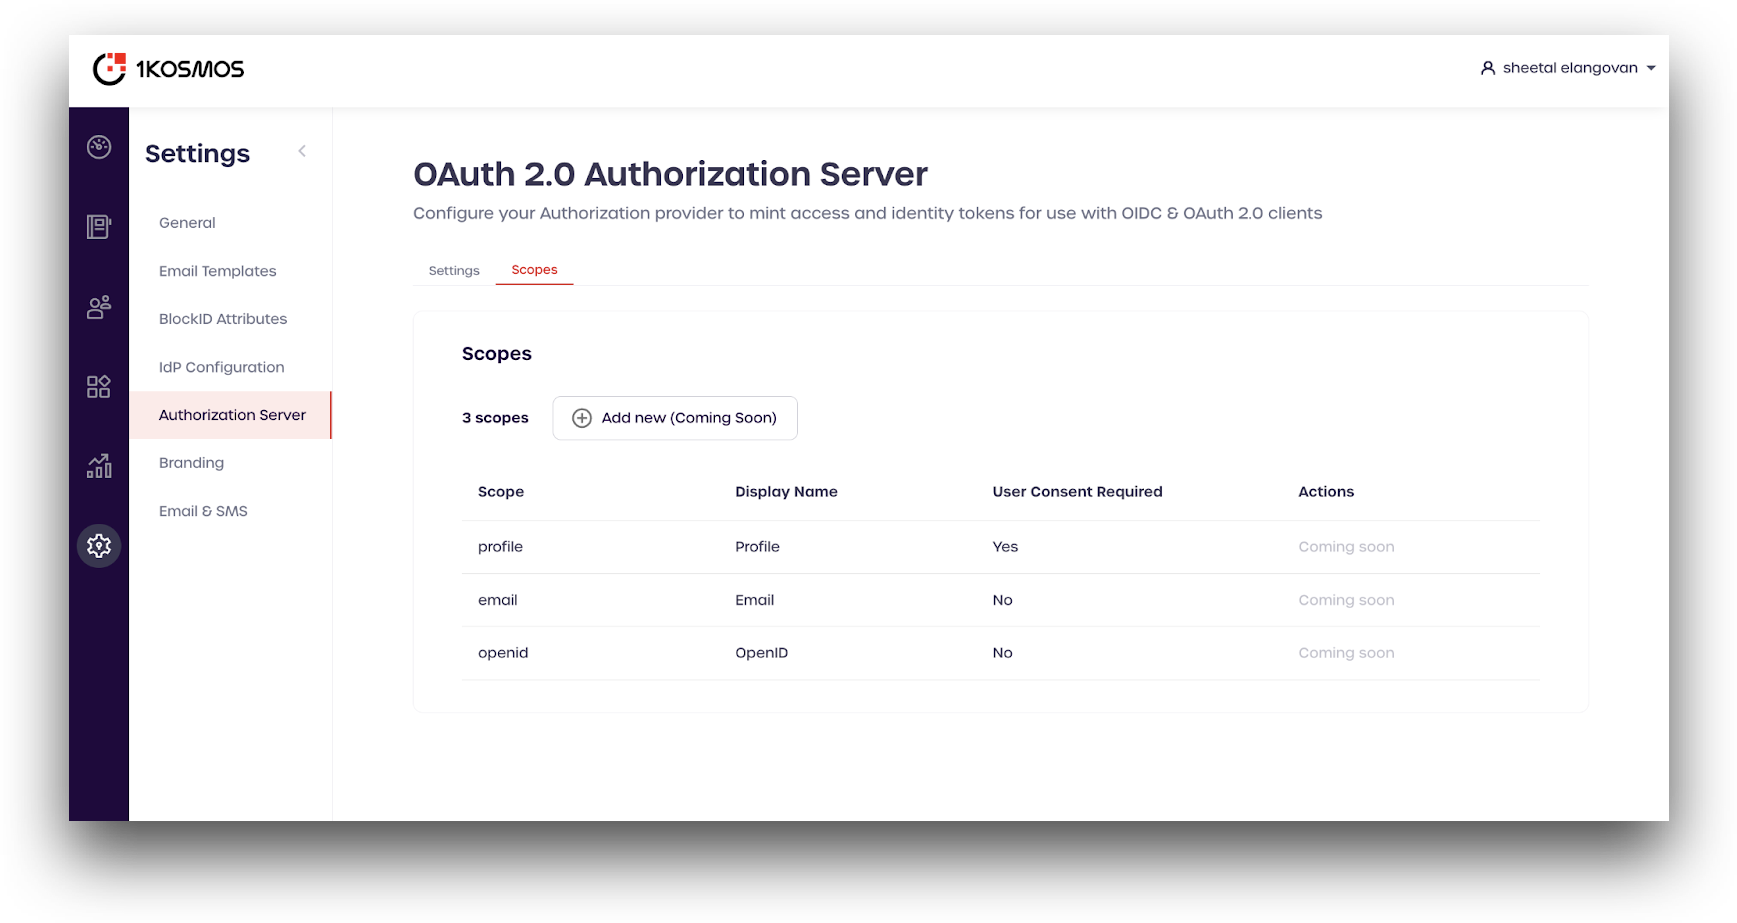
The OAuth 2.0 Authorization Server page includes details about your community's authorization server. Clients can use the information on this page to programmatically configure their interactions with BlockID.
To view the settings for your authorization server, navigate to Settings > Authorization Server.
Scope Settings
For scopes that require user consent, end-users will be prompted to accept or deny sharing of information.