Kantara Certified IAL2 Verification
Community administrators can now create and manage a new Identity Assurance Level 2 (IAL2) verification flow. This feature enables end users to complete a one-time IAL2 verification by submitting two specified identity documents, biometric, and SSN.
Unlike the current verification workflow, this process does not retain verified user information after verification. It supports compliance and assurance requirements where one-time verification without data persistence is necessary.
Key capabilities include:
- Custom Document Requirements: Define any two types of identity documents that users must submit during the verification process.
- Session Expiration Control: Set an expiration interval for verification sessions. By default, sessions expire after 30 minutes if not completed.
- UI Customization: Modify the user interface to align with specific IAL2 workflow requirements.
- Data Retention Settings: Configure how long verified user data is retained, based on compliance or business needs.
- Flow Deployment: Save and deploy configured flows for immediate use by end users.
This feature enables a one-time, persistent verification process, distinguishing it from the existing flow where user data may be deleted or reset.
Prerequisites for Identity Verification
Before you begin verifying your identity, please ensure the following:
- Camera Access: Make sure your device’s camera has the necessary permissions enabled.
- Selfie Check Tips: Avoid glare in the background and remove any hats, glasses, or masks for a clear facial capture.
- Document Preparation: Have your identity documents ready before starting the verification process.
Triggering IAL 2 Journey
Community administrators can use the /workflow/workflow_instance/create API to generate a verification URL and send the link to the user via email/phone.
Verifying Identity
End users can use the generated session URL to begin identity verification. Ensure you have the appropriate identity document ready for scanning and submission. To verify your identity, follow these steps:
-
Click the session URL you received.
-
Read the instructions on the Getting Started screen and click Start Verification.

-
Grant necessary camera permissions; click Allow Camera Permissions.
 note
noteOn the Allow Camera Permission screen, the UI checks if the device camera meets the required resolution of 1080x1920. If the requirement is not met, the UI redirects to the "QR Scan" screen, prompting the user to scan a QR code to continue the verification process on another device.

-
In the Selfie Check screen, click Begin Selfie.
-
Position your face within the oval shown on the screen. When aligned properly, click Take Selfie.
-
After successfully capturing your selfie, prepare the required identity documents as displayed on the screen, then click Continue to proceed.
-
Read the instructions on the Scan the Document screen carefully and then click Scan Document to proceed.

-
Scan the front side of the first document. Once its authenticity is verified, the system will prompt you to scan the next required document; Click Continue.
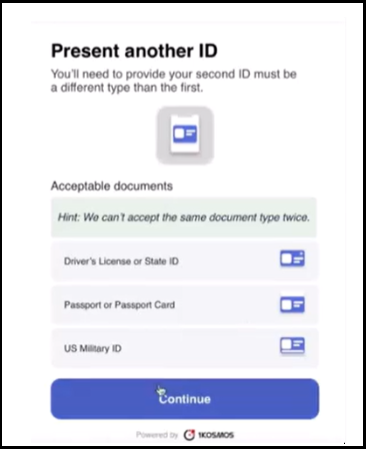
If the authenticity check fails, a message saying Verification not performed will appear. Click Try Again to repeat the process.
-
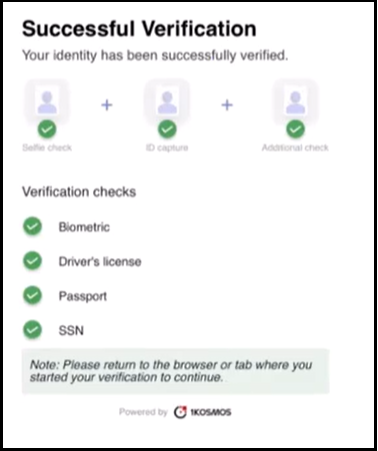
As an additional verification step, you will be prompted to enter your Social Security Number (SSN). Enter the SSN and click Continue to proceed.
Upon successful verification, the UI confirms that your identity has been successfully verified and displays a list of the documents used during the verification process.