Auth Proxy for RADIUS Server
Overview
The RADIUS server is a command-line executable that facilitates connections between your Active Directory (AD) or LDAP user accounts on BlockID and your RADIUS client. The RADIUS server is configurable using the AdminX control plane.
The RADIUS configurations tab under the Applications menu has been renamed to Auth Proxy. Community administrators can use the Auth Proxy tab in the AdminX interface to authenticate the client server such as Radius or the LDAP, or both. Following are its features:
- Administrators can configure the behavior of authProxy remotely.
- The port can be configured via the command line using
-P <port>. - The new
-u <uuid>required parameter uses the configuration from the database.
Requirements
- 64-bit Operating System (Windows, macOS, or Linux)
- RAM - 4 GB (Minimum)
- Connection to the internet (required to communicate with BlockID and your RADIUS client)
- BlockID Mobile Application (for entering one-time passcodes and push authentication)
- Administrator access to AdminX (for configuration and download)
Supported Authentication Methods
The Auth Proxy server supports the following authentication methods for login and community administrators can configure which methods are permitted:
- Push Authentication
- Interactive Voice Response (IVR)
- Passcodes
- OTP
- Password and OTP
- OTP and Password
Managing Auth Proxy Server
The community administrator can use the Adminx interface to download and configure the Auth Proxy server for managing the Radius protocols. This section consists of the following topics:
- Creating Auth Proxy Configuration
- Modifying an Existing Auth Proxy Configuration
- Deleting an Existing Auth Proxy Configuration
Creating Auth Proxy Configuration
The community administrator can use the new Auth Proxy tab under Applications to create a new auth proxy configuration for Radius authentications. The Auth Proxy configuration supports the authentication with Push, Interactive Voice Response (IVR), and passcodes.
To create a new auth proxy configuration, follow these steps:
-
In the AdminX interface, navigate to Applications > Auth Proxy. The 1K Auth Proxy for RADIUS / LDAP page is displayed.

-
Click + Add New Configuration. The Create new Auth Proxy Configuration page is displayed.

-
In the Configuration Name field, enter a name for the configuration.
noteIt is required to remember the config ID as it is required to run the Auth Proxy for Radius/LDAP.
-
In the Supported Login Methods section, select the appropriate authentication methods:
-
Login with Push : When enabled, users can authenticate to their Radius client by sending a push notification to their mobile device using the BlockID Mobile Application. Instead of entering a password, users enter the keyword push, triggering a push notification to their BlockID mobile. Users will need to authenticate the push notification using their enrolled biometrics, such as a fingerprint or face scan.
- To enable, check the Login with Push check box.
- To disable, uncheck the Login with Push check box.
-
Login with Interactive Voice Response (IVR) : When enabled, users can authenticate their Radius client using Interactive Voice Response (IVR) on their mobile device. They simply provide their username along with the keyword phone in the password field. This initiates a phone call to the user's registered number, where they are prompted to click on a specified button received on the IVR to authorize the authentication process.
-
Login with passcodes : In this section, Administrators can enable and define which One-Time Passcode (OTP) combinations can be used for authentication. Select from the following passcode authentication options:
- Not supported – Select this option if users must not be allowed to login using passcodes.
- Prompt for OTP only – When prompted for a password, the user must only provide the 6-digit passcode to log in.
- Prompt for Password and OTP – When prompted for a password, the user must provide the password with the 6-digit passcode appended to the end of the password.
Example: MyP@ssw0rd873174 - Prompt for OTP and Password - When prompted for a password, the user must provide the password with the 6-digit passcode prepended before the password.
Example: 873174MyP@ssw0rd
-
-
Download the Auth Proxy server for Radius specific to the desired OS: Windows, Linux, or Mac machines.
The download link contains a zip archive and comes preconfigured with your community license key. -
After configuring your Auth Proxy server, click Create to save your configuration in AdminX.
Modifying an Existing Auth Proxy Configuration
You can use the AdminX interface to modify an existing Auth Proxy configuration any time. To modify your Auth Proxy configuration, follow these steps:
-
Navigate to the Auth Proxy configuration you want to edit and click the pencil icon, located in the Actions column on the right.

-
Make any desired changes and click Save. You can also download another copy of the modified configurations of the Auth Proxy server if desired.
Note: The wait time for these changes to take effect is 10 minutes.
Deleting an Existing Auth Proxy Configuration
The community administrators can use the AdminX interface to delete an existing Auth Proxy configuration.
To delete an existing Auth Proxy configuration, follow these steps:
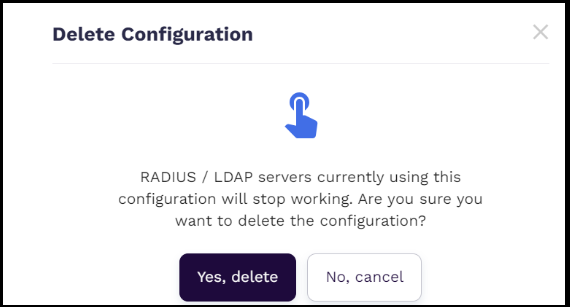
- Navigate to the Auth Proxy configuration that you want to delete and click the trash icon, located in the Actions column on the right pane.
- In the Delete Configuration pop-up that is displayed, click Yes, delete.
Note: After removing the configuration, users cannot authenticate using the deleted Config ID.
Configuring Community for Radius Servers
After downloading the Auth Proxy for RADIUS based on your operating system, transfer the archive to your server and extract its contents to a folder of your choice. The folder will include the authProxy application, a license.json file, and several bash scripts.
You can use the license.json file to configure the details required to connect with 1Kosmos services. The structure of the json file is as follows:
{
  "licenseKey":"xxxxxx-997b-xxxx-81f2-46a02be18b83",
  "tenantDNS":"acme@1kosmos.net",
  "communityId": "5f3d8d0cd866fa61019cf969"
}
The following table provides information on the parameters of the license.json file:
| Parameter | Description | Expected Value | Sample Value |
|---|---|---|---|
| licenseKey | Contains the license key required to make connection | <licence key> | Xxxxxxx-89d8-xxxx |
| tenantDNS | Contains the server to which the connection has to be established | <tenant url> | acme@1kosmos.net |
| communityID | Contains the name of the community | <community name> | default |
| proxyURL(optional) | URL of the proxy | <proxy url> | http://12.12.12.12:8083/proxy.pac |
| ProxyUser(optional) | Username in case of authenticated proxy | <proxy user> | proxyuser |
Open a terminal window and navigate to the folder containing the bash scripts. Execute the following commands from your terminal to run the Radius server.
The following examples illustrate how to use the license.json file to configure the tenant details and proxy URLs:
To configure the tenant details:
{
  "licenseKey":"xxx-xxxx-xxxxx-xxxx-xxxx-xxxxxxx",
  "tenantDNS":"acme.1kosmos.net",
  "communityId": "5ffdsnjua61019dww986"
}
To configure the tenant details and a proxy URL:
{
  "licenseKey":"xxxx-xxxxxxxx-xxxxx-xxxxxx",
  "tenantDNS":"acme.1kosmos.net",
  "communityId": "5sxzzzxxxx9879"
  "proxyUrl": "http://proxy.example.com"
}
To configure the tenant details, a proxy url, and a proxy user:
{
  "licenseKey":"xxxxxx-xxxxx-xxxx-xxxxxx",
  "tenantDNS":"acme.1kosmos.net",
  "communityId": "5fewwwjjz444544444sfxxxx"
  "proxyUrl": "http://proxy.example.com",
  "proxyUser": "proxy"
}
Command Line Arguments
Make sure to enter your Config ID from AdminX as your UUID. These strings need to match for the Radius server to work.
Common Parameters for Both Radius and LDAP Servers
- -u
<uuid>(required): Set youruuid. Use your Config ID from AdminX. - -p
<proxy password>(optional): Set your proxy password.
RADIUS Server Setup and Configuration
Follow these steps to start the RADIUS server, configure its parameters, and set the RADIUS secret.
Starting the Radius Server Service
To start the Radius server, run the following commands:
Note that the -u <uuid> param is required.
cd <INSTALL>
./startGoAuthProxy.bsh -u 7e9e71aa-3ad3-11ee-be56-0242ac120002 -r
To start the server on port 1815, use the -p <port> option (default port is 1812)
./startGoAuthProxy.bsh -p 1815 -u 7e9e71aa-3ad3-11ee-be56-0242ac120002 -r
To start server with a proxy password, use the -p option followed by the password:
./startGoAuthProxy.bsh -p `<proxy password>` -u 7e9e71aa-3ad3-11ee-be56-0242ac120002 -r
To start the server with a new radius secret, run the following command:
./startGoAuthProxy.bsh -s `<new secret>` -u 7e9e71aa-3ad3-11ee-be56-0242ac120002 -r
Note: If the radius secret contains bash shell special characters ( $, (,), …), then the secret must be escaped so that the bash does not interpret the characters as shell commands, for example, you can use the secret as secret$pecialchar(12).
RADIUS Server Configuration Parameters
To configure the RADIUS server, you can use the following command-line parameters, which allow you to customize various settings such as server startup, port, and secret key.
-r <true|false>: This command line parameter is required to start the RADIUS server. It can be used in conjunction with the LDAP/LDAP-lparameter to start both the RADIUS and LDAP servers. The default value isfalse.truestarts the RADIUS server along with the LDAP server.
-P <port>: Use this to override the default RADIUS port (1812).-s <new secret>: Use this to override the default RADIUS secret value,secret.- Note: The default RADIUS secret
secretshould only be used for testing purposes. For production servers, always use a secure secret string. - If the RADIUS secret string contains bash shell special characters (see https://tecadmin.net/bash-special-characters), the secret must be escaped to prevent Bash from interpreting the characters as shell commands.
- Note: The default RADIUS secret
Configuring the Radius Secret
Your RADIUS client and RADIUS goauthproxy server must be configured with the same shared password or secret. The maximum length of the shared secret is 256 bytes and is case sensitive. It is recommended that the shared secret be at least of the size 16 characters:
Examples:
You can use the following sample commands to initiate the RADIUS server service with a shared secret. The following table provides information on the sample syntax that can be used for performing various actions:
| Start the Radius server on... | Syntax |
|---|---|
| Port 1813 using the default secret | ./startGoAuthProxy.bsh -p 1813 -u 20783f4d-fc7a-4133-b379-1224f1e3c92e -r |
| Port 1812 using the default secret | ./startGoAuthProxy.bsh -u 20783f4d-fc7a-4133-b379-1224f1e3c92e - |
| Port 1813 using the escaped secret | ./startGoAuthProxy.bsh -p 1813 -u 7e9e71aa-3ad3-11ee-be56-0242ac120002 -s secret\$pecialchar\(12\) -r |
Stopping the Radius Server Service
To stop the Radius servers, execute the stopGoAuthProxy.bsh command.
The following table outlines the command required to stop the Radius server:
| Port | Command |
|---|---|
| 1814(Radius) | ./stopGoAuthProxy.bsh -P 1814 |
Managing Logs and PID Directories
The logs for Radius servers are written to a single log file. Each server instance has its own log file located in the port-<port>/logs directory. The log directory is referenced when the server starts.
For example, if the directory /work1/gosrc/github/go-authproxy/staging/acme-dev/port-1389 does not exist, then when the server starts, it gets created.
Sample Log File:
/work1/gosrc/github/go-authproxy/staging/acme-dev/port-1389/logs/default_20240718T140842.log
Sample PID Location:
/work1/gosrc/github/go-authproxy/staging/acme-dev/port-1389/pid/pidFile.pid
GoAuthProxy server started (pid=3327817)
To create a directory for logs and PIDs using Radius port, use the following syntax. The following table provides sample syntax illustrating the same.
| Port | Example |
|---|---|
| 1812 | ./startGoAuthProxy.bsh -p 1812 -u 20783f4d-fc7a-4133-b379-1224f1e3c92e -r |
| 1813 | ./startGoAuthProxy.bsh -P 1813 -u 20783f4d-fc7a-4133-b379-1224f1e3c92e -r |
RADIUS Event Logs in AdminX
The RADIUS server generates Event Logs whenever a user successfully or unsuccessfully authenticates using RADIUS. Administrators can review the logs in AdminX for detailed information about each authentication attempt.
The following events are created when using RADIUS authentication methods:
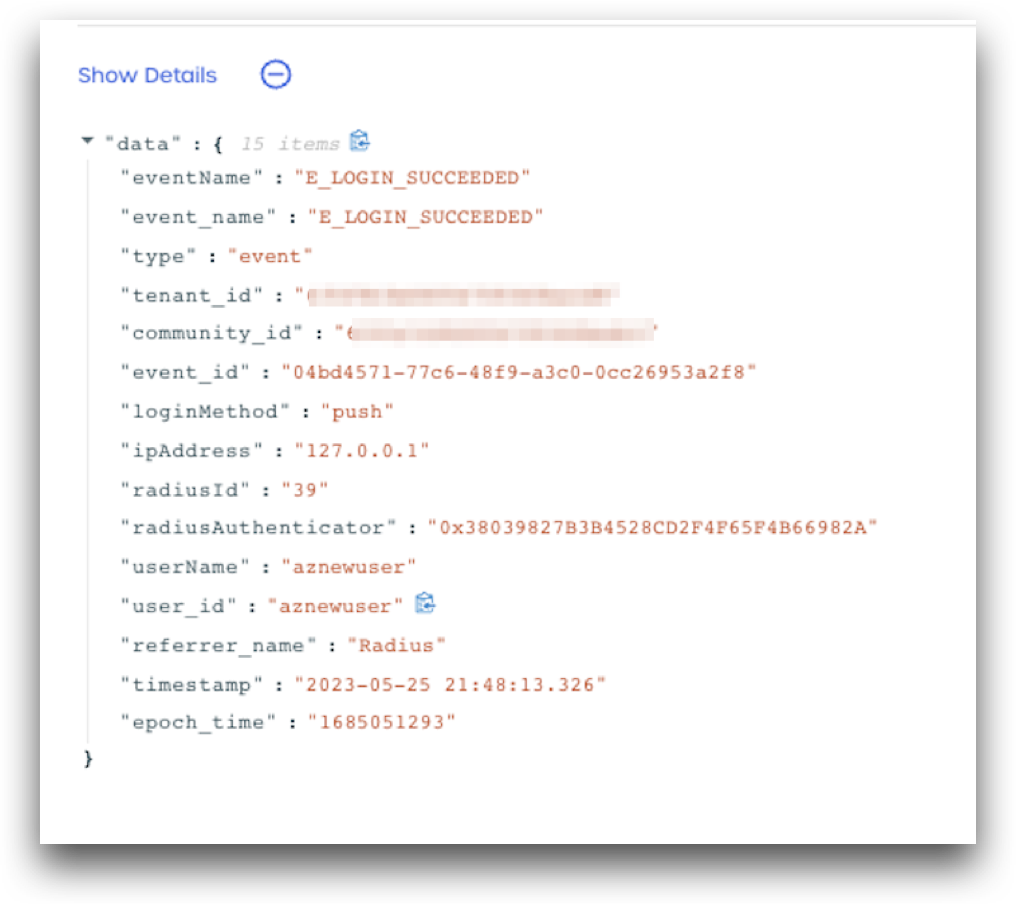
E_LOGIN_SUCCEEDED
The E_LOGIN_SUCCEEDED event is created when a user completes RADIUS authentication using Push or OTP.
Details Captured:
- Tenant Info
- referrer_name = RADIUS
- Time of Event
- Username
- User IP Address
- RADIUS client identifier
- RADIUS client name
- Login method: “push”, “otp”`
A screenshot of an E_LOGIN_SUCCEEDED event log from AdminX is shown below:
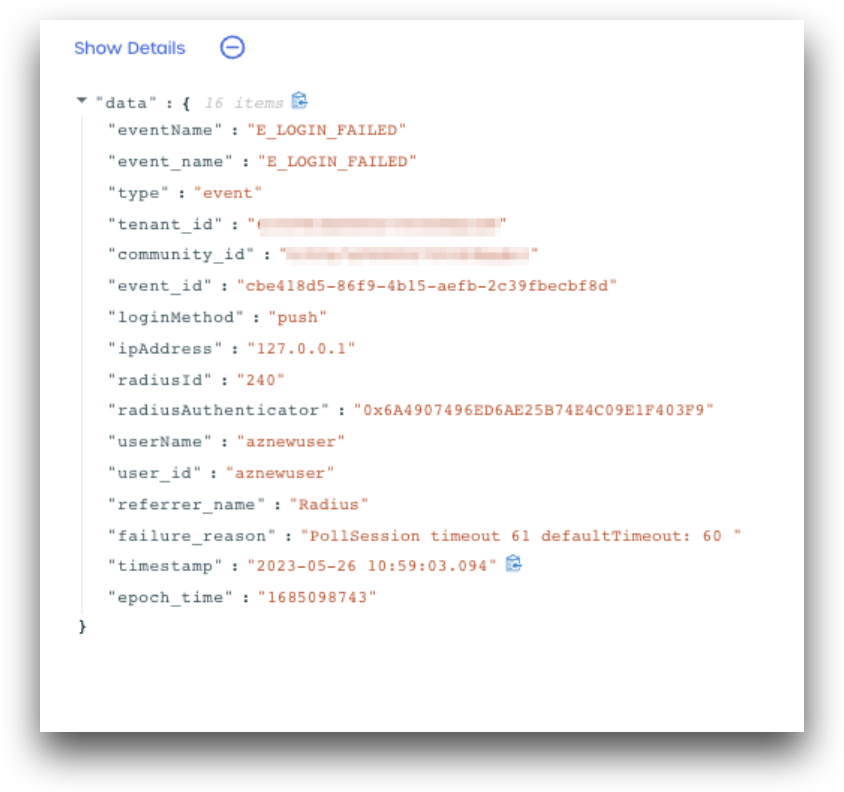
E_LOGIN_FAILED
The E_LOGIN_FAILED event is created when a user fails RADIUS authentication.
Details Captured:
- Tenant Info
- referrer_name = RADIUS
- Time of Event
- Username
- User IP Address
- RADIUS client identifier
- RADIUS client name
- Login method: “push”, “otp”`
A screenshot of an E_LOGIN_FAILED event log from AdminX is shown below: