Health Agent
Overview
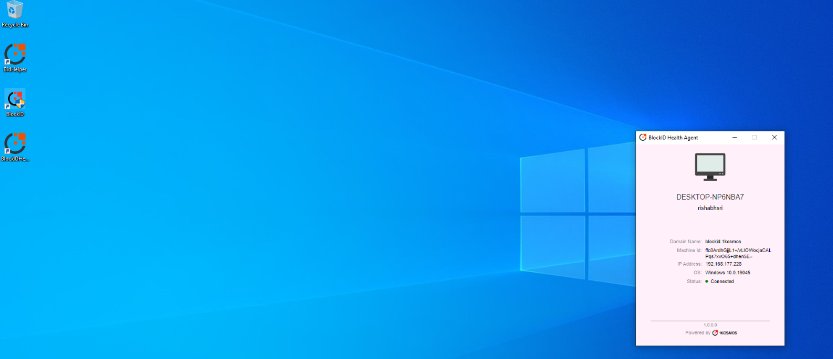
The BlockIDHealthAgent is a lightweight and efficient tool that captures system information to enable authentication policies based on the device.
This tool:
-
Operates in the background as a tray application.
-
Gathers the following essential details from the host system:
-
Domain Name
-
Machine Id
-
IP Address
-
Operating System (OS)
-
Status:
Connected
-
During authentication, this captured information is relayed to the 1Kosmos cloud through AdminX. The 1Kosmos cloud uses this information to perform adaptive authentication and designs authentication journeys according to the user’s threat profile. This helps in strengthening the overall security posture. This information is also recorded in the login events facilitating future referencing to this information.
Dependencies
The following dependencies are expected to be a part of the system through regular updates. If these dependencies are not present, the installer will try to install them automatically. If automatic downloading or installation of these dependencies is restricted in the customer's environment, they must ensure that these dependencies are installed manually before proceeding.
| Package | Link |
|---|---|
| Microsoft Visual C++ 2015-2022 Redistributable | x64 and x86 |
| Microsoft .Net Runtime Environment 4.6.2 | https://go.microsoft.com/fwlink/?linkid=780596 |
| Microsoft Web View 2 (This should already be included with the Windows 10/11 updates for the Edge browser.) | https://go.microsoft.com/fwlink/p/?LinkId=2124703 |
Installation
The BlockIDHealthAgent for Windows is shipped as a lightweight installer. Installation requires the administrator privileges. The agent can be installed through the GUI wizard or can be automated through GPO or MDM deployment based on the enterprise policies.
The agent runs a http server on the localhost. The AdminX control plane when loaded on the browser, interacts with the agent to collect necessary system information. By default, the server is run on port 8080. However, it can be updated to run on a custom port.
The port can be updated in the config.json file. This file should be present in the same directory as the installer. During installation, the custom port will be picked up and automatically provisioned.
Below are the BlockIDHealthAgent installation steps:
-
Download the BlockIDHealthAgent for Windows installer. You can reach out to your CS Representative to gain access to the installer.
-
After downloading, extract the
.zipfile. -
Open the application.
-
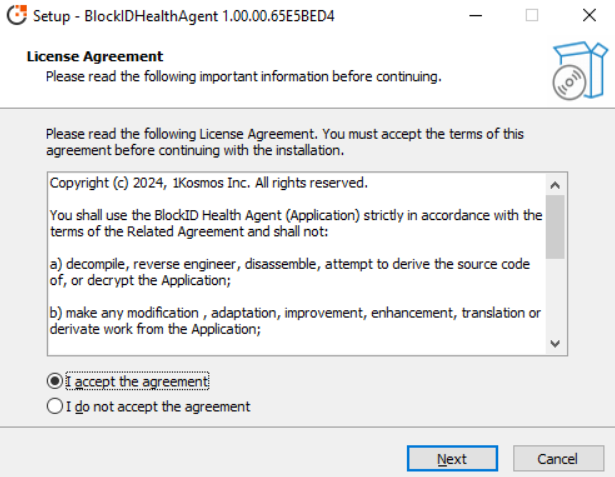
Accept the license agreement and click Next.
-
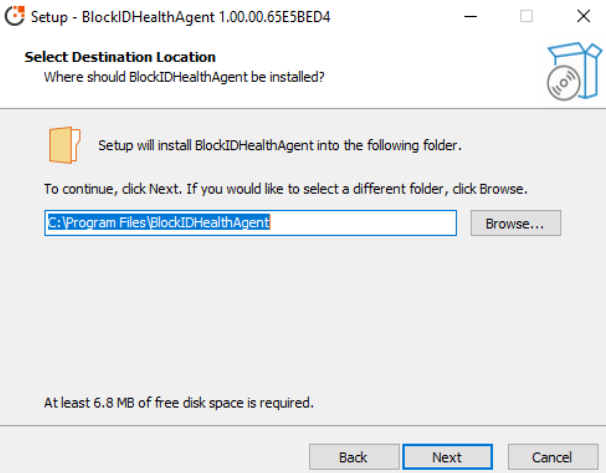
Select the destination location, default is C:\Program Files\BlockIDHealthAgent. If you want to select a different location, click Browse. After selecting the required location, click Next.
-
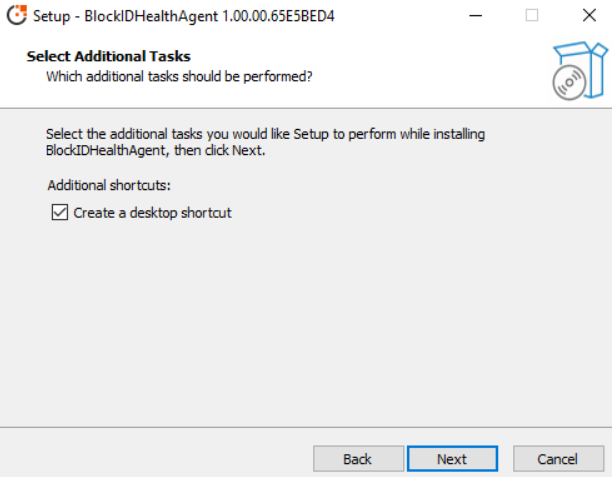
Select additional tasks, that is, select Create a desktop shortcut checkbox, and click Next.
-
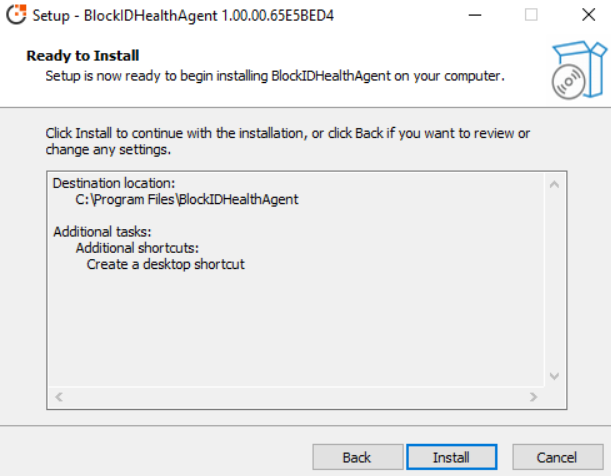
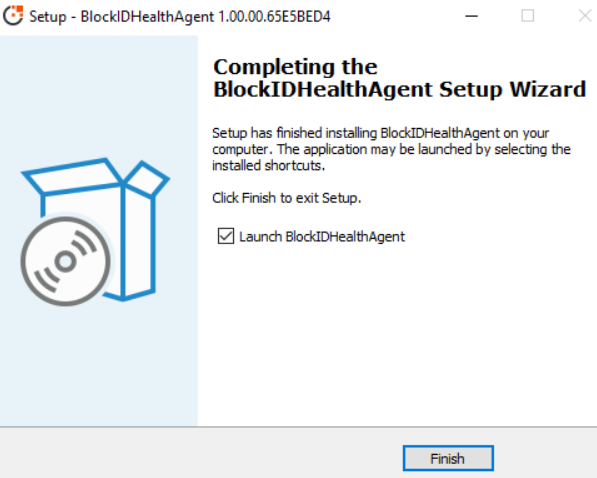
Setup is now ready to begin installing the BlockIDHealthAgent on your computer, click Install.
-
Setup has finished installing the BlockIDHealthAgent on your computer. Select Launch BlockIDHealthAgent checkbox and click Finish.
-
BlockIDHealthAgent wizard displays the essential details.
-
Only an administrator can install the BlockIDHealthAgent.
-
Only an administrator can stop or exit the BlockIDHealthAgent.
-
The BlockIDHealthAgent is a tray application that runs with the context of the user and starts up automatically when a user logs in.
-
The BlockIDHealthAgent does not require any registration.
-
The BlockIDHealthAgent does not make any external API calls.
-
The BlockIDHealthAgent might require permissions for running the http server on local host, default port
8080, and require to be whitelisted on the endpoint security solution being used. -
Running of dlls from "C:\Program Files\BlockIDHealthAgent" location must not be blocked.
Setting Port for the BlockIDHealthAgent
After installing the BlockIDHealthAgent, if you want to modify the default port 8080, navigate to the default install folder C:\Program Files\BlockIDHealthAgent and update the config.json file with the new port. After this file has been updated, either restart the BlockIDHealthAgent, or sign out, and then sign in for the changes to take effect.
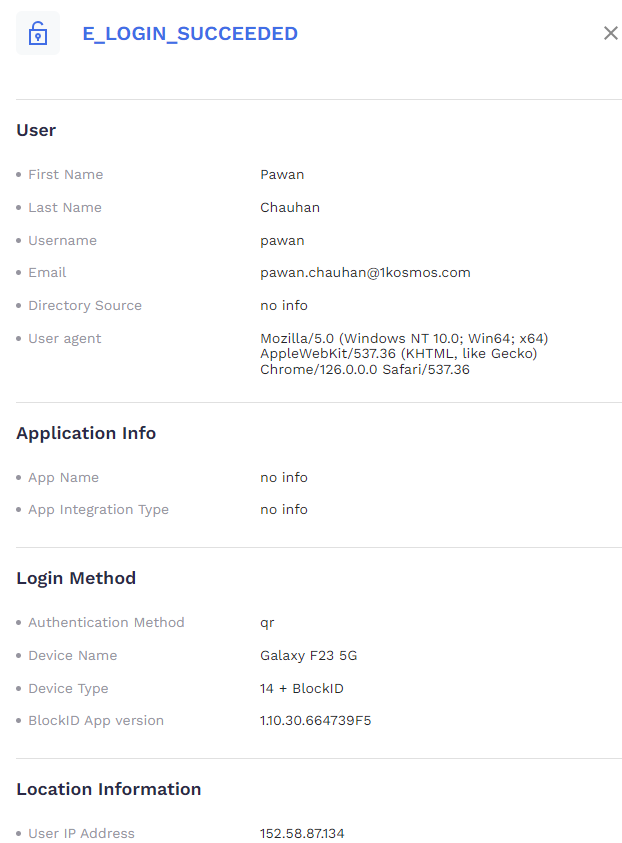
E_LOGIN_SUCCEEDED Event
For workstation having the BlockIDHealthAgent installed, additional metrics are captured in the E_LOGIN_SUCCEEDED event when the login happens via AdminX. The port settings for AdminX are maintained in instance CaaS. Please contact the customer representative to set up your instance CaaS with the right agent URL.
context: {tenantId, communityId, internal:false}
keyPath: "applications.desktop_health_agent"
{ "agentUrl": "http://localhost:<port>" }
Basic Event Structure
Below are the details:
{
	"type": "event",
	"event_ts": 1719124702244,
	"version": "v1",
	"journey_id": "ba650729-a2ca-4eec-8992-09a147a60950",
	"session_id": "364e4af7-419b-47e1-ab4f-2bf7b864b783",
	"client_ip_address": "152.58.87.134",
	"caller_user_agent": "Mozilla/5.0 (Windows NT 10.0; Win64; x64) AppleWebKit/537.36 (KHTML, like Gecko) Chrome/126.0.0.0 Safari/537.36",
	"login_state": "SUCCESS",
	"user_id": "pawan",
	"user_status": "active",
	"user_email": "pawan.chauhan@1kosmos.com",
	"user_firstname": "Pawan",
	"user_lastname": "Chauhan",
	"source_user_directory": "db",
	"tenant_tag": "1kosmos",
	"service_name": "athena",
	"server_ip": "10.8.31.95",
	"auth_method": "qr",
	"device_id": "59c6426dd79cc21d",
	"auth_device_os": "14",
	"auth_device_name": "Galaxy F23 5G",
	"auth_device_app_name": "BlockID",
	"auth_device_app_version": "1.10.30.664739F5",
	"auth_device_ip_address": "152.58.116.51",
	"auth_device_latitude": 0,
	"auth_device_longitude": 0,
	"moduleId": "6087371a80abe60013fb30b5",
	"factsSubmitted": {
		"applicationId": "adminx",
		"agent_version": "1.0.1.0",
		"groups": [],
		"authModuleId": "6087371a80abe60013fb30b5",
		"authenticationMethods": [
			"uwl"
		],
		"username": "pawan",
		"machine_user": "pawan@DESKTOP-N6319JD",
		"IP": "152.58.87.134"
	},
	"authJourneysMatched": [
		{
			"name": "Pawan",
			"id": "66759fd41ab5d50946507a94"
		}
	],
	"user_role": "community-admin",
	"event_id": "97a0fbd1-f7e9-4289-abf9-0680554bb135",
	"timestamp": "2024-06-23 12:08:22.244",
	"epoch_time": "1719144502",
	"eventName": "E_LOGIN_SUCCEEDED",
	"event_name": "E_LOGIN_SUCCEEDED"
}
E_LOGIN_FAILED Event
Below are the details:
{
	"type": "event",
	"event_ts": 1724744475348,
	"version": "v1",
	"journey_id": "5018dd53-9430-42d7-98c7-31f54435874c",
	"client_ip_address": "34.148.220.87",
	"caller_user_agent": "Mozilla/5.0 (Windows NT 10.0; Win64; x64) AppleWebKit/537.36 (KHTML, like Gecko) Chrome/127.0.0.0 Safari/537.36",
	"login_state": "FAILED",
	"user_id": "sasha",
	"user_status": "active",
	"user_email": "oleksandra.m@1kosmos.com",
	"user_firstname": "Oleksandra",
	"user_lastname": "Maslennikova",
	"source_user_directory": "db",
	"tenant_dns": "https://acme.1kosmos.net",
	"tenant_tag": "1kosmos",
	"service_name": "athena",
	"server_ip": "10.8.4.142",
	"auth_method": "otp",
	"auth_device_os": "none",
	"auth_device_name": "not available",
	"auth_device_app_name": "not available",
	"auth_device_app_version": "not available",
	"auth_device_latitude": 0,
	"auth_device_longitude": 0,
	"moduleId": "6087371a80abe60013fb30b5",
	"factsSubmitted": {
		"applicationId": "adminx",
		"machine_id": "o5P0qmHsHxvTvxqACWbuF1elEi+8oB3K8V60mqXqgcA=",
		"machine_name": "dev-ad-0",
		"machine_domain": "blockid.1kosmos",
		"machine_os": "Windows Server",
		"machine_os_version": "10.0.17763",
		"machine_mac_addr": [
			"42-01-0A-8E-00-03",
			"00-FF-48-F3-44-06"
		],
		"machine_ip": [
			"10.142.0.3"
		],
		"agent_version": "1.0.1.0"
	},
	"eventData": {
		"reason": "Invalid OTP"
	},
	"event_id": "997ac2a0-08ba-41c5-8759-fc8f95130140",
	"timestamp": "2024-08-27 07:41:15.348",
	"epoch_time": "1724744475",
	"tenant_id": "5f3d8d0cd866fa61019cf968",
	"community_id": "5f3d8d0cd866fa61019cf969",
	"eventName": "E_LOGIN_FAILED",
	"event_name": "E_LOGIN_FAILED"
}
Device based Adaptive Auth Journey
The BlockIDHealthAgent facilitates device based adaptive auth journey. For devices/workstations having the BlockIDHealthAgent installed, adaptive auth journey can be created based on different Conditions. Application and Groups are the Conditions without having the BlockIDHealthAgent installed.
Additional Conditions after having the BlockIDHealthAgent installed are:
-
IP Address: The BlockIDHealthAgent captures the event based on theIP Addressconditions, such asis in the range ofandis outside the range of. Enter theIP Addressas per the selected condition and event will be captured with the required details. -
Username: The BlockIDHealthAgent captures the event based on theUsernamecondition, such asis one of. Enter theUsernameas per the selected condition and event will be captured with the required details. -
Domain: The BlockIDHealthAgent captures the event for domain and non-domain devices/workstations based on theDomainconditions, such asis one ofandis not one of. Enter theDomainas per the selected condition and event will be captured with the required details. -
Machine Name: The BlockIDHealthAgent captures the event based on theMachine Nameconditions, such asis one ofandis not one of. Enter theMachine Nameas per the selected condition and event will be captured with the required details. -
Machine & User: The BlockIDHealthAgent captures the event based on theMachine & Userconditions, such asis one ofandis not one of. Enter theMachine & Useras per the selected condition and event will be captured with the required details.
The following details are captured through the BlockIDHealthAgent:
"machine_id": "R0UBhPLys4jrS9aLri9n5IEDn1hK14yayD6wcxVpHhE=",
"machine_name": "DESKTOP-N6319JD",
"machine_domain": "1Kosmos.com",
"machine_os": "Windows",
"machine_os_version": "10.0.22621",
"machine_mac_addr": [
	"C0-25-A5-2C-38-27",
	"28-D0-EA-DD-EE-6A",
	"28-D0-EA-DD-EE-6B",
	"2A-D0-EA-DD-EE-6A"
],
"machine_ip": [
	"192.168.177.23"
],
Add new Adaptive Auth Journey
To add new adaptive auth journey:
-
Navigate to your AdminX tenant.
-
Log in as a Community Administrator.
-
Click the Authentication icon on the left-hand menu.
-
Select Add new adaptive auth journey under Adaptive Authentication > Adaptive Authentication Journeys. The Create New Adaptive Auth Journey page opens.
-
Enter Journey Name.
-
Select Conditions:
Application,Groups,IP Address,Username,Domain,Machine Name, andMachine & User. -
Select Decision.
- Action:
MFA RequiredandDeny access. - Authentication Method:
Just Password,Push notification,QR Code,FIDO,BlockID App Codes,Hardware Token OTP,Password & any OTP,Password & Web OTP,Password & SMS OTP,Password & Email OTP,Password & Voice OTP,Password & Push notification,Password & FIDO,Password & BlockID App Codes, andPassword & Hardware OTP Codes. Note: Authentication Method is visible only when you select Action asMFA Requiredfrom the drop-down list.
- Action:
-
Click Save. A message Authentication journey has been created appears.
Modify Adaptive Auth Journey
To modify the adaptive auth journey:
-
Navigate to Adaptive Authentication > Adaptive Authentication Journeys.
-
Select the respective Journey Name from the list of Journeys.
-
Click Edit against the selected Journey Name. The Create New Adaptive Auth Journey page opens.
-
Make required modifications to the adaptive auth journey and click Save. A message Authentication journey has been updated appears.