> For the complete documentation index, see [llms.txt](https://docs.1kosmos.com/llms.txt). Markdown versions of documentation pages are available by appending `.md` to page URLs; this page is available as [Markdown](https://docs.1kosmos.com/integrations/authentication/custom-integrations/saml-application-integrations.md).
# SAML Application Integrations
The Security Assertion Markup Language (SAML) integration enables passwordless authentication for users logging into a service provider's web application.
***
The Security Assertion Markup Language (**SAML**) integration screen lets you add your identity provider (IDP) information and configure its authorization and settings. This will enable a passwordless authentication solution for your organization's users (who have logged into the service provider's site). This lets you log in to your SP account using biometrics. Biometric options include Touch ID/Face ID and LiveID.
For detailed information about SAML and to review the full protocol specification, see [Security Assertion Markup Language (SAML) V2.0 Technical Overview](http://docs.oasis-open.org/security/saml/Post2.0/sstc-saml-tech-overview-2.0.html)
### **1Kosmos as Identity Provider**
1Kosmos can integrate with SAML applications by acting as an Identity Provider (IDP) that provides single sign-on (SSO) to external Service Provider (SP) applications.
The service provider (SP) initiates the SAML sign-in flow with 1Kosmos when the user goes to sign-in, or when the user attempts to visit a protected resource:
1. The SP generates a SAML Request, which triggers the authentication flow with 1Kosmos as the IDP.
2. The user enters their log-in details.
3. 1Kosmos generates a SAML Response containing the assertion of the authenticated user. In addition, a SAML Response may contain additional information, such as user profile information and group/role information, depending on what the Service Provider can support.
4. The authenticated user is returned to the external Service Provider's application
For more information on setting your Identity Provider in AdminX, see [Identity Provider (IDP) Configuration](https://docs.1kosmos.com/productdocs/docs/idp-configuration).
### Managing Re-Authentication
1Kosmos now lets community administrators force re-authentication for users accessing SAML/OIDC Service Provider (SP) applications. This feature prompts users to re-enter any required credentials for the relevant authentication journey, even if they are already logged in.
Re-authentication can be enabled with the introduction of a new setting, Force Re-authentication, while adding SAML/OIDC applications. By default, this setting is disabled.
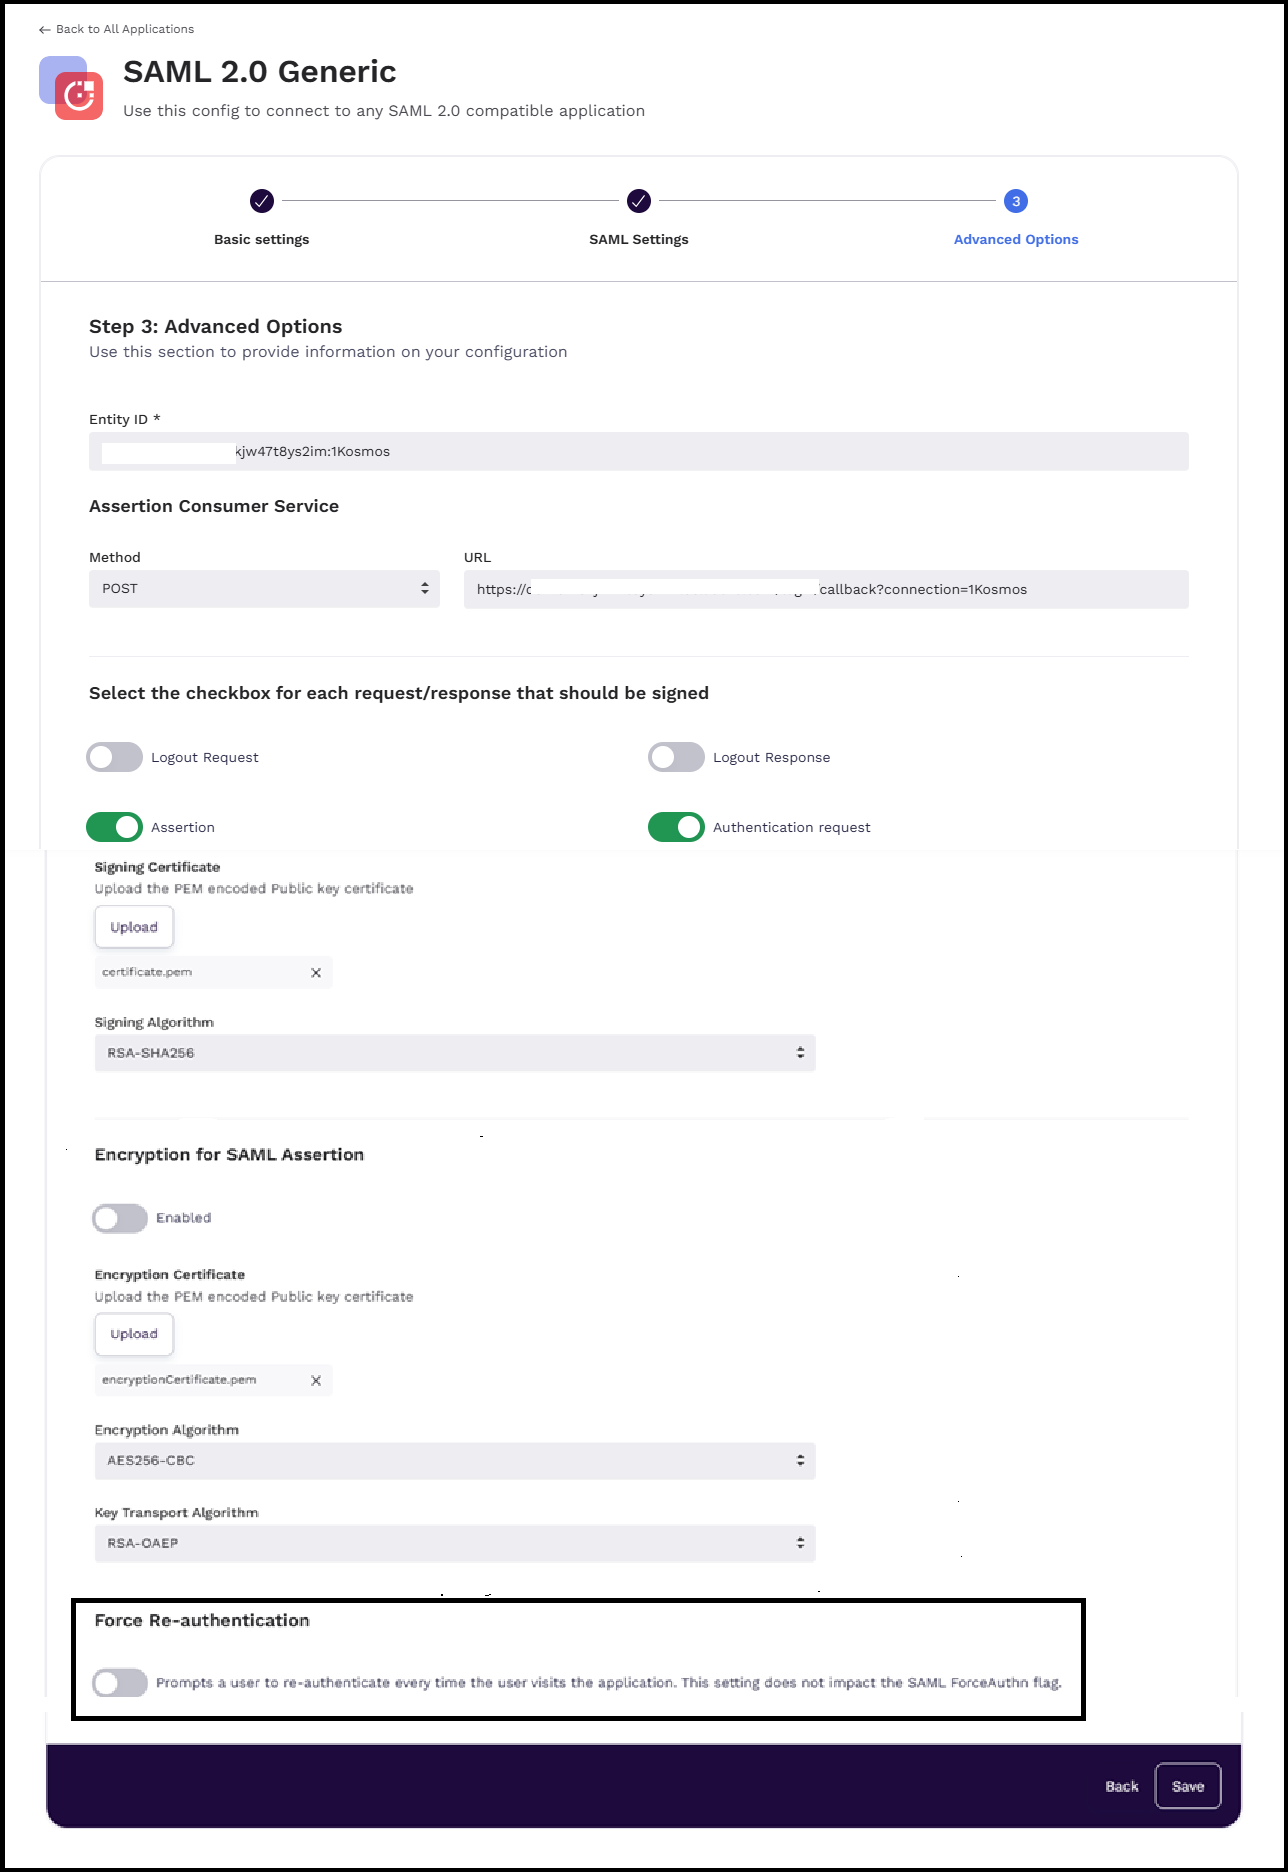
To re-authenticate a SAML application, follow these steps:
1. Log in to your tenant as a community administrator.
2. Navigate to **Applications > Add Applications**.
3. Configure your SAML integration.
4. Navigate to the **Advanced Options** tab of your SAML integration, enable the **Force Re-authentication** slider, and then click **Save**.
5. Open the target application URL in a new tab. If you already have an active session in AdminX, you will be redirected to the 1Kosmos Authentication page with your username pre-filled.
6. Select an authentication method. Once the authentication is successful, you will be logged in to the target application.
**Event Logs**
The following events are triggered during force re-authentication.
* E\_SP\_MODIFIED
* E\_LOGIN\_SUCCEEDED
* E\_SP\_REDIRECT\_SUCCEEDED
#### Redirect users to a custom URL after single logout (RelayState)
Community administrators can control where users land after an SP-initiated Single Logout (SLO). The 1Kosmos (BlockID) IDP reads and honors a `RelayState` parameter on the SLO request: after the IDP session is terminated, the browser is redirected to the URL supplied in RelayState instead of the default 1Kosmos logout page. The destination can be the application's own logout page, a corporate portal, or any external URL.
This is useful in SP-initiated SSO journeys, where the user starts from the Service Provider application and expects to return to a familiar application page after signing out rather than seeing the 1Kosmos logout screen.
AdminX has no separate setting for this behavior. The redirect is driven entirely by the `RelayState` parameter on the SLO request, so configuration happens on the Service Provider side.
{% hint style="info" %}
This post-logout Relay State is different from the **IDP Initiated Login → Relay State** field in the SAML application settings. That field redirects the user *after authentication* (login). The post-logout redirect described here is set only by appending a `RelayState` parameter to the SLO URL, and its value is commonly the application's **Access URL**.
{% endhint %}
**Prerequisites**
* The SP application is configured for SAML-based SSO with 1Kosmos (BlockID) as the IDP.
* The SP SLO request uses the **HTTP POST** method.
* Community Administrator access to the AdminX console (to retrieve the community SLO URL and, if used, the application Access URL).
* User logged into SP application using 1Kosmos SSO / IdP-initiated SSO.
**Configure the RelayState**
Set the Relay State on the **Service Provider side** by appending it as a query parameter to the IDP Single Logout URL in the SP's Single Sign-On settings.
1. Identify your community's IDP Single Logout URL:
```
https:///adminapi/community//slo
```
2. URL-encode the destination URL you want users redirected to after logout. This is often the application's Access URL from the SAML application settings.
3. Append it to the SLO URL using the `RelayState` parameter:
```
https:///adminapi/community//slo?RelayState=
```
**Example:**
```
https://acme.1kosmos.net/adminapi/community/default/slo?RelayState=https%3A%2F%2Facme.1kosmos.net%2Fadmin%2Fdefault%2Flogin%3FappId%3D69fb02c996e77b17be19bdd2
```
4. Save the updated SLO URL in the SP's Single Sign-On configuration.
**Key notes:**
* The parameter name is case-sensitive: `RelayState`.
* The redirect URL value must be URL-encoded.
* Both same-origin and cross-origin (external) redirect URLs are supported.
**Logout flow**
1. The user is logged into the SP application via 1Kosmos IDP SSO.
2. The user clicks **logout** in the SP application.
3. The SP application terminates its own session and redirects the browser to the 1Kosmos IDP SLO URL (with `RelayState` appended).
4. 1Kosmos terminates the IDP session and reads the `RelayState` parameter.
5. If `RelayState` is present and contains a valid, safe URL, the browser is redirected to that URL.
6. If `RelayState` is absent, empty, or contains an unsafe scheme, the user is redirected to the default 1Kosmos logout page.
{% hint style="info" %}
**Notes and Limitations:**
* **No AdminX configuration required.** The Relay State is read directly from the incoming SLO request URL; there is no placeholder or field for it in the AdminX SAML application configuration.
* **Security.** Unsafe URL schemes (`javascript:`, `data:`) are rejected to prevent open-redirect vulnerabilities. Invalid or malformed values fall back to the default logout page.
* **Backward compatibility.** Existing SLO configurations without a `RelayState` parameter are unaffected and continue to redirect to the default 1Kosmos logout page.
{% endhint %}
### **SAML Integration in AdminX**
#### Add a New SAML Application
This section describes the steps for adding a *generic* SAML application. For more information on the list of pre-built integrations, see[Pre-built Integrations](/integrations/authentication/pre-built-integrations.md).
To get started, follow these steps:
1. Log in to your tenant as a community administrator.
2. Navigate to the **Applications** page. Click **Add Application**.
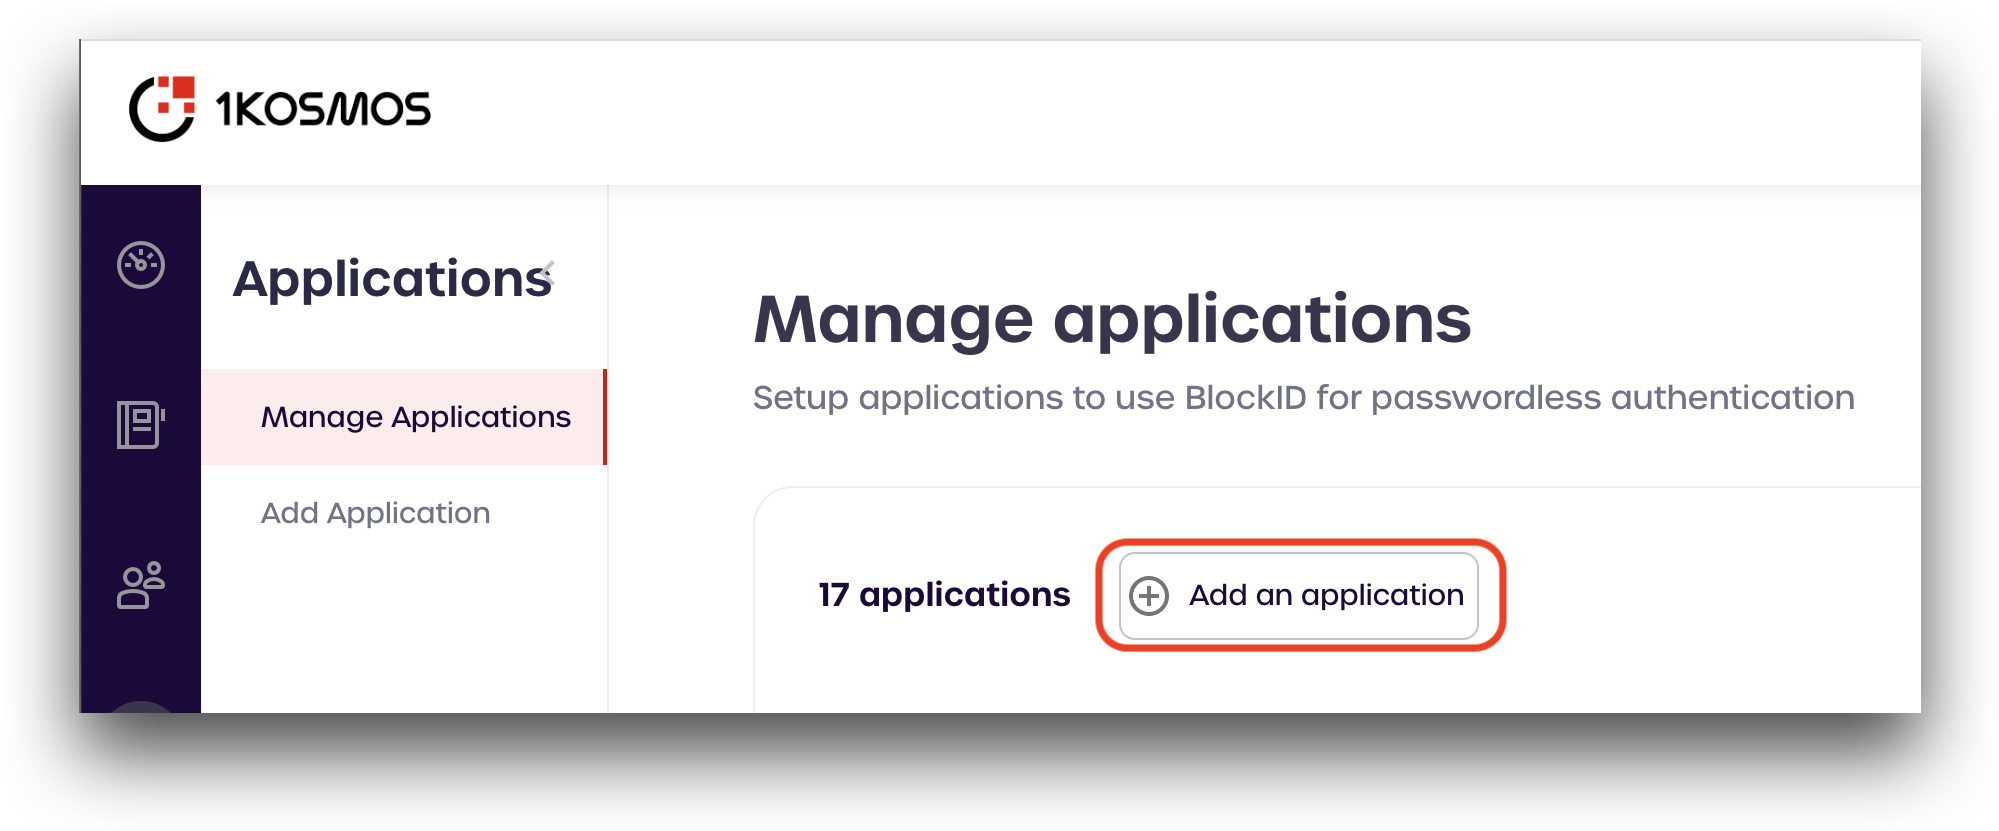
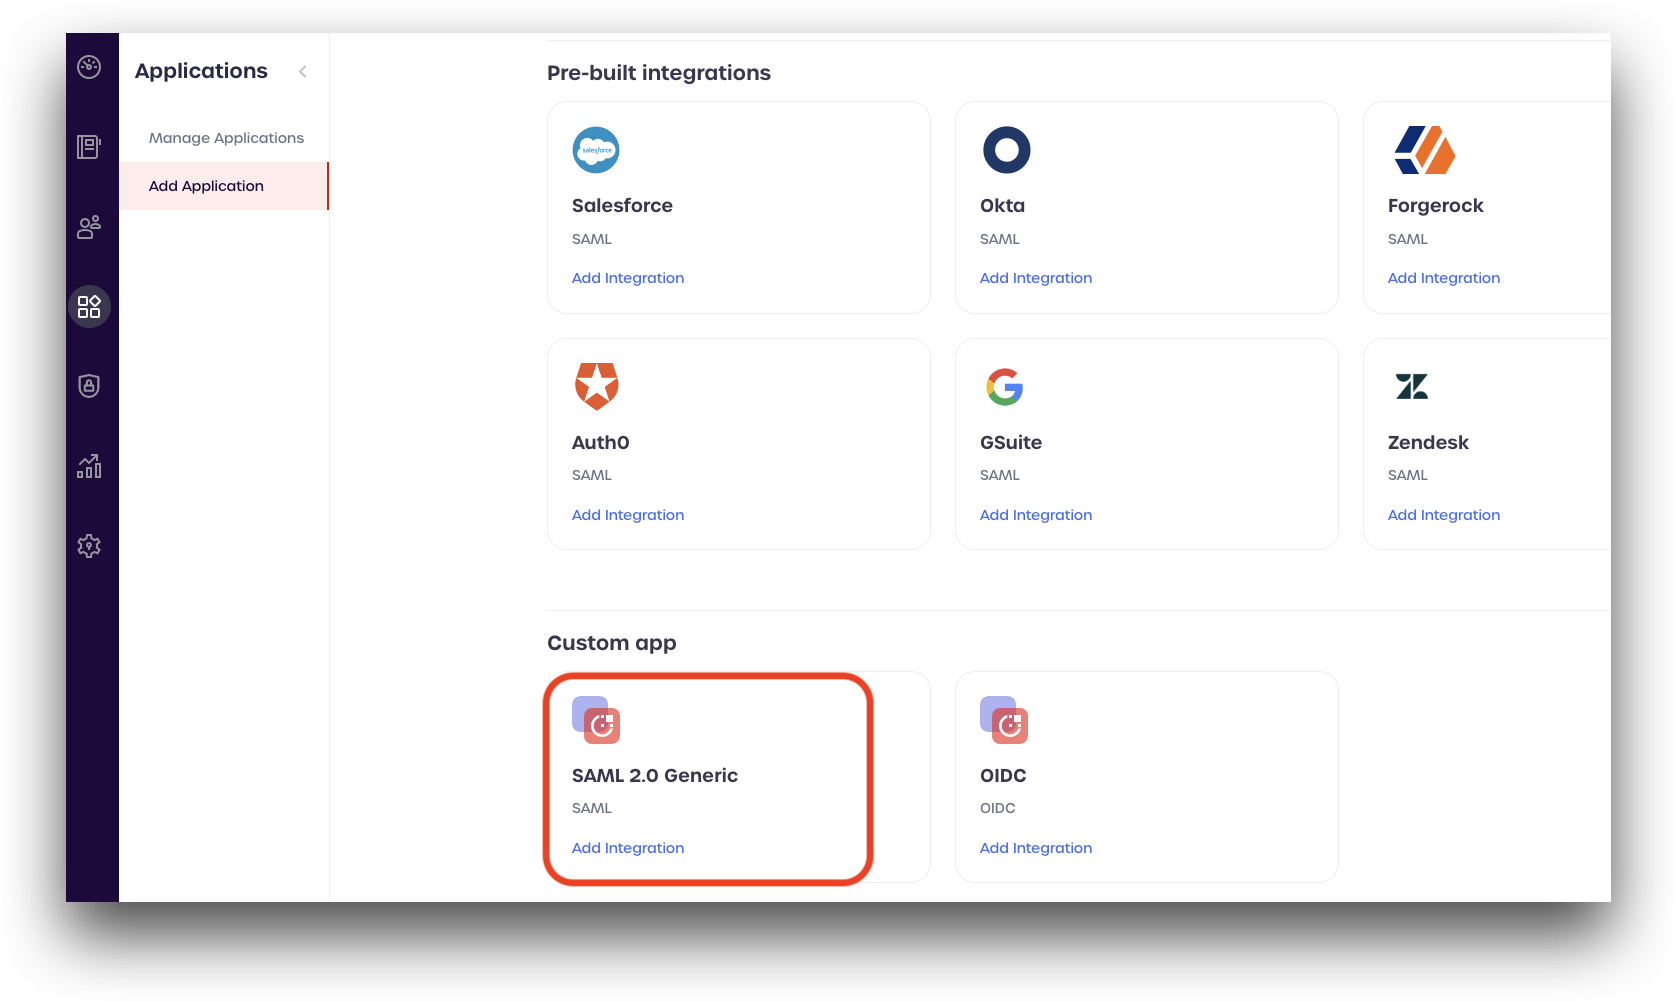
3. From the **Add new applications** page, scroll down to your service provider.
4. If your service provider is not listed, select **SAML2.0 Generic** (located in the **Custom app** section) and click *Add Integration*.
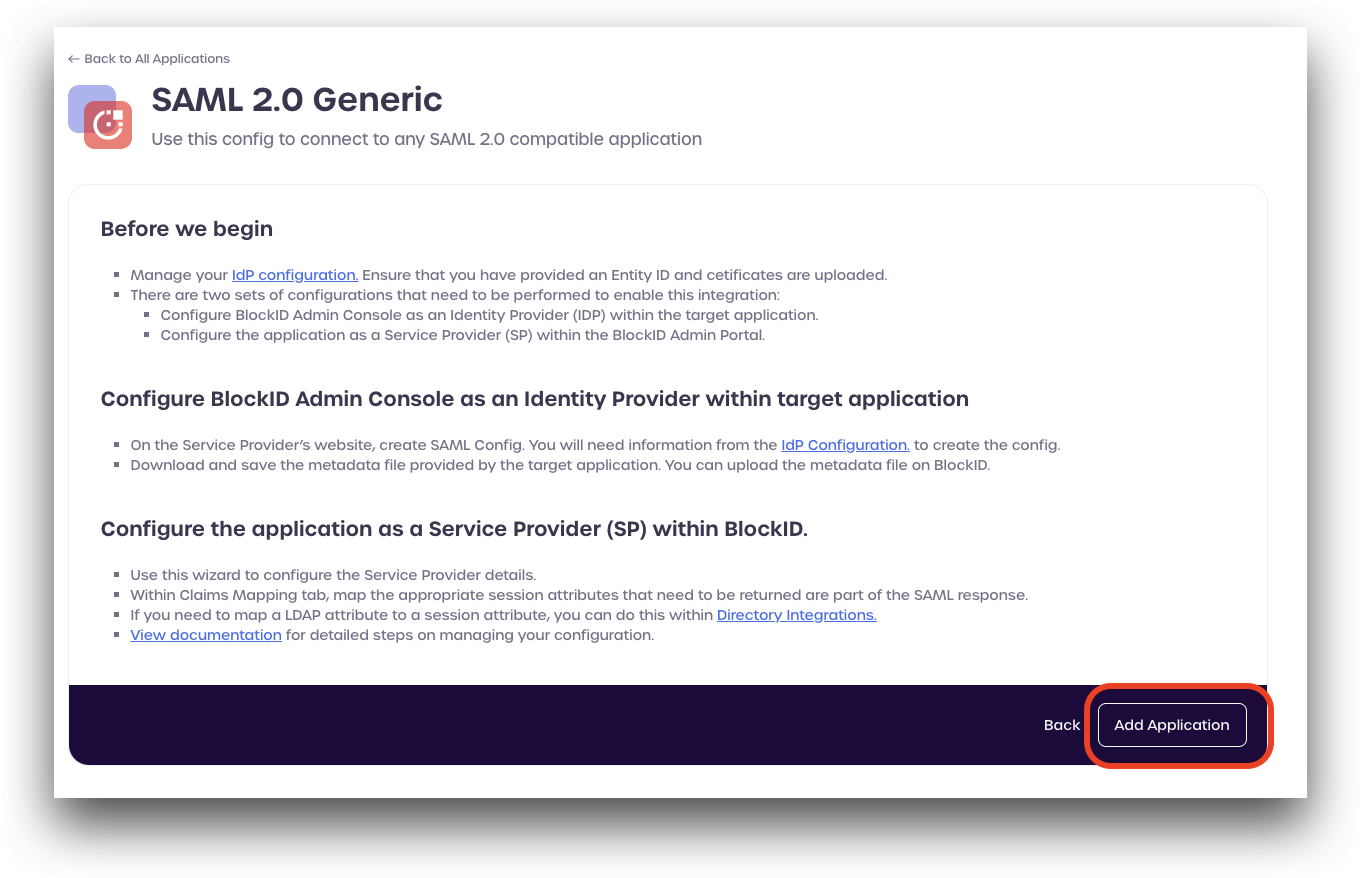
5. Review the information listed on the page. You will need to have completed the steps outlined in [Identity Provider (IDP) Configuration](https://docs.1kosmos.com/productdocs/docs/idp-configuration/) before continuing with your SAML application integration.
6. Click **Add Application** to continue.
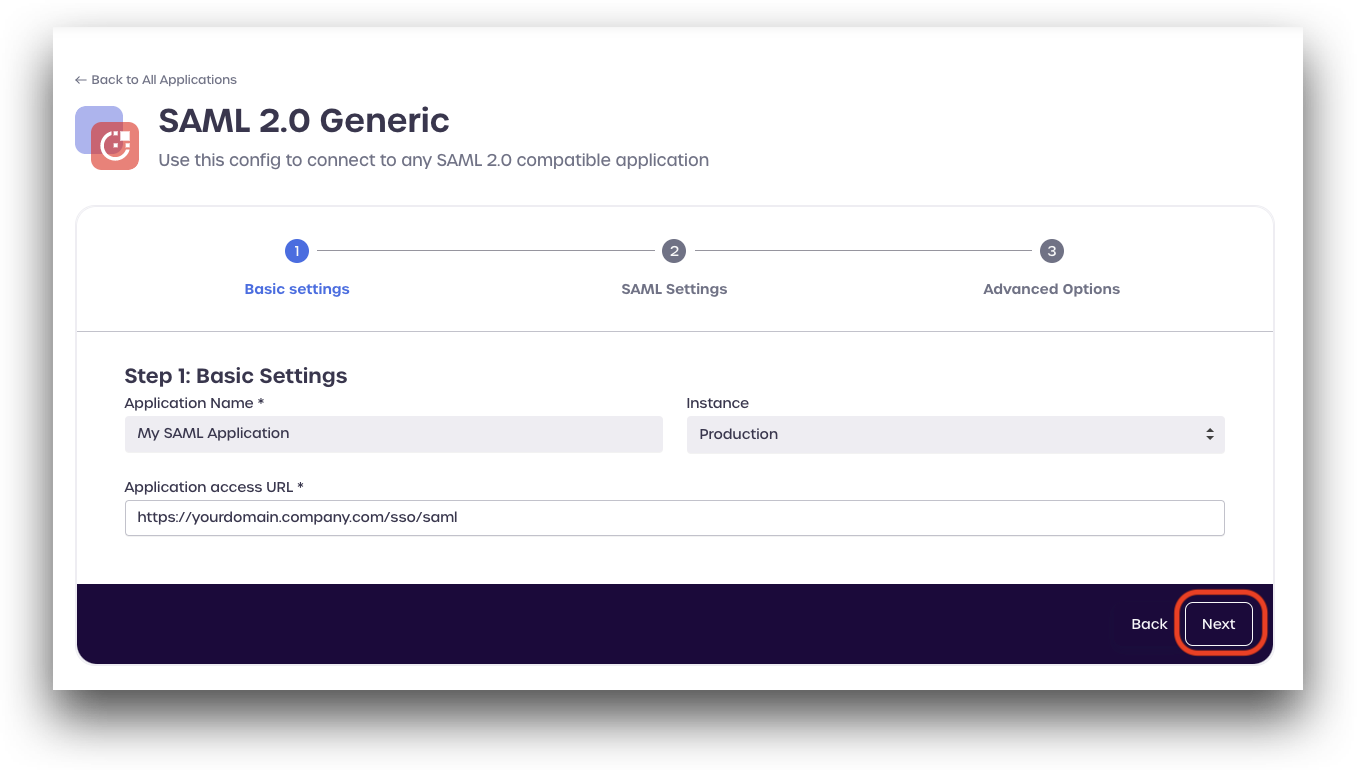
7. Enter an **application name**, and select an instance type.
8. Enter the **Application access URL** given by your Service Provider (SP). The URL should look something like: `https://mydomain.company.com/sso/saml`
9. Click **Next** to continue.
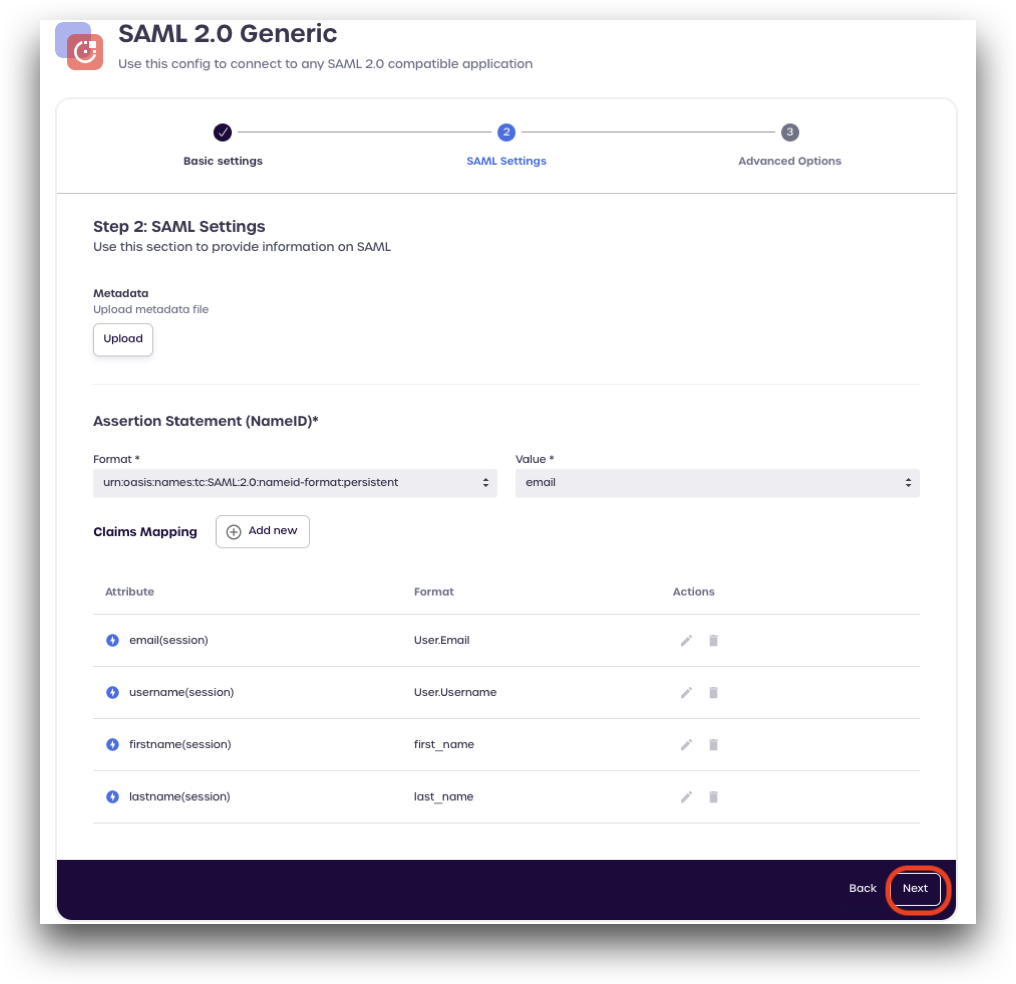
10. Under **Step 2: SAML Settings**, add the following attributes settings:
* Metadata: Upload a SAML metadata file if one is available from your service provider **Assertion Statement (NameID)**:
* Format: `urn:oasis:names:tc:SAML:2.0:nameid-format:persistent`
* Value: enter an attribute, such as `email`
11. In the **Claims Mapping** section, click **Add new**.
12. Add the following attributes and their formats as specified by your Service Provider. An example of claims mapping is provided below:
* **Attribute**: `email` **Format**: `User.Email`
* **Attribute**: `username` **Format**: `User.Username`
* **Attribute**: `firstname` **Format**: `first_name`
* **Attribute**: `lastname` **Format**: `last_name`
13. Click **Next** to continue.
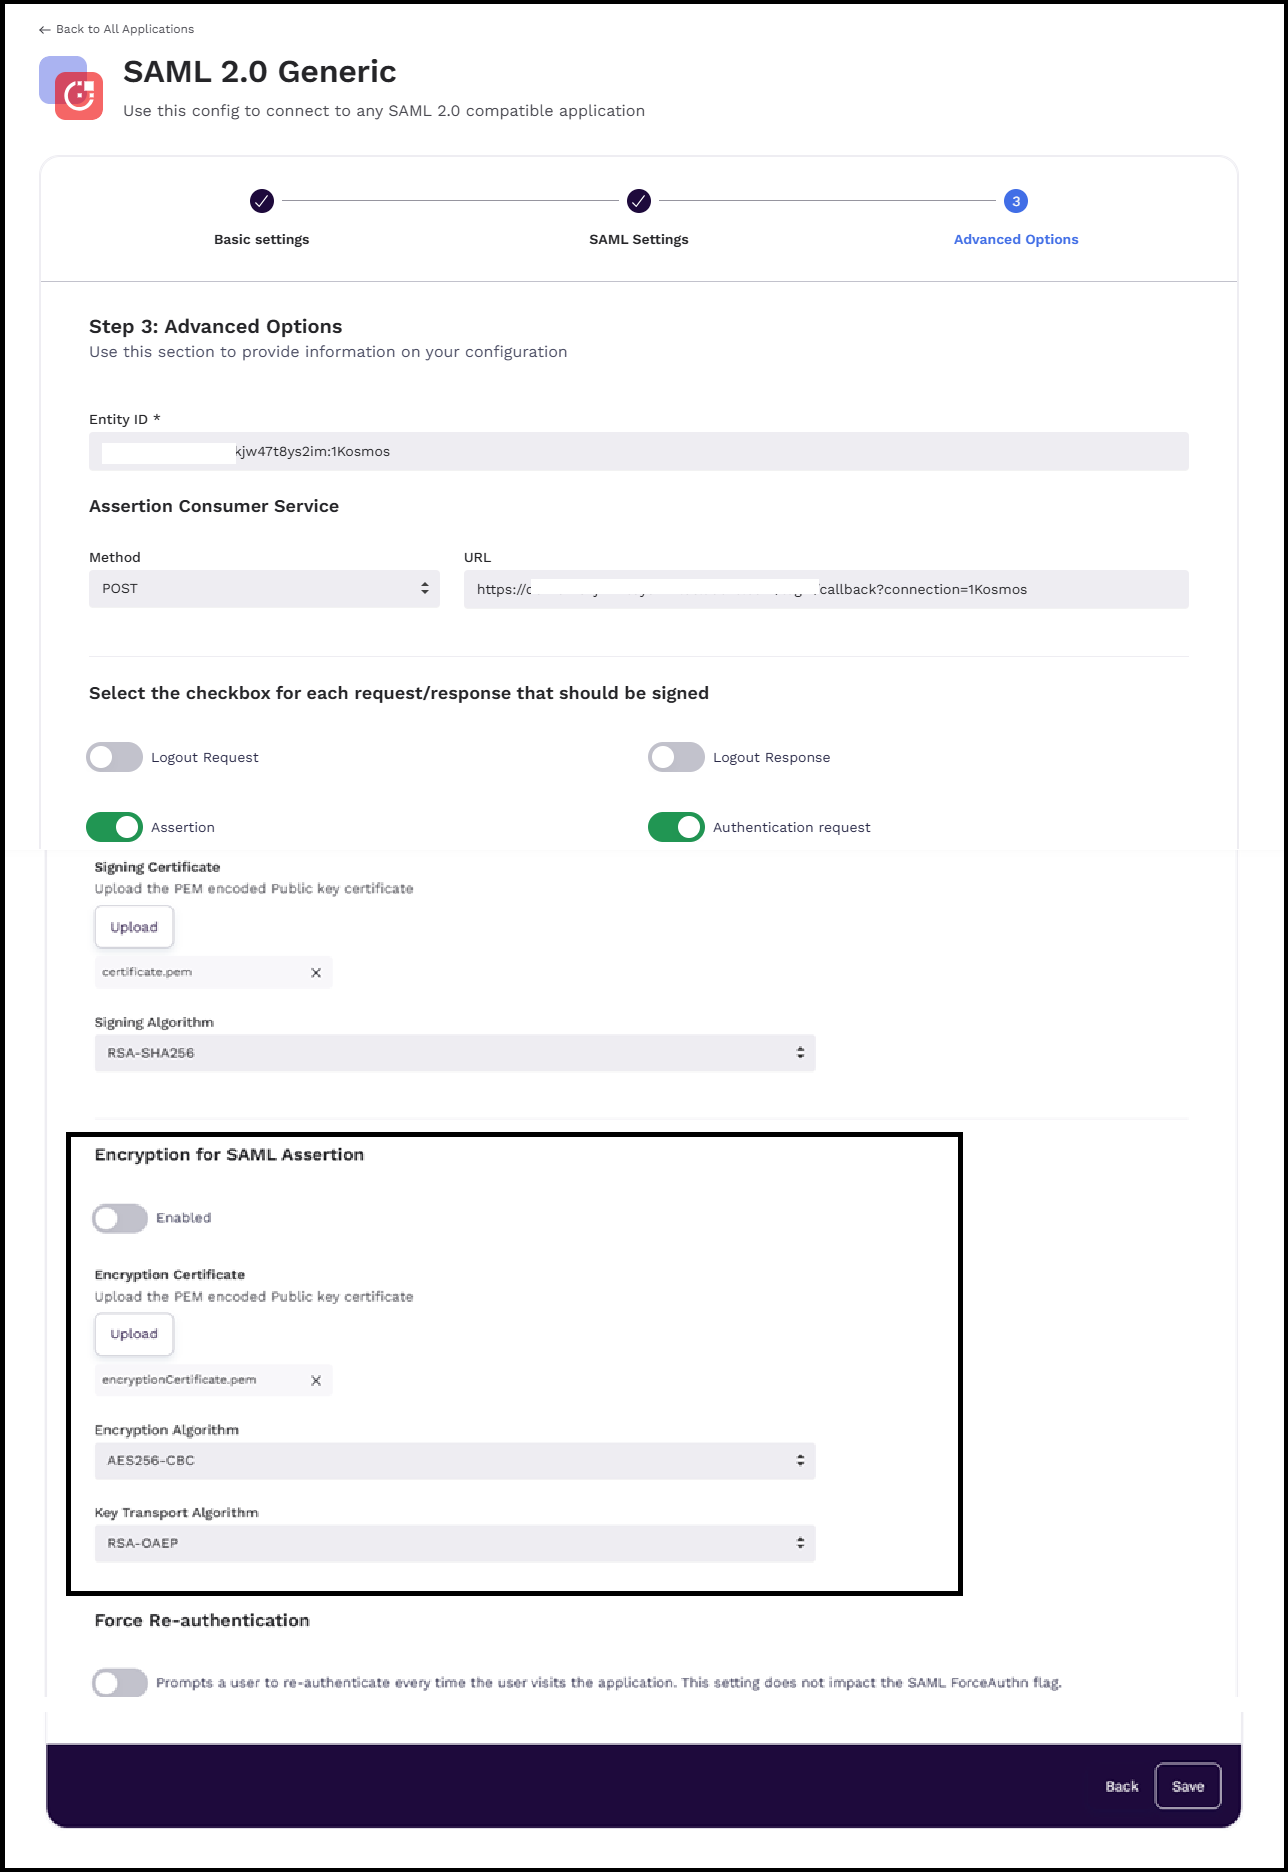
14. In the **Advanced Options** tab, enter and select the following details:
**Entity ID**: Enter the entity ID. For example, `https://mydomain.company.com`
15. In the **Assertion Consumer Service** section, perform the following steps:
* **Method**: `POST`.
* **URL**: Enter the SAML assertion consumer URL given by your SAML service provider. The URL should look something like `https://mydomain.company.com/sso/saml`
16. In the **Select the checkbox for each request/response that should be signed** section, perform any steps as specified by your service provider.
* **Signing Certificate**: Upload a public-key `.pem` file if one has been provided by your service provider.
17. In the **Encryption for SAML Assertion** section, you can encrypt SAML assertions before they are transmitted to the service provider to ensure secure data exchange. By default, SAML assertion encryption is disabled.
* The supported Encryption Algorithm: AES256-CBC
* The supported Key Transport Algorithm: RSA-OAEP
18. Enable the Force Re-authentication option to re-authenticate the user every time they visit the application.
19. Enable the IDP-initiated Login option to redirect the user after authentication.\
**Note**: This Relay State applies to **IDP-initiated login** and redirects the user *after authentication*. It is not the same as the **post-logout** Relay State, which is configured by appending a `RelayState` parameter to the IDP Single Logout (SLO) URL. See[#redirect-users-to-a-custom-url-after-single-logout-relaystate](#redirect-users-to-a-custom-url-after-single-logout-relaystate "mention").
{% hint style="info" %}
Access URL (screenshot below) will be available only after the Application is created. It is not available while creating a new application.
{% endhint %}
\
Click **Save** to finish adding your SAML application.
#### Testing the Connection
1. In your browser, enter the target application domain URL. You will be redirected to your 1Kosmos Admin console's single sign-on page.
2. Login with 1Kosmos by scanning the QR code with the 1Kosmos Mobile Application or by entering your username, password, and OTP.
After authenticating, you will be logged into the target application, confirming the SAML integration has worked successfully.
---
# Agent Instructions
This documentation is published with GitBook. GitBook is the documentation platform designed so that both humans and AI agents can read, navigate, and reason over technical content effectively. Learn more at gitbook.com.
## Querying This Documentation
If you need additional information that is not directly available in this page, you can query the documentation by asking a question.
Perform an HTTP GET request on the following URL with the `ask` and `goal` query parameters:
```
GET https://docs.1kosmos.com/integrations/authentication/custom-integrations/saml-application-integrations.md?ask=&goal=
```
`ask` is the immediate question: it should be specific, self-contained, and written in natural language.
`goal` is what the user is ultimately trying to achieve, the reason they need the answer. Sharing it helps GitBook give you a better, more relevant answer. A goal is most helpful when it describes the outcome the user wants rather than restating the question. For example, with `ask=how do I create an API token`, a goal like `automate deployments from our CI pipeline` lets GitBook tailor the answer to that use case.
The response will contain a direct answer to the question and relevant excerpts and sources from the documentation.
Use this mechanism when the answer is not explicitly present in the current page, you need clarification or additional context, or you want to retrieve related documentation sections.
