Generic SAML Application
Overview
This document describes the procedure to configure your generic SAML application for Single Sign On (SSO) with BlockID using the AdminX control plane. After completing the integration steps below, users can log in to your organization's application using their enrolled biometrics with BlockID passwordless authentication. The biometric options include Touch ID / Face ID and Live ID.
Before you Begin
When setting up a SAML application for SSO, there are two separate entities that we will need to access: your Identity Provider (IdP)and your Service Provider (SP).
- Your IdP in this case will be 1Kosmos, and all configuration will be done using the AdminX control plane.
- Your SP is the provider that you will be logging in to. The SP will provide the SAML application.
Users will need Admin access to the IdP and the SP to set up their SAML application.
With all this in mind, please ensure that the following prerequisites have been met before continuing:
IdP Configuration
- Identity Provider (IdP) Configuration completed in AdminX. The following information will be needed to configure your Service Provider (SP) to use BlockID as your IdP:
- Encryption Certificate
- Single SignOn Service URL
- Single Logout Service URL
SP Configuration
- Access to your SAML application's settings and URLs:
- Access URL
- Entity ID
- Assertion statement (NameID)
- Assertion consumer service URL
- Claims
- Signing Certificate
- Requests and responses
- Signing Algorithm
- SAML metadata (if needed)
Other Requirements
- BlockID Mobile Application installed on your mobile device if using the following passwordless authentication options:
- QR Code login
- Push Notification login
Configuring your Service Provider (SP) to use 1Kosmos as its Identity Provider (IdP)
If you still need to do so, you must configure your Service Provider (SP) to use 1Kosmos BlockID as its Identity Provider (IdP). This step needs to be done before adding your SAML application. Please see Identity Provider (IdP) Configuration for information on how to configure your IdP in AdminX.
In another article, we outlined the steps to configure our Service Provider, OneLogin, to use 1Kosmos as its Identity Provider. Please see OneLogin for an example of how to configure your Service Provider to use 1Kosmos as its IdP.
Please note that every Service Provider will have a different configuration menu. Please get in touch with your Service Provider directly for support if you need assistance.
Adding a Generic SAML Application in AdminX
By way of example, we will be setting up a free OneLogin instance as our generic SAML application. The configuration process in AdminX is the same for all SAML applications configuring a generic SAML application - enter your own application's URLs and details when following the steps below.
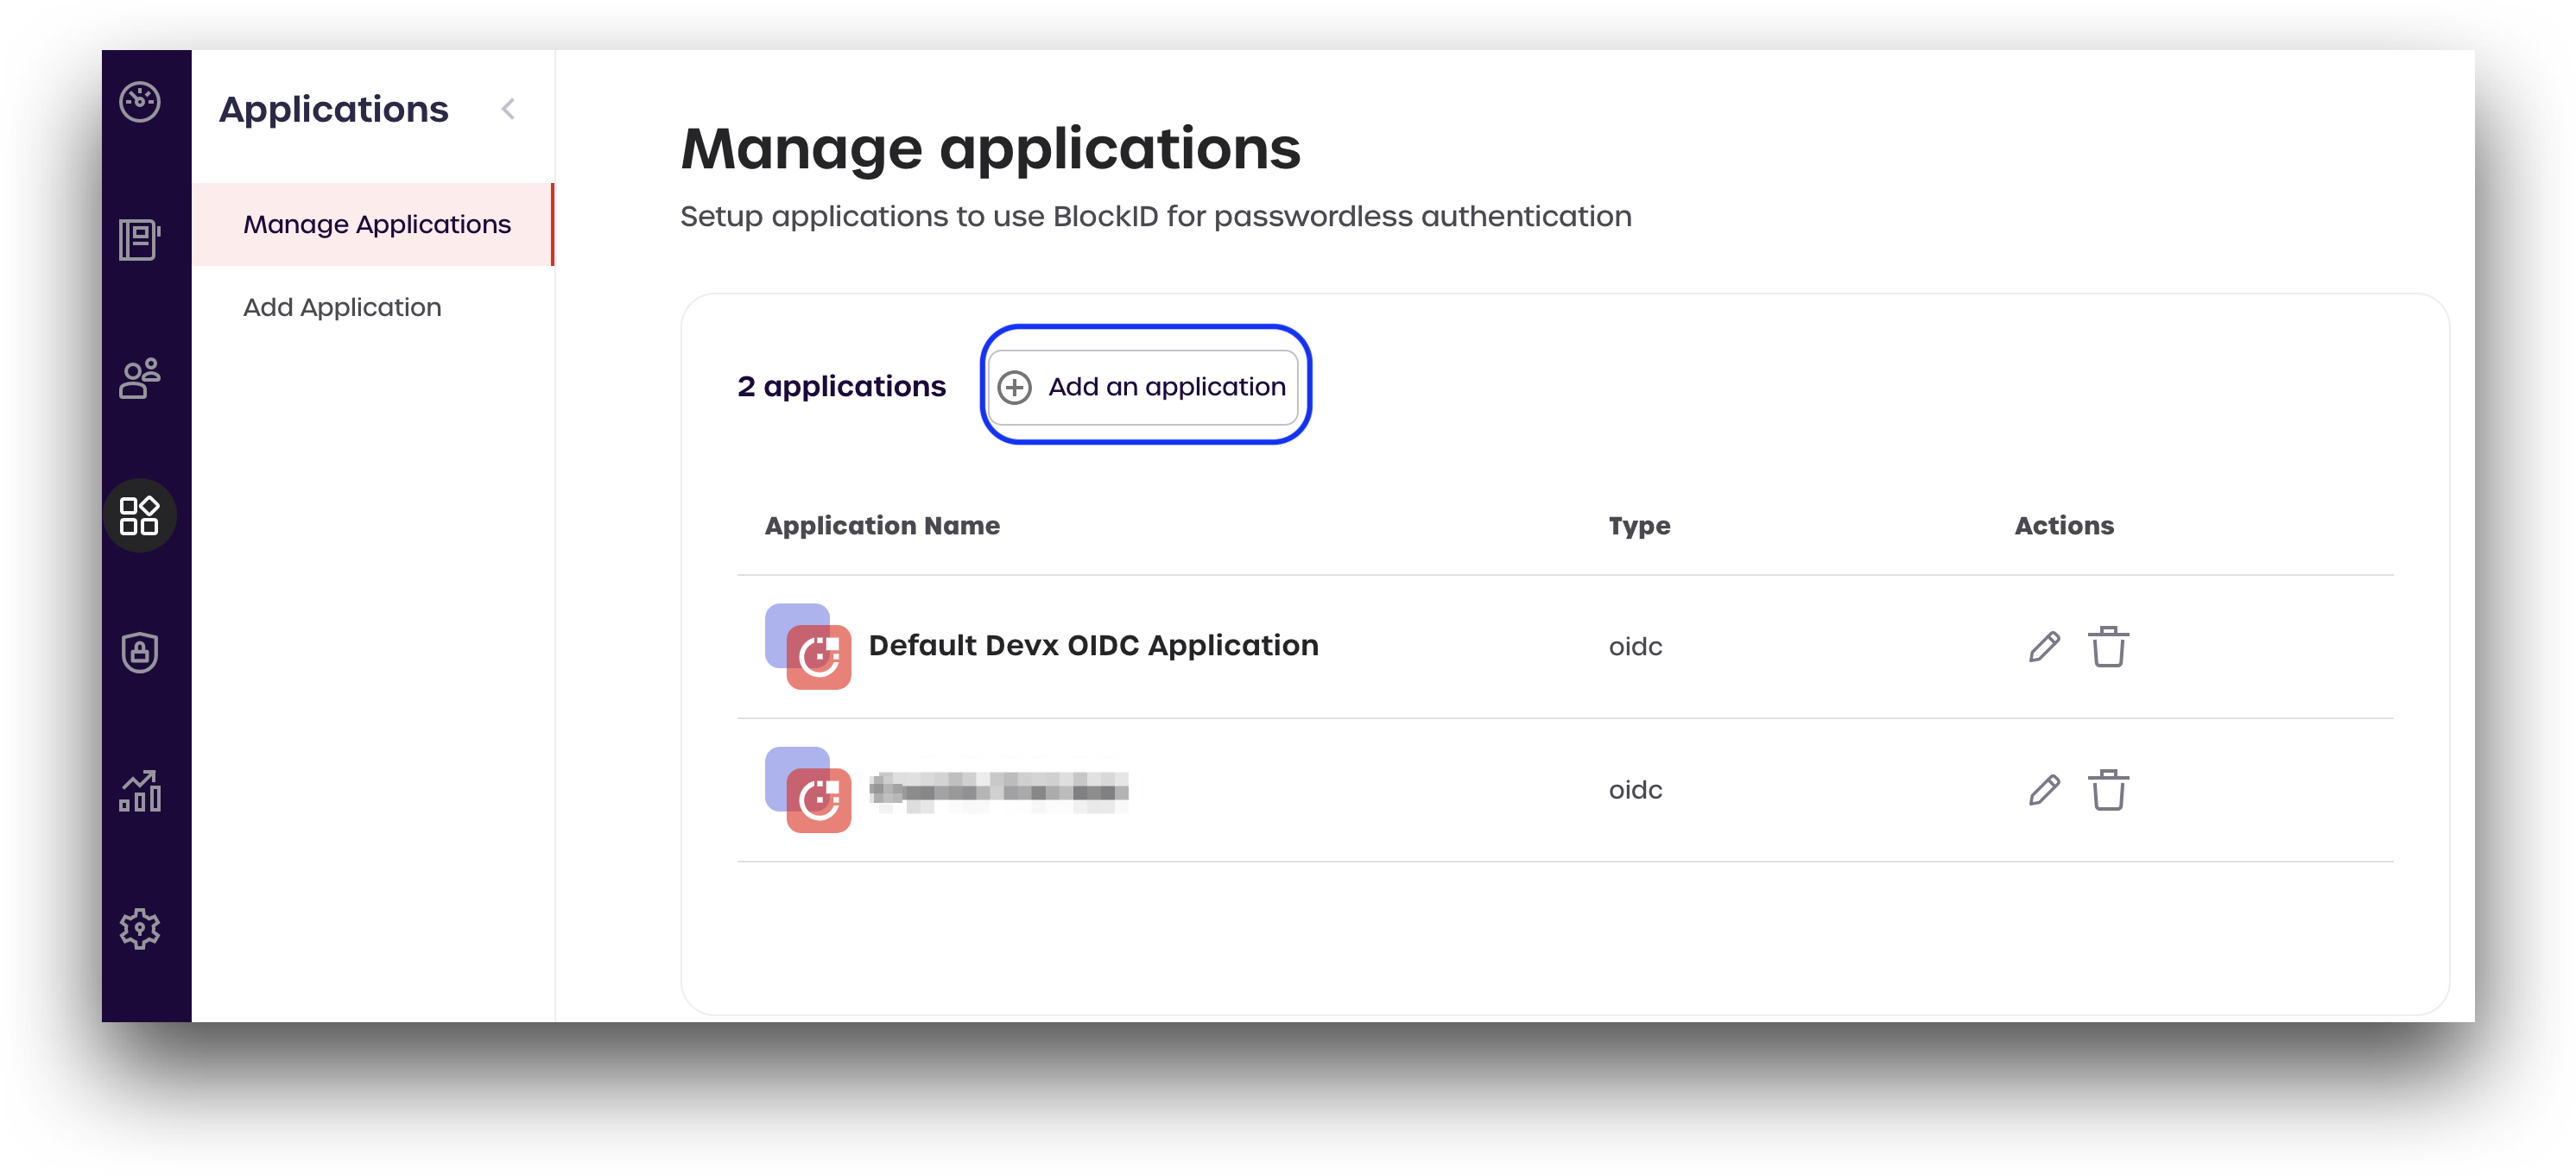
- To get started, navigate to your AdminX instance and log in as an Administrator.
- Click Applications -> Manage Applications to access your current SAML and OIDC applications.
- Click Add an application
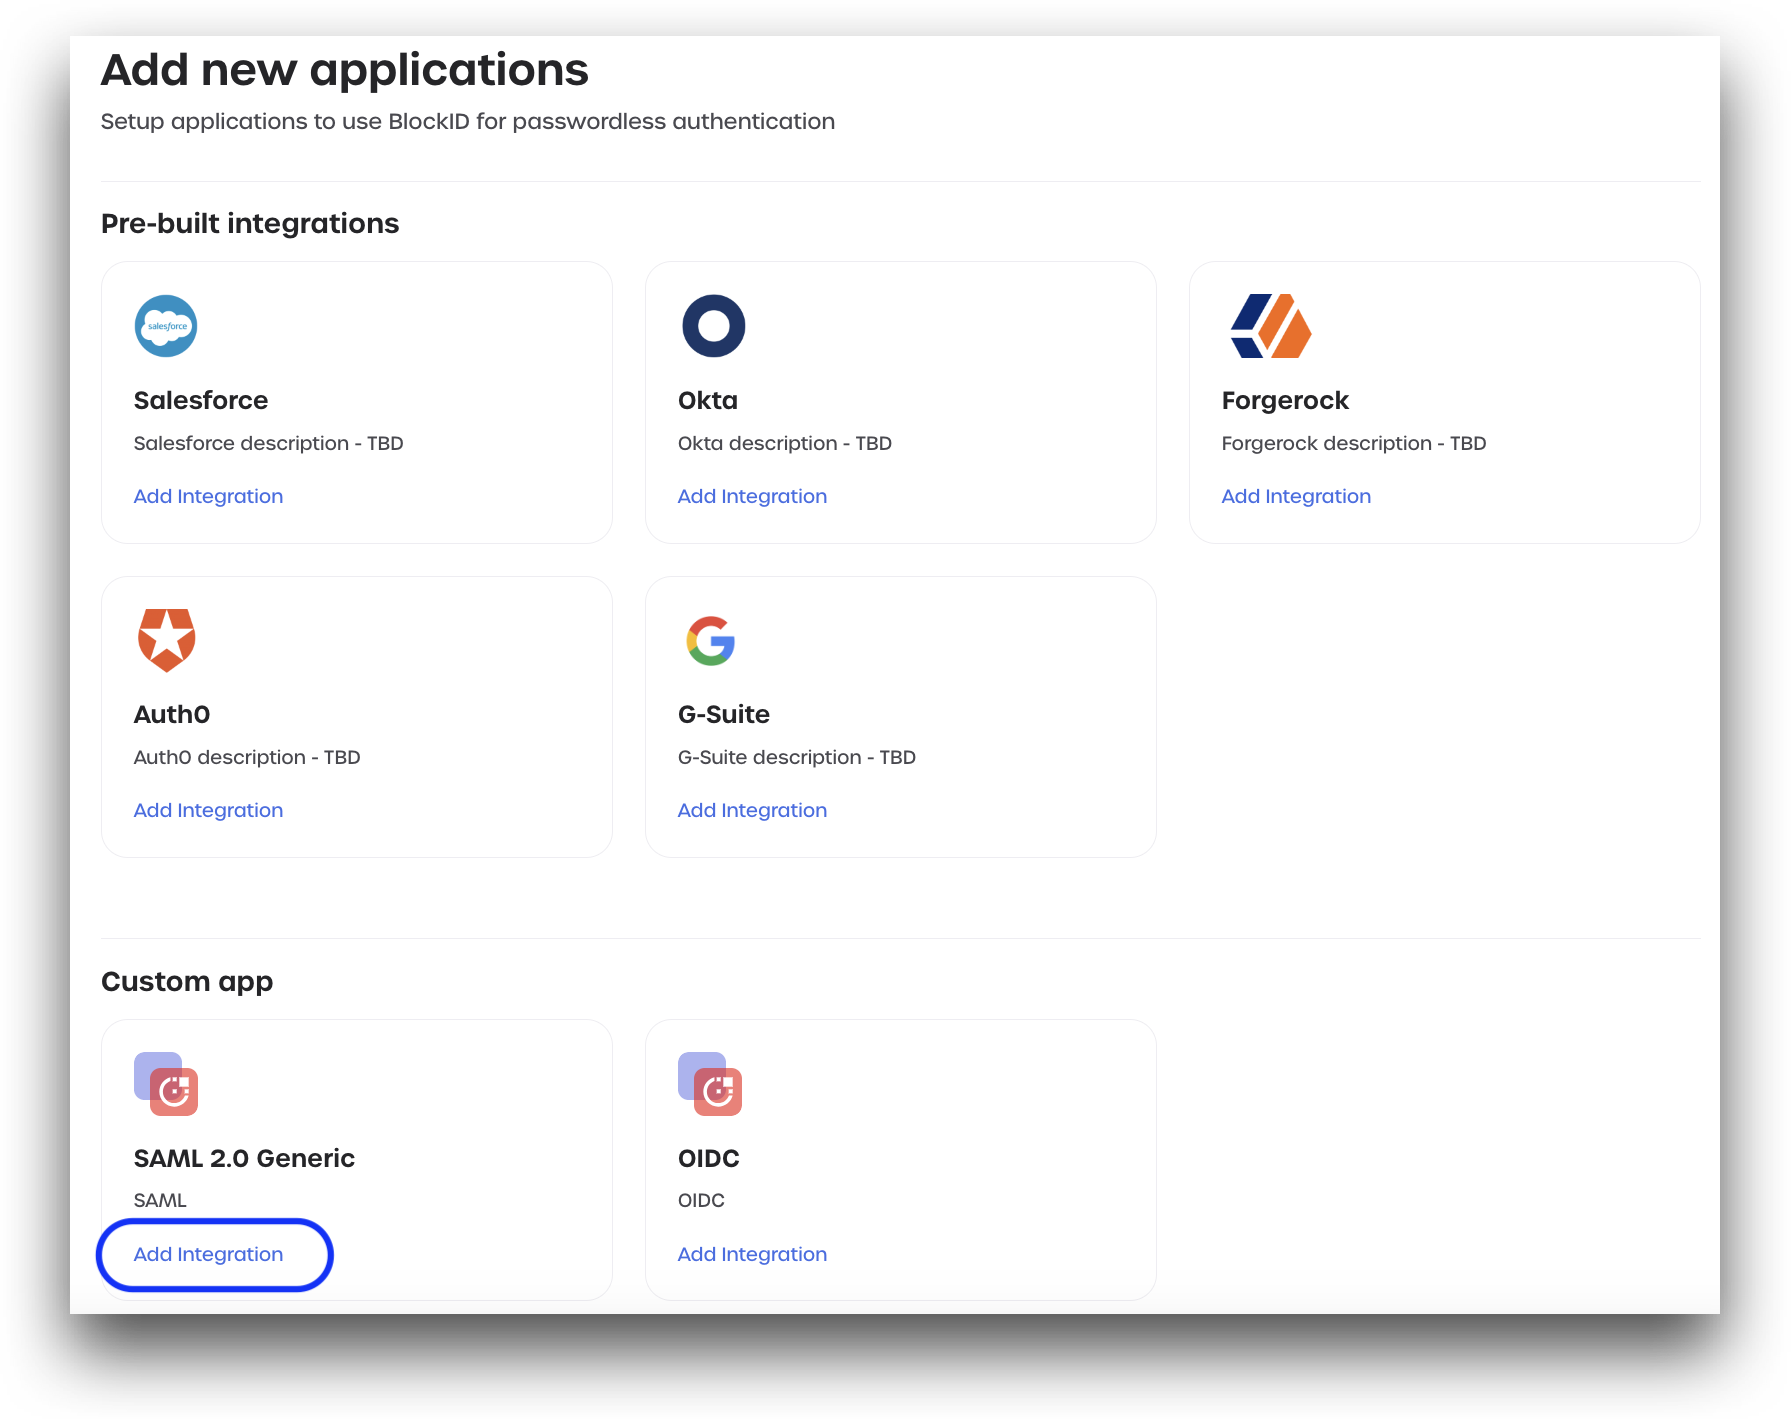
- From the Add new applications page, scroll down to SAML 2.0 Generic, located under Custom App, and click Add Integration.
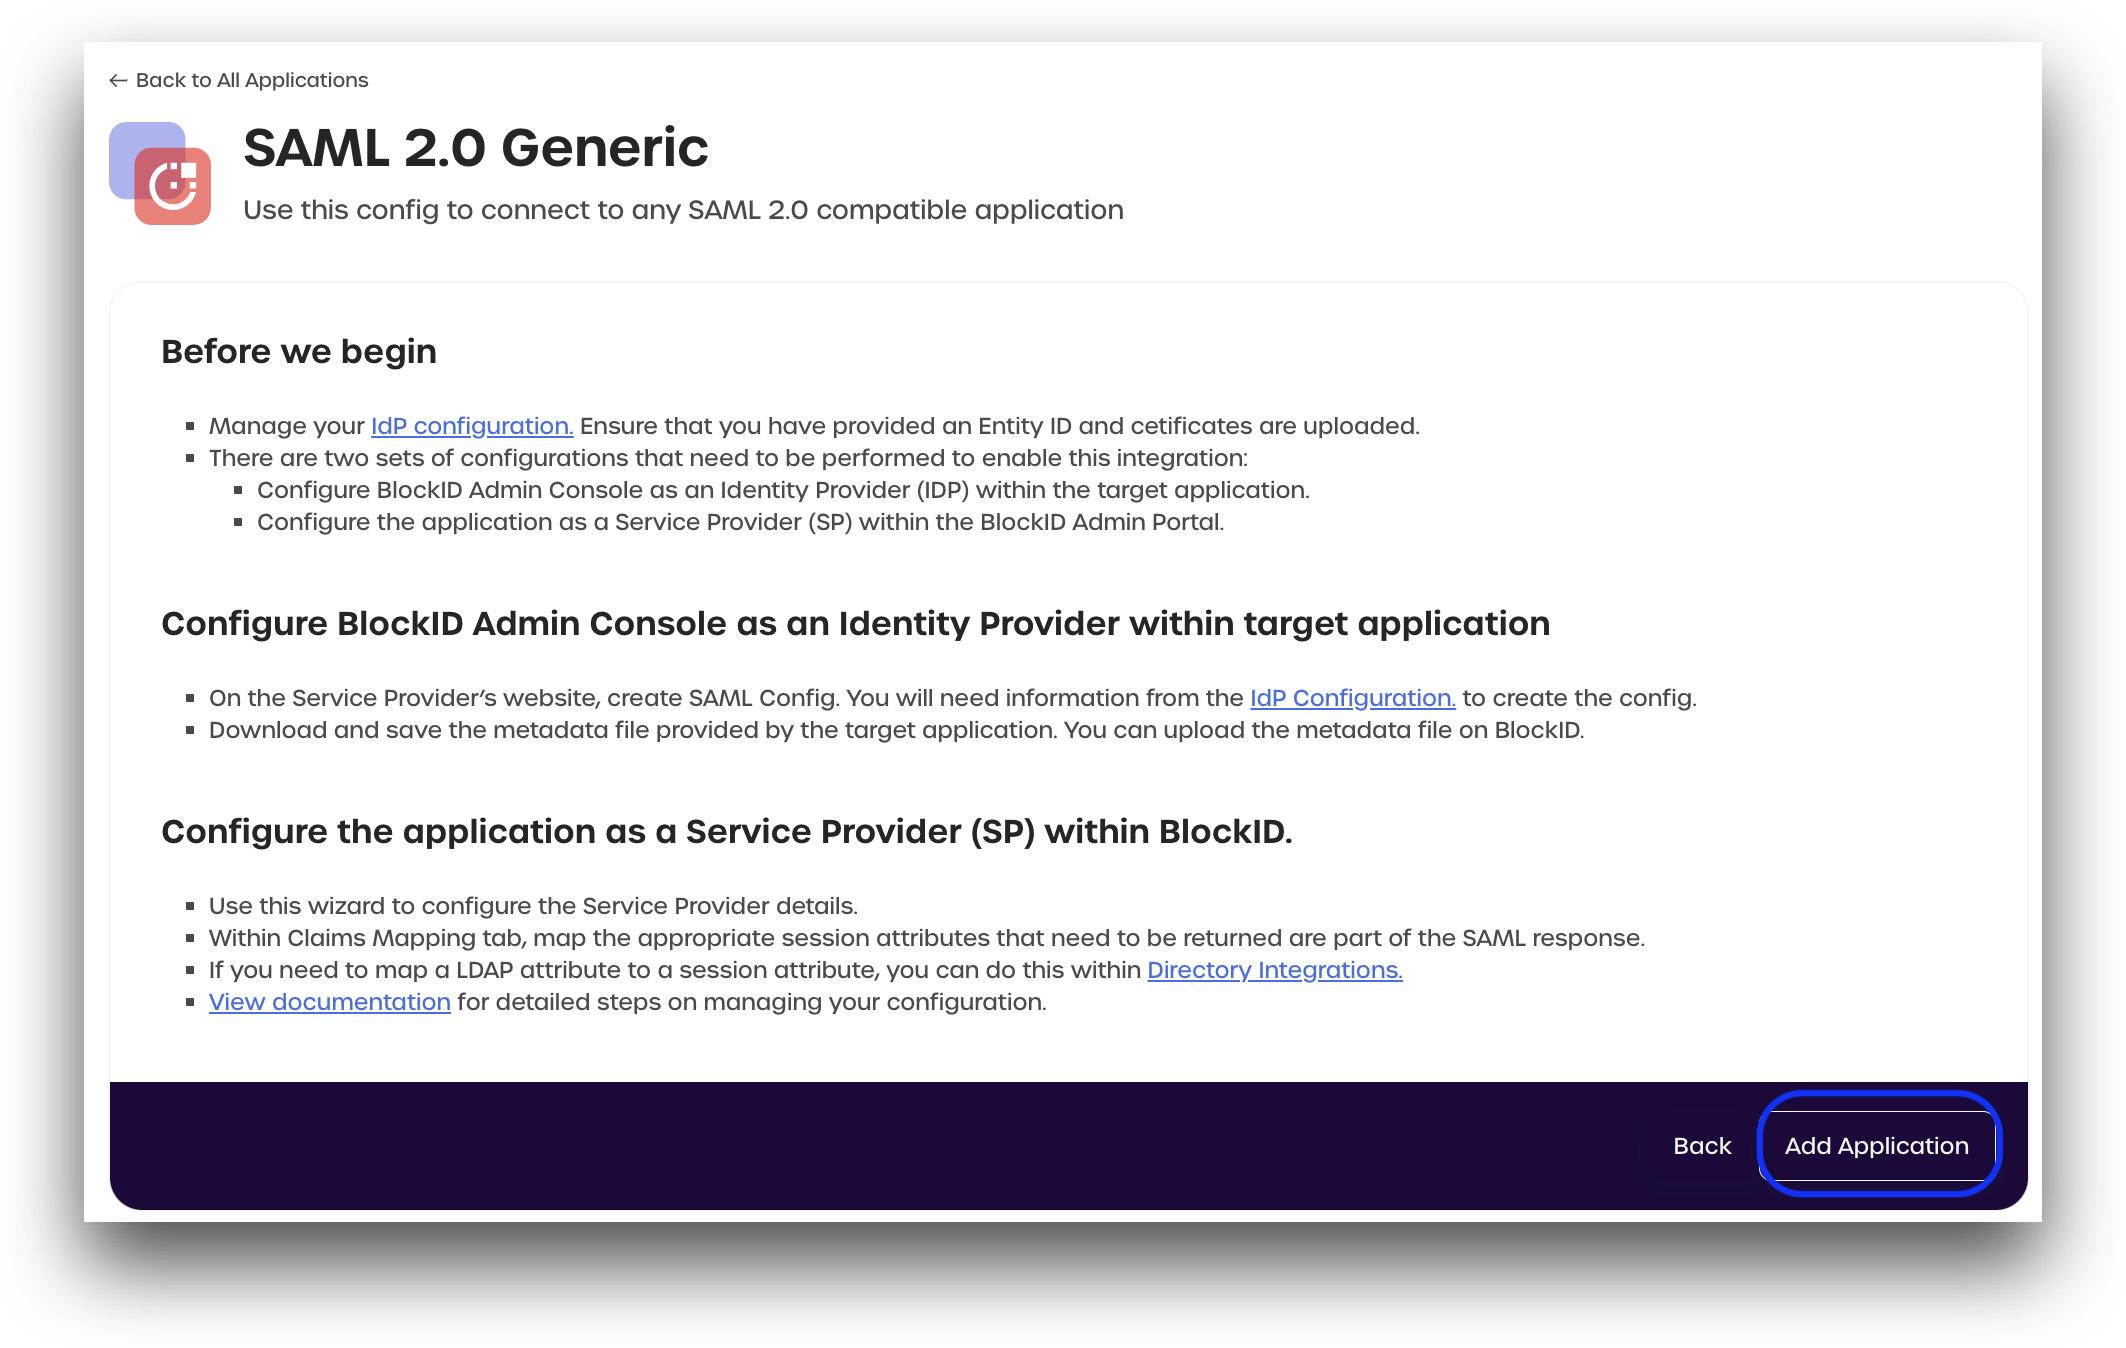
- Review the displayed information outlining the access and privileges needed to continue. Click Add Application.
Step 1: Basic Settings
Enter an application name to use. We will use the title
OneLogin - Generic SAMLfor this example.Select an instance type from the dropdown menu. If this application is for internal testing only, select
Sandbox. Otherwise, selectProduction.Enter your SAML application access URL. For OneLogin, the access URL is
https://<yourtenant>.onelogin.com/portal- This URL will typically be the login URL for the Administration panel of your Service Provider (SP). Please get in touch with your SP directly if you have any questions on how to find your access URL.
Click Next.
Step 2: SAML Settings
Enter the following SAML details as shown below.
**Assertion Statement (NameID)
- Format:
urn:oasis:names:tc:SAML:2.0:nameid-format:persistent - Value:
email(located under BlockID Session Attributes)
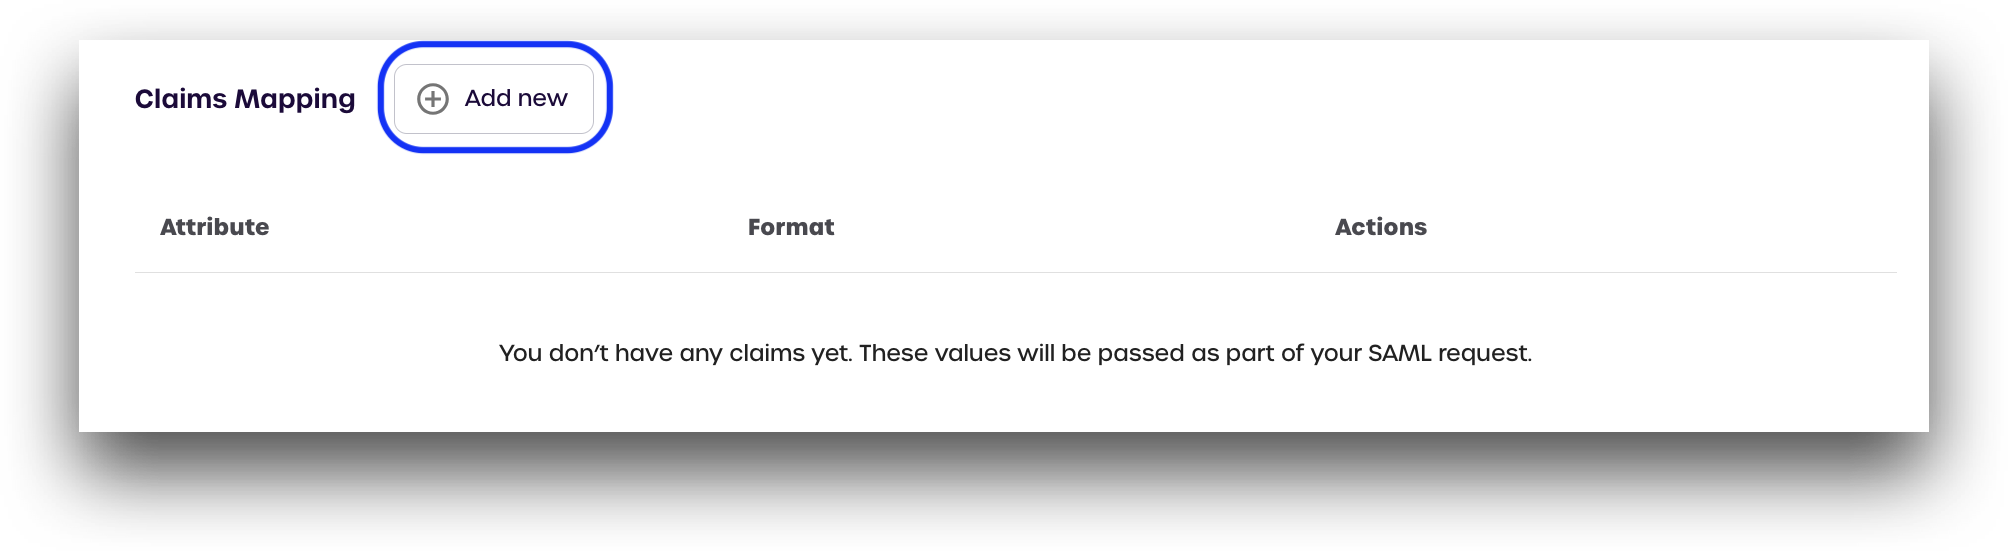
Claims Mapping
Click Add new and add the following claims:
- Email:
- Attribute:
email - Format:
User.Email
- Attribute:
- Username:
- Attribute:
username - Format:
User.Username
- Attribute:
- First Name:
- Attribute:
firstname - Format:
first_name
- Attribute:
- Last Name:
- Attribute:
lastname - Format:
last_name
- Attribute:
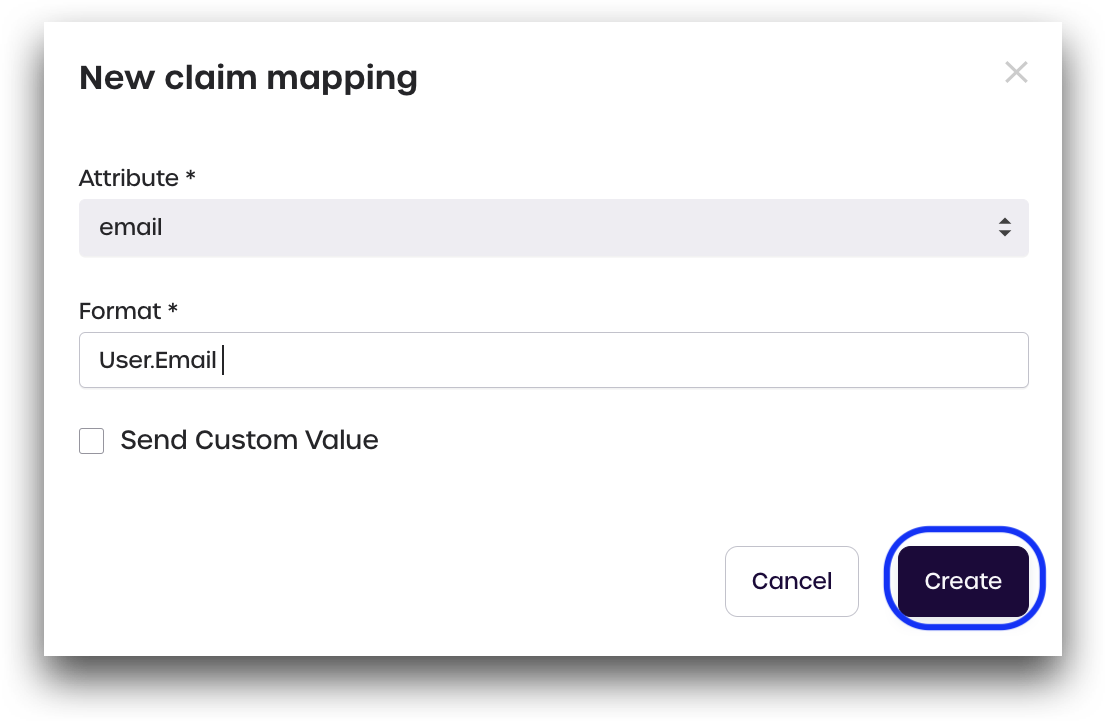
When finished, your page should look similar to the image below.

Custom Claim Values
Some Service Providers might require their claims to include a value not listed in the menu. In this case, users can modify a claim to send a custom value.
If you don't need to send a custom claim value, please click Next and continue to Advanced Options
There are three different custom value types to choose from:
- Value Type:
Static- Static, hardcoded value. Whatever you enter as the
valuewill be used
- Static, hardcoded value. Whatever you enter as the
- Value Type:
Default:- If a value is present for the selected attribute, the custom value will be ignored. If no value is present, then whatever you enter as
valuewill be sent instead of a blank response.
- If a value is present for the selected attribute, the custom value will be ignored. If no value is present, then whatever you enter as
- Value Type:
Null:- A blank (null) response will be returned as the
valueevery time.
- A blank (null) response will be returned as the
Examples
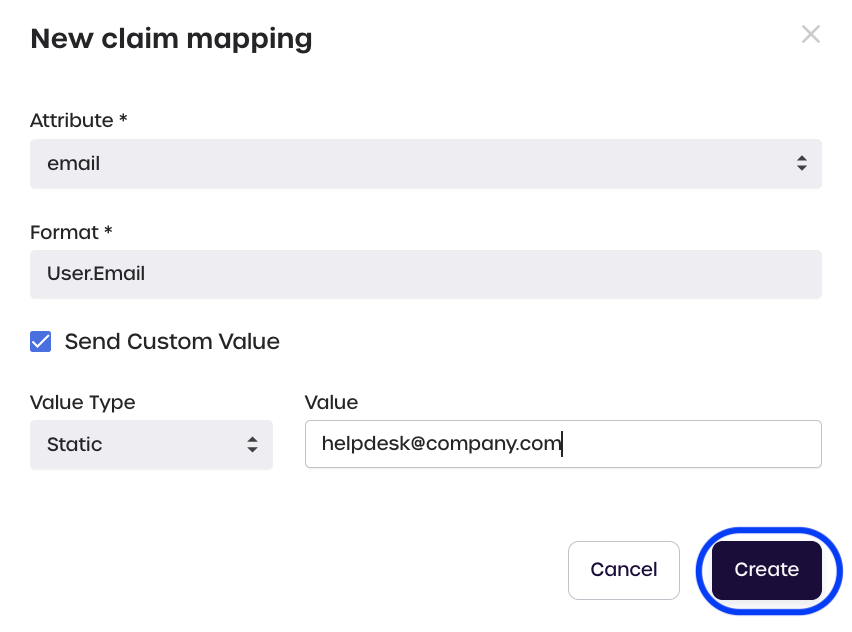
- Static Custom Value:
Under Claims Mapping, a user adds the email attribute, using User.Email as the format.
The Static custom value type is selected, with helpdesk@company.com entered as the custom value.
Instead of the user's actual email (as determined from when the user registered an account with the Service Provider), the email helpdesk@company.com will be sent back to the Service Provider as part of the SAML response.
- Default Custom Value:
Under Claims Mapping, a user adds the email attribute, using User.Email as the format.
The Default custom value type is selected, with helpdesk@company.com entered as the custom value.
If the user already has a registered email address associated with their account, their actual email will be returned. If no email is found, helpdesk@company.com will be returned to the Service Provider as part of the SAML response.
- Null Custom Value:
Under Claims Mapping, a user adds the email attribute, using User.Email as the format.
The Null custom value type is selected. No custom value can be entered when Null is specified.
A blank (null) email will be sent back to the Service Provider as part of the SAML response, even if the user has an email currently associated with their account.
Add a Custom Claim Value
Users add a custom claim value by following the steps below.
- Click Add new
- Select the attribute and add the format for the claim you wish to modify
- Check Send Custom Value
- Select the Value Type and enter the custom value
- Click Create
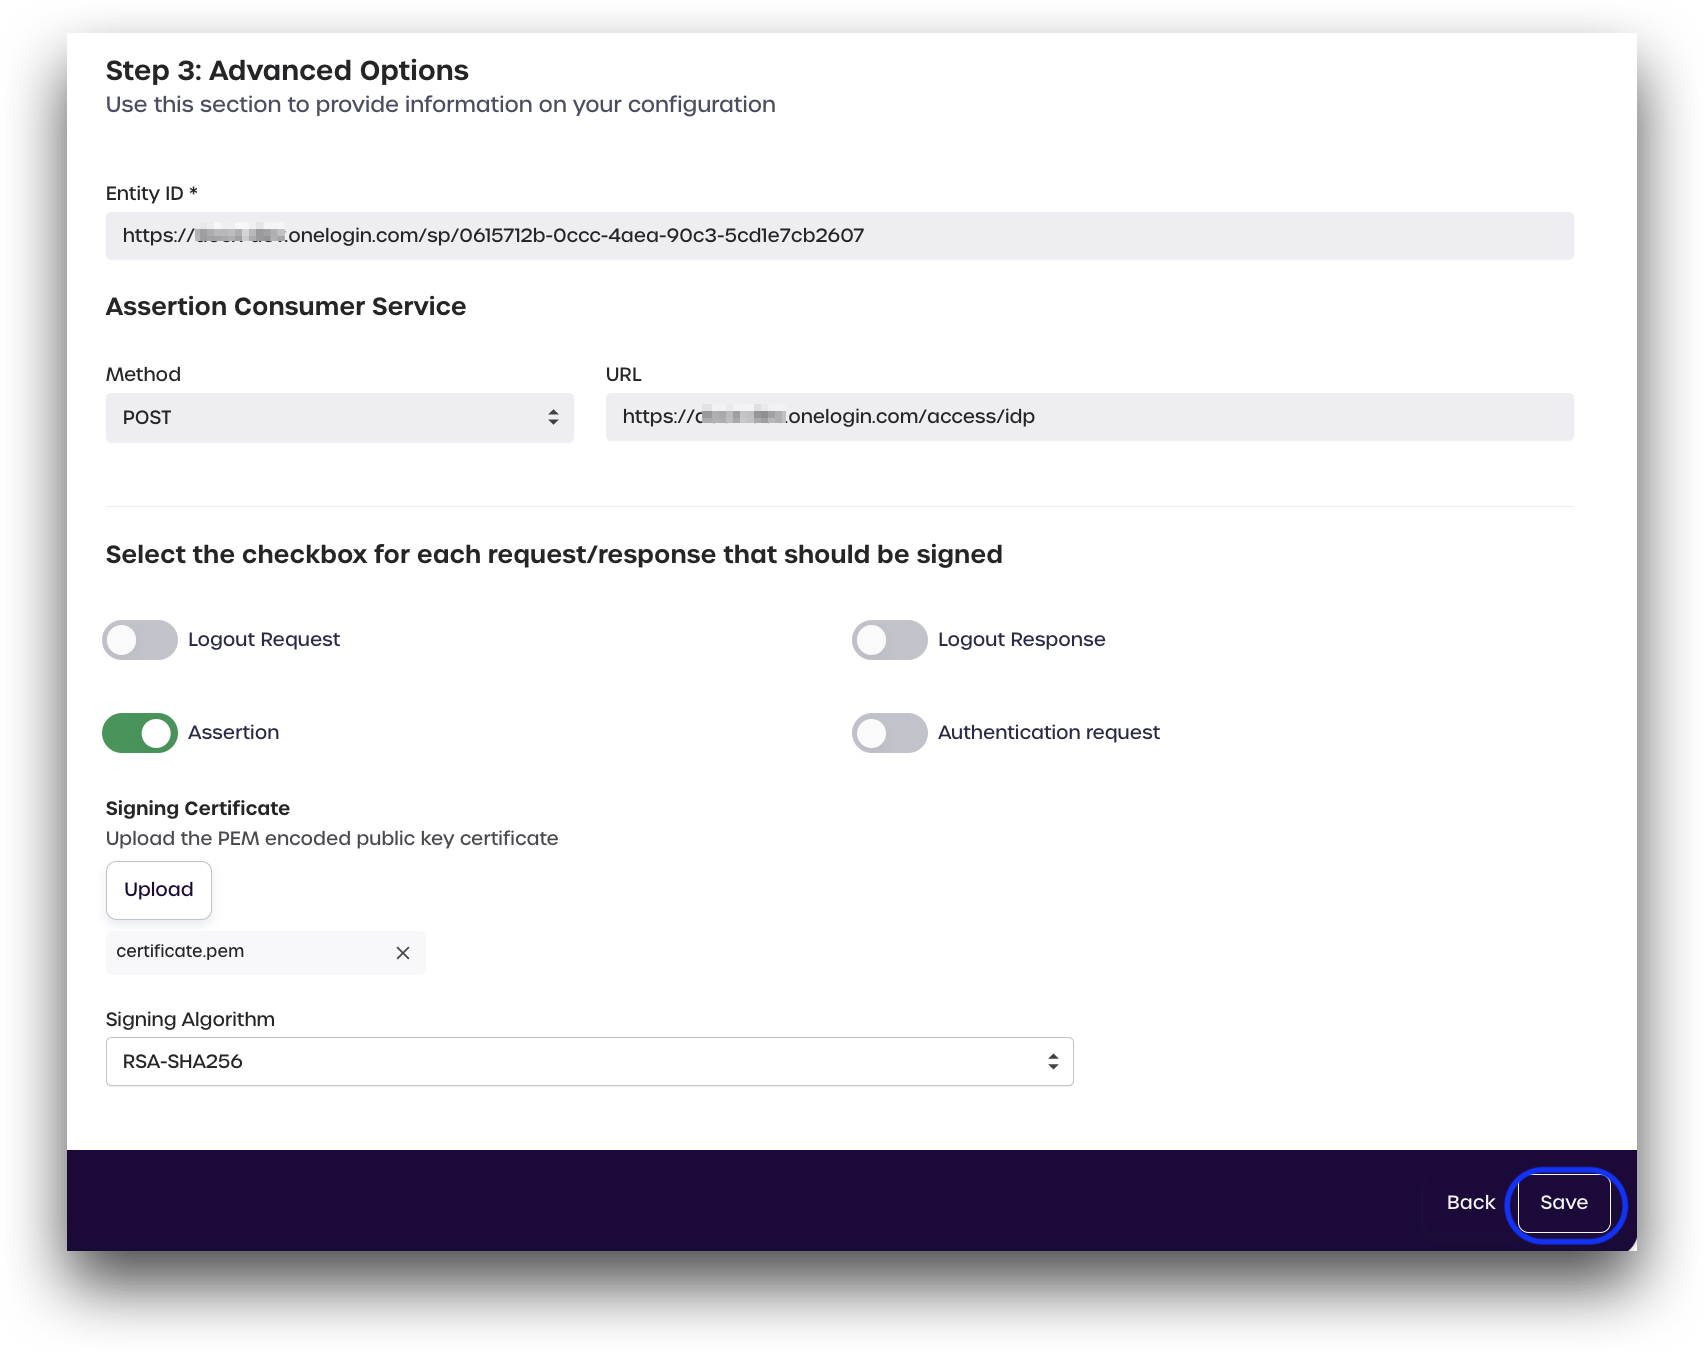
Step 3: Advanced Options
In this section, you must enter some details provided by your Service Provider. It is easiest to log in to your Service Provider in a second tab in your browser to easily copy and paste the required information from your SP into AdminX.
You must access the IdP settings and SAML configuration for your Service Provider. Please get in touch with your SP directly if you have any questions on how to find the information required below.
Example SP SAML Configurations Page
Here is an example of the SAML Configurations page for a OneLogin tenant, located in Authentication -> Trusted IdPs -> 1Kosmos. If you have not yet set up 1Kosmos as your IdP, please see OneLogin for an example of how to configure 1Kosmos as your IdP.
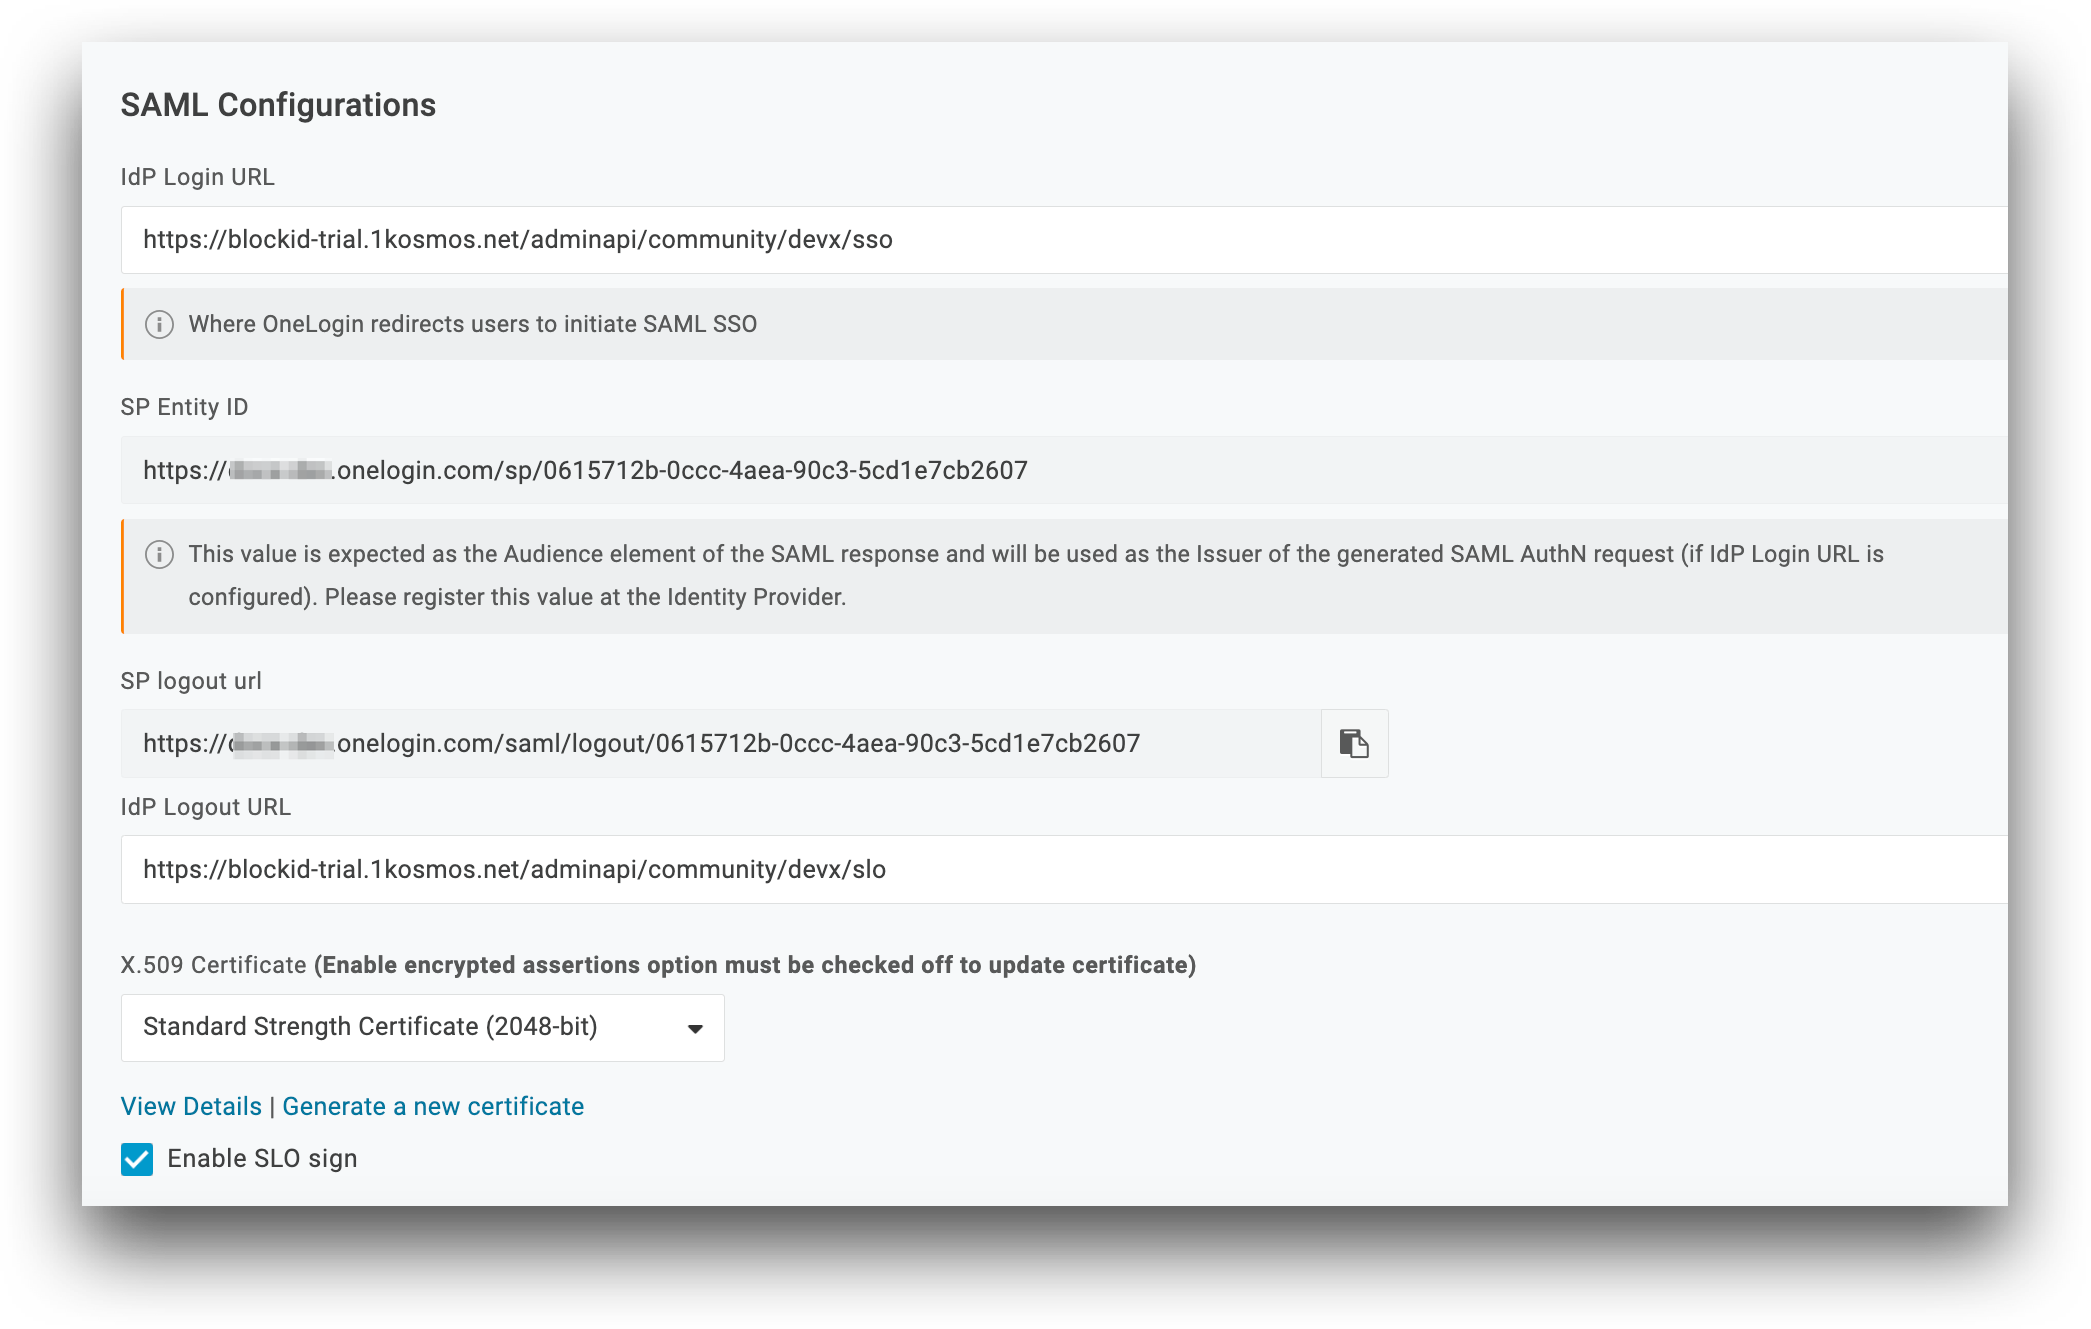
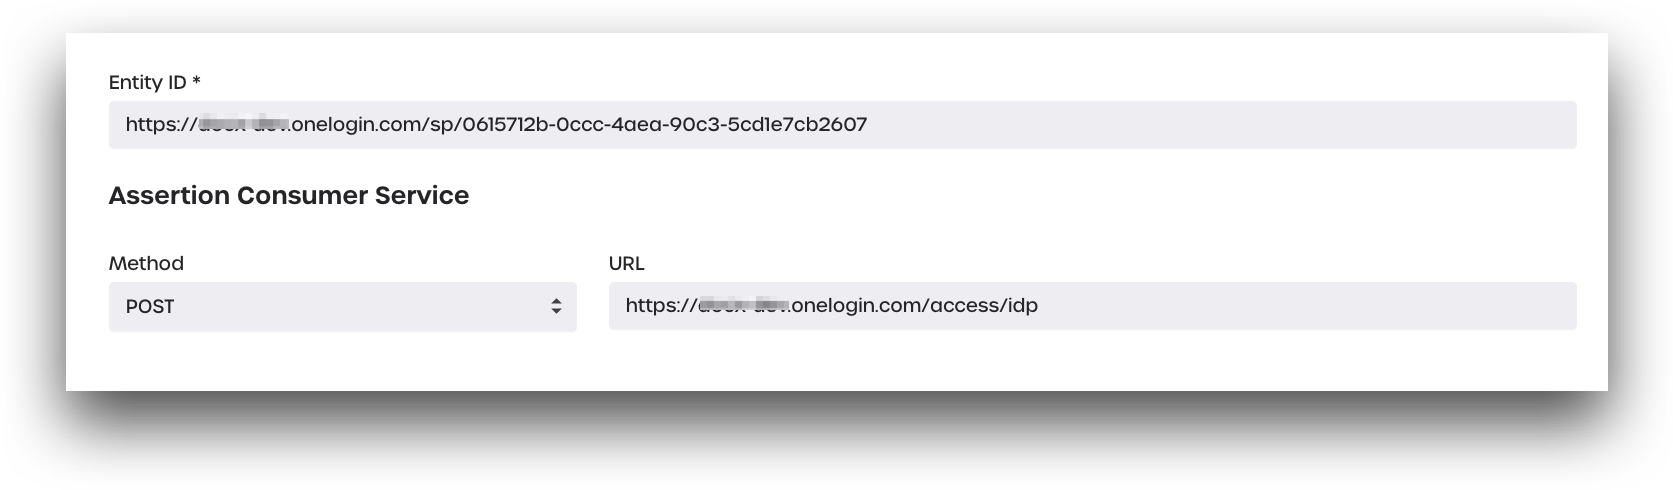
Entity ID *
In AdminX, enter your Entity ID as provided by your SP in the provided box. It should look similar to the example below.
- Entity ID *:
https://<yout tenant>.onelogin.com/sp/0615712b-0ccc-4aea-90c3-5cd1e70000
Assertion Consumer Service
Enter your assertion consumer service (ACS) URL in the provided box. Your ACS URL is almost always in the following format: https://<your-tenant>.<serviceprovider>.com/access/idp
- Method:
POST - URL:
https://<your-tenant>.onelogin.com/access/idp
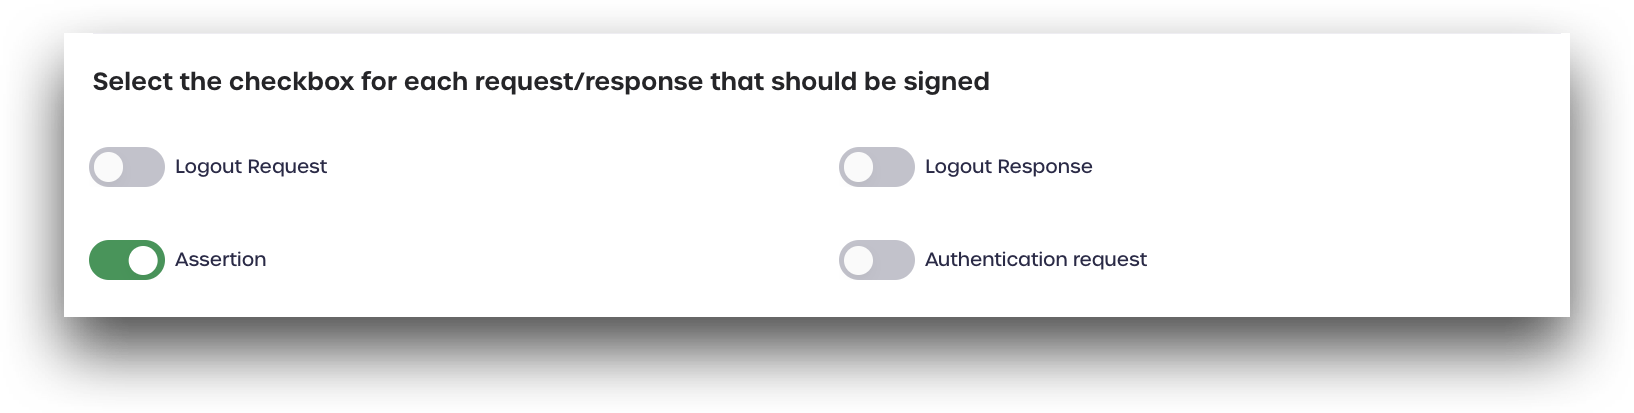
Select the Checkbox for Each Request/Response that Should be Signed
Toggle the switches for each request or response needed by your SP. For OneLogin, the Assertion switch should be enabled.
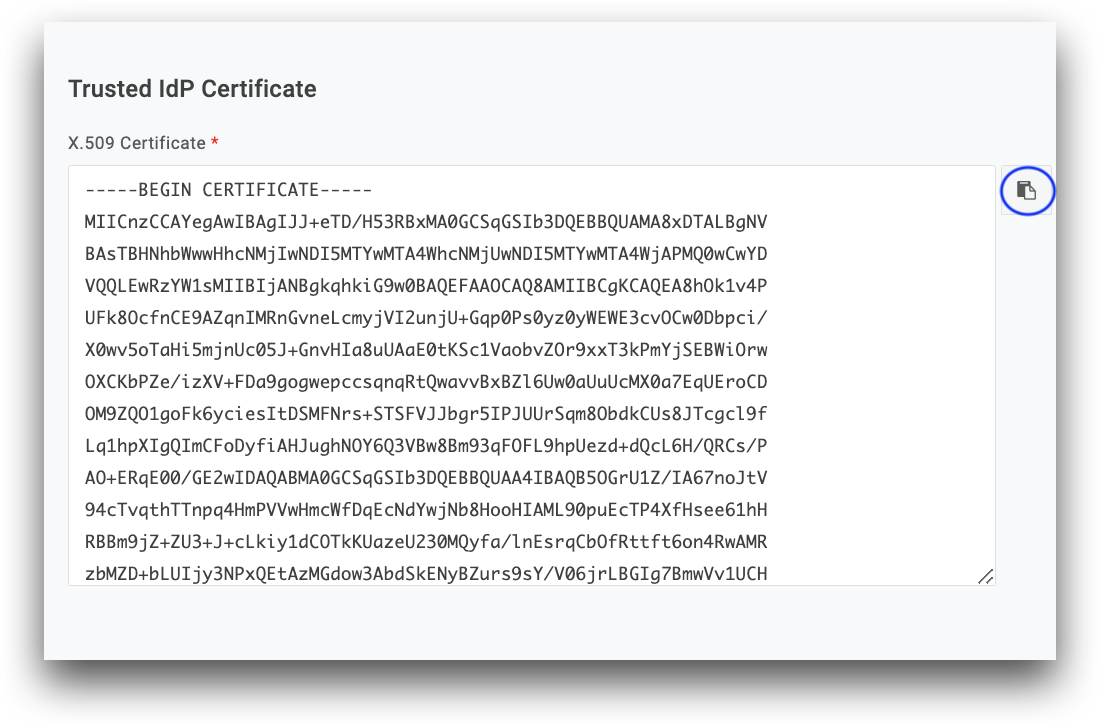
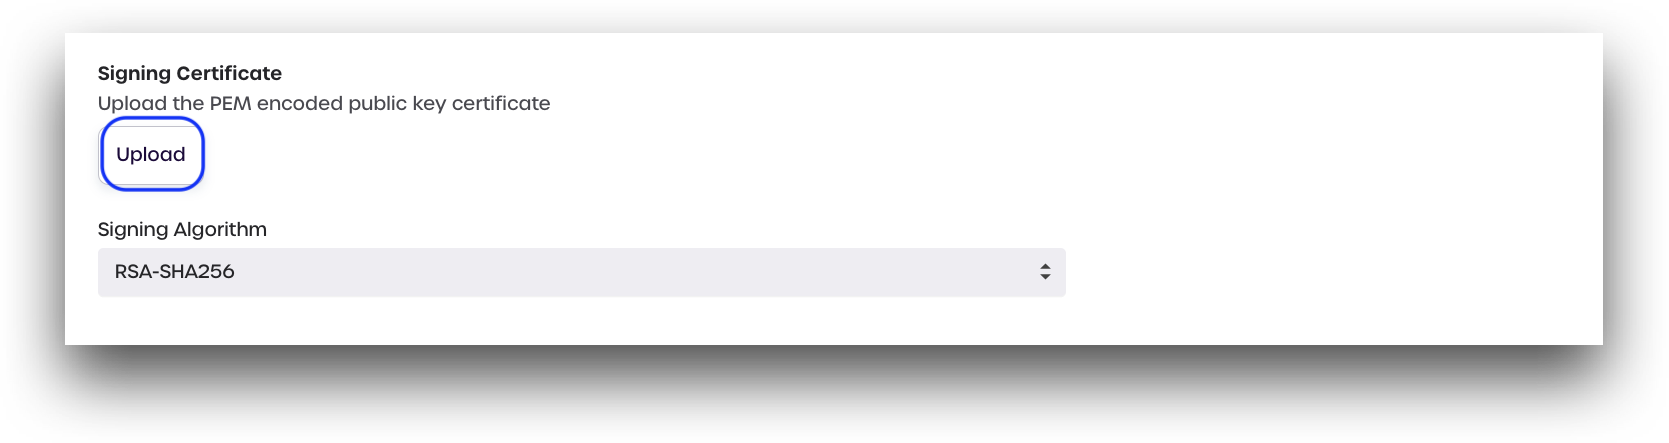
Signing Certificate
Upload your PEM encoded X.509 Certificate as provided by your IdP. If your IdP does not provide a direct download link for your certificate, creating a .pem file might be necessary using a text editor. To do so, please do the following:
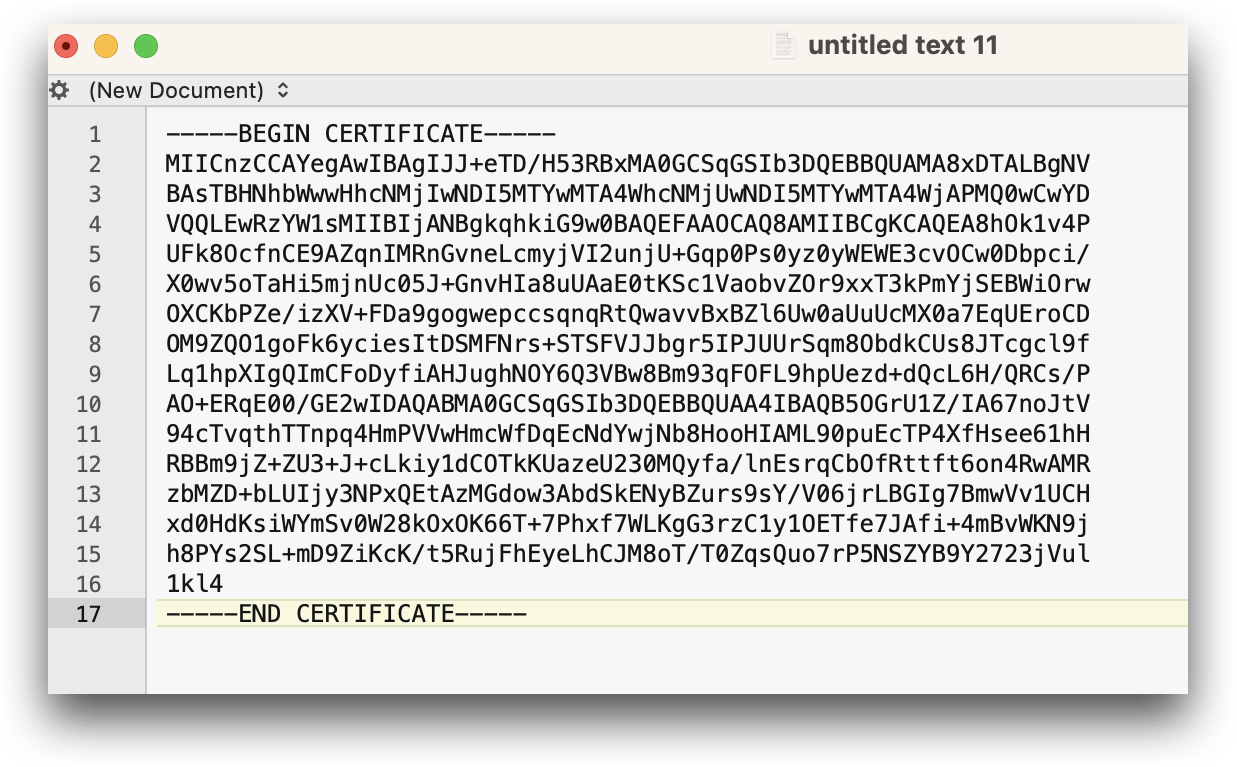
- Copy your X.509 certificate as provided by your SP to your clipboard
- Open a text editor, and paste the copied certificate
- Save the file as certificate.pem. You must ensure that the file is saved not as a
.txtfile but as a.pemfile.
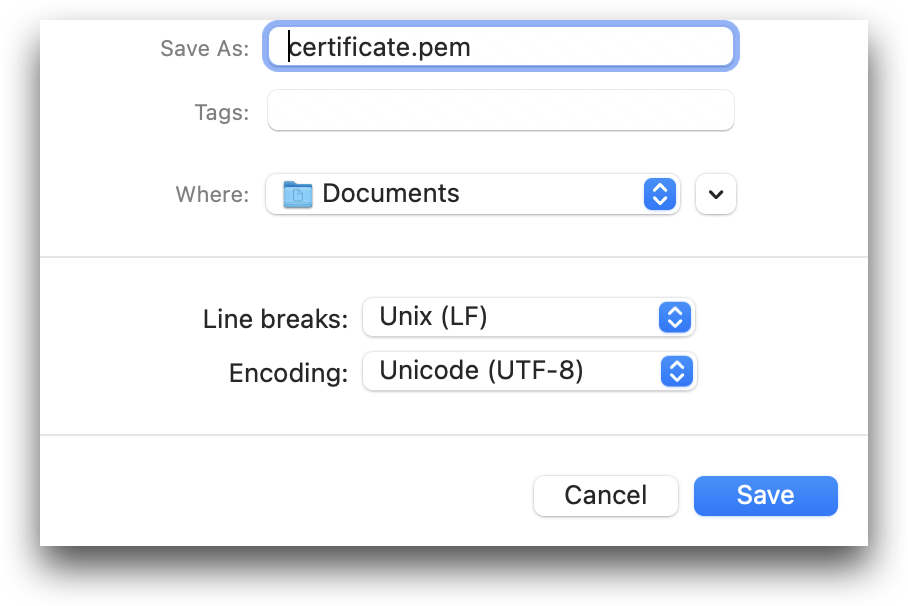
- Upload
certificate.pemin AdminX
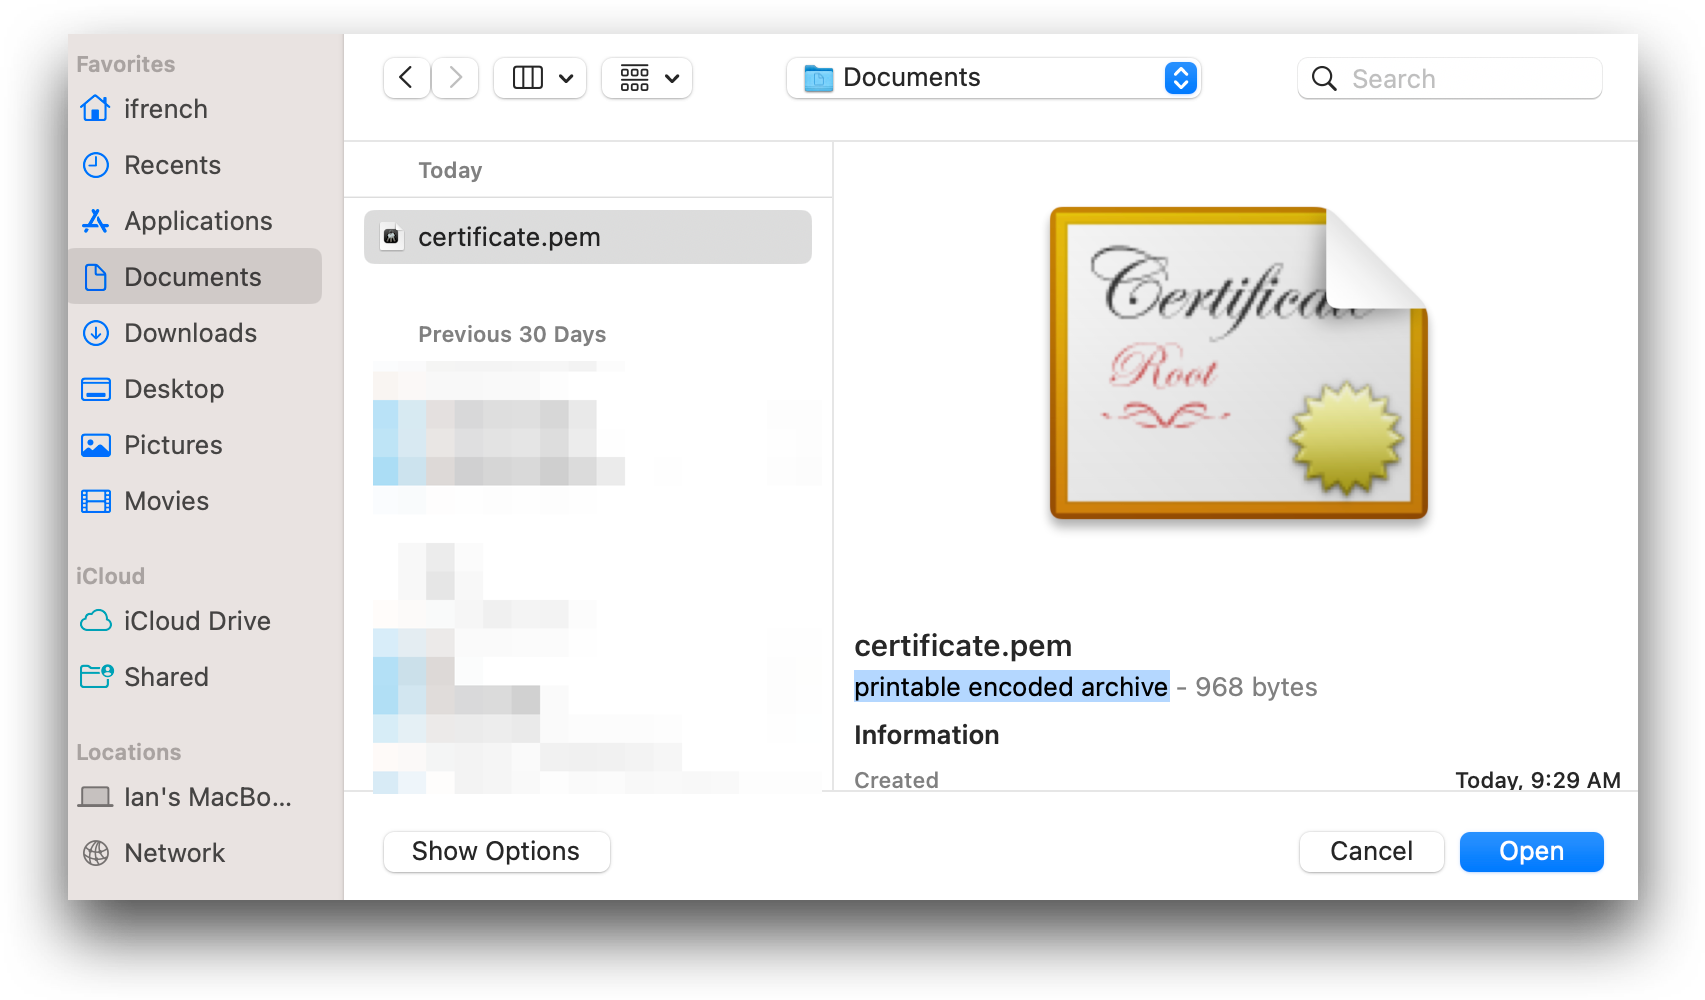
- Verify that
certificate.pemhas been successfully uploaded.
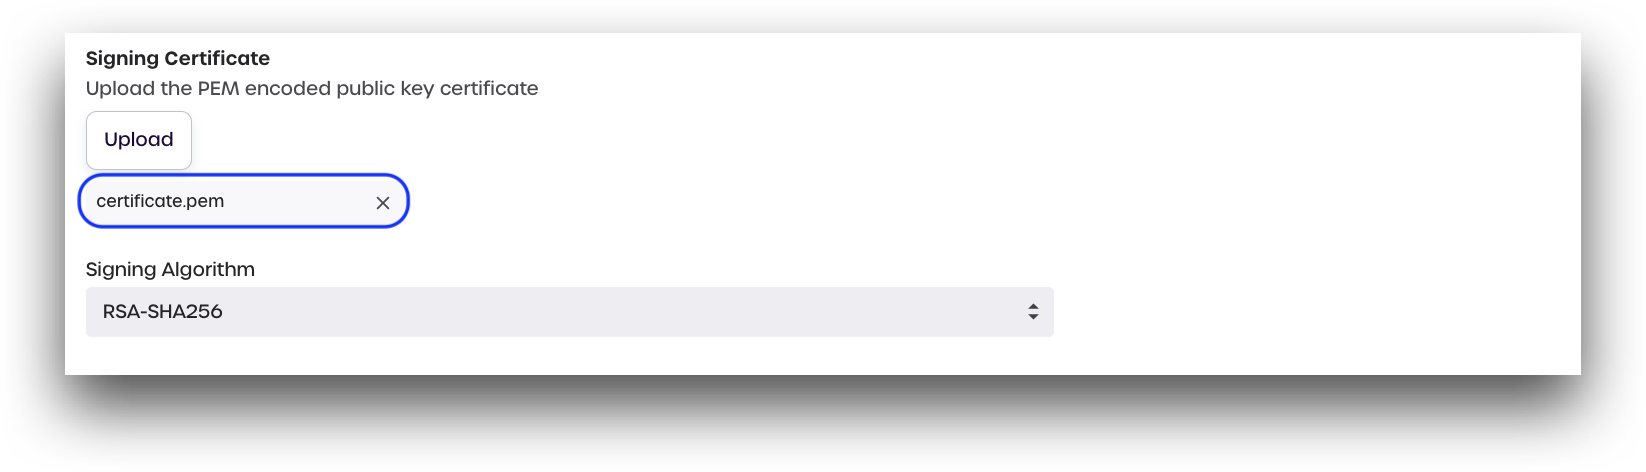
Signing Algorithm
Select a signing algorithm from the dropdown to use with your SAML application. We recommend using at least RSA-SHA256
After reviewing all your information, click Save to finish configuring your SAML application.
Testing your SAML Application
The last step is to test your Generic SAML application integration and ensure it can be used for SSO. For this example, we will test the SAML application we created for OneLogin.
- Completely logout from your Service Provider.
- Navigate back to the login page for your Service Provider. You should now see an option to log in with 1Kosmos BlockID.
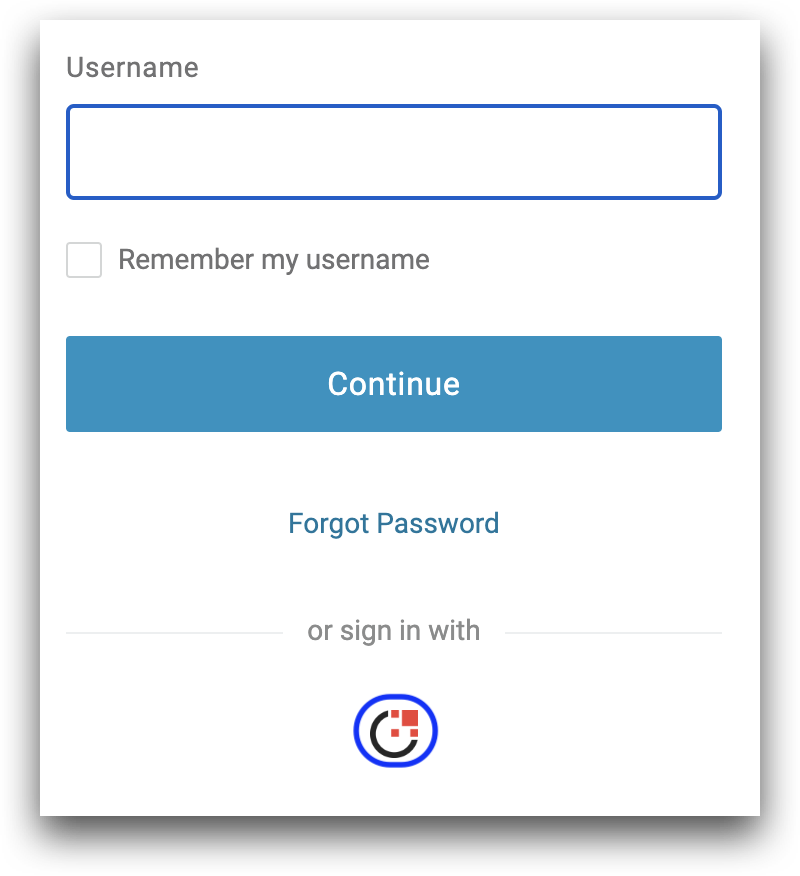
Click the BlockID icon. You will be redirected to the BlockID AdminX portal for user login.
Login with BlockID. After successful authentication, you will be returned to the OneLogin portal as an authenticated user.